
1. Introduction
This manual provides detailed instructions for the installation, operation, and maintenance of your INFITARY RV TPMS (Tire Pressure Monitoring System) Model U901. This system is designed to enhance driving safety by continuously monitoring tire pressure and temperature, providing real-time alerts for potential issues.
Proper use of this system can help prevent tire-related accidents, optimize fuel efficiency, and extend tire lifespan. Please read this manual thoroughly before using the product.

Image 1.1: INFITARY RV TPMS Monitor and Six External Sensors
2. Product Features
- Real-time Monitoring: Continuously monitors tire pressure and temperature for up to 6 tires.
- High Accuracy: Electronic pressure detection ensures data accuracy within ±1 PSI.
- Safety Alarms: Provides automatic alerts for air leakage, abnormal tire pressure, high temperature, and low sensor battery.
- Large LCD Display: Clear, wide-angle screen with a graphic user interface for easy data visualization.
- Dual Power Supply: Monitor can be powered via cigarette lighter or its built-in rechargeable lithium battery, with an additional mini USB port for charging.
- Durable Sensors: Lightweight, anti-theft, IP5K4K waterproof, and dustproof external sensors designed for various climates.
- Wide Compatibility: Suitable for various large vehicles including RVs, buses, trucks, trailers, tractors, SUVs, vans, campers, and motorhomes.

Image 2.1: Key benefits of the TPMS system, including leak prediction and puncture prevention.

Image 2.2: The TPMS is ideal for various large vehicles, ensuring safety.

Image 2.3: Smartly designed lightweight sensors ensure safe driving in harsh environments.
3. Package Contents
Verify that all items listed below are included in your package:
- 1 x Tire Pressure Monitor
- 6 x Tire Pressure Sensors
- 6 x Hexagon Nuts
- 1 x Cigarette Lighter Power Cable
- 1 x Junction Line
- 1 x Bracket
- 1 x Opener Tool
- 1 x Hex Wrench
- 1 x User Manual

Image 3.1: All components included in the INFITARY RV TPMS package.
4. Setup and Installation
Important: Ensure the monitor is turned on before installing the sensors.
4.1 Monitor Installation
The monitor can be installed on your dashboard using the provided bracket. It can be powered via the cigarette lighter power cable or its internal rechargeable battery.

Image 4.1: Examples of monitor placement for optimal visibility.
4.2 Sensor Installation
- Install the anti-theft washer onto the valve stem first.
- Tighten the sensor onto the valve stem.
- Rotate the hexagon nut counterclockwise until it is snug against the sensor.
- Use the hex wrench to tighten the washer by rotating it anticlockwise, securing the sensor in place.
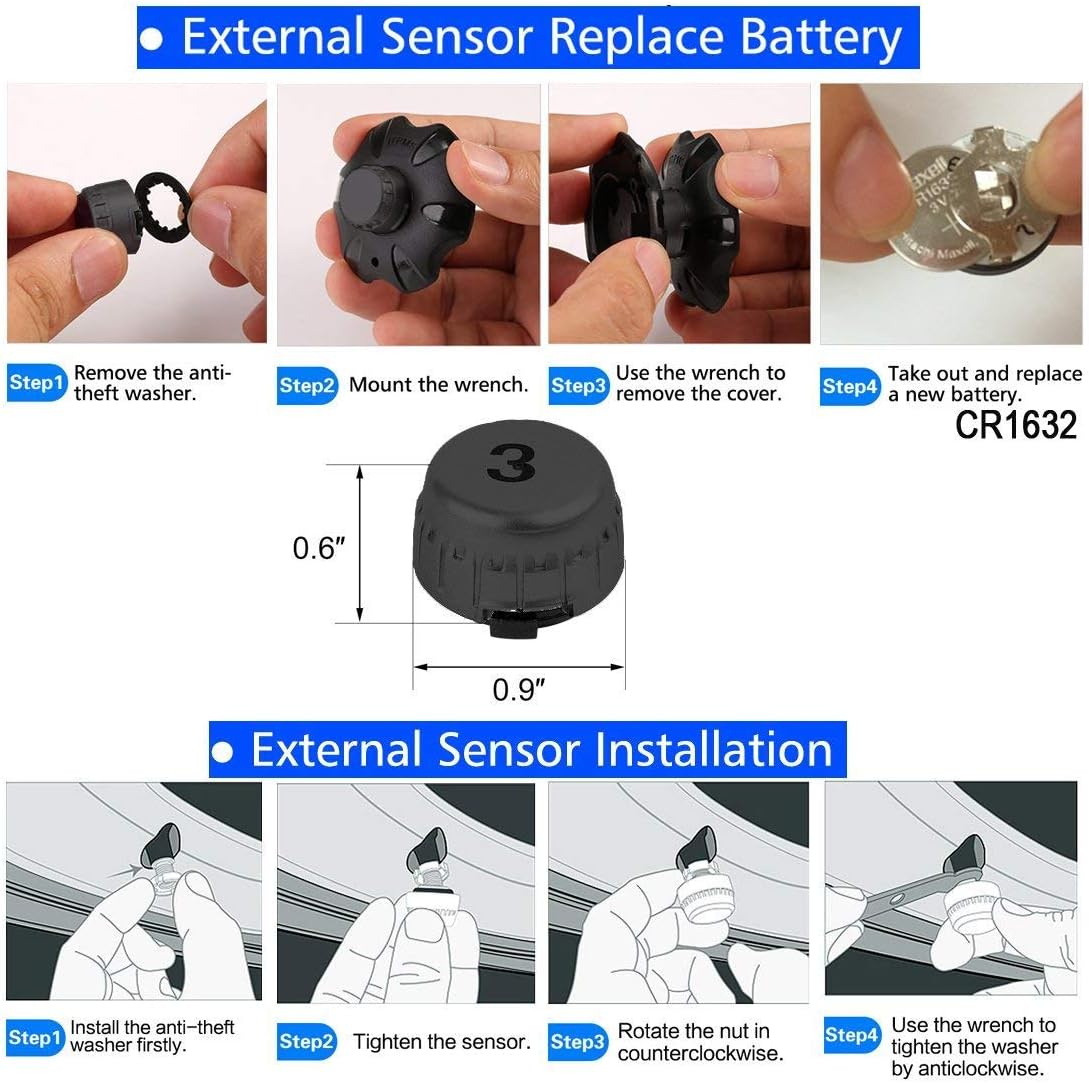
Image 4.2: Step-by-step guide for external sensor installation.
4.3 Antenna Installation
The system offers two antenna options: the standard aerial head or a long antenna with a signal wire booster. For enhanced signal, especially on larger vehicles like RVs or trailers, it is recommended to install the long antenna.

Image 4.3: Antenna options and recommended long antenna placement for improved signal strength.
For visual guidance on installation and operation, please refer to the video guides accessible via the QR codes below:

Image 4.4: QR codes for installation and operation video guides.
- Installation Video Guide: View Installation Video
- Operation Video Guide: View Operation Video
5. Operation
5.1 Basic Monitoring
Once installed and powered on, the monitor will display real-time tire pressure and temperature data for all connected sensors. Data updates occur approximately every 3 seconds. The system will alert you visually and audibly for:
- High/low pressure
- High temperature
- Slow air leaks
- Low battery for monitor or sensors
5.2 Customizable Values
The following settings can be customized via the monitor's interface:
- Pressure Alarm Value: Adjust the high and low pressure thresholds (default safety range: 60-175 PSI).
- Temperature Alarm Value: Set the high temperature alarm threshold (default: 149°F / 65°C).
- Unit of Pressure: Select between BAR or PSI.
- Unit of Temperature: Select between ℃ (Celsius) or ℉ (Fahrenheit).
- Brightness of Screen: Adjust display brightness.
5.3 Tire Exchange and Matching
If tires are exchanged or a sensor is replaced, the system allows for re-matching sensors to ensure correct data display. Refer to the operation video guide (Image 4.4) for detailed instructions on this process.
6. Maintenance
6.1 Sensor Battery Replacement
The external sensors use CR1632 batteries, which typically last over 2 years. To replace a sensor battery:
- Remove the anti-theft washer from the sensor.
- Mount the opener tool onto the sensor.
- Use the opener tool to remove the sensor cover.
- Carefully take out the old CR1632 battery and replace it with a new one, ensuring correct polarity.
- Reattach the sensor cover and secure it with the anti-theft washer using the hex wrench.
Image 6.1: Step-by-step guide for external sensor battery replacement.
7. Troubleshooting
- Data Not Displayed Fully: If tire data is incomplete or incorrect, re-match the monitor and sensors. Drive the vehicle for a short period to allow the system to re-establish communication.
- Sensor Malfunction/Loss: If a sensor is lost or stops working, a replacement can be obtained from the manufacturer. The new sensor can then be re-matched to the TPMS monitor.
- Weak Signal: For large vehicles or in areas with signal interference, ensure the long antenna option is installed correctly to enhance signal reception.
- Monitor Not Turning On: Check the cigarette lighter power cable connection and ensure the vehicle's ignition is on. If using battery power, ensure the internal battery is charged.
8. Specifications
8.1 Monitor Specifications
- Working Temperature: -20℃ to 80℃ (-4℉ to 176℉)
- Storage Temperature: -30℃ to 85℃ (-22℉ to 185℉)
- Input Voltage: DC 8V-30V
- Transmitting Frequency: 433.92MHz
- Dimensions (L*W*H): 86 x 57 x 26 mm
- Weight: 96g
8.2 Sensor Specifications
- Working Temperature: -20℃ to 100℃ (-4℉ to 212℉)
- Storage Temperature: -20℃ to 100℃ (-4℉ to 212℉)
- Pressure Range: 0-203 PSI
- Default Lower Limit: 60/100 PSI (customizable)
- Pressure Precision: ±1.5 PSI
- High Temperature Alarm: 149°F (65℃) (customizable)
- Temperature Precision: ±3℃
- Battery: CR1632 (Changeable)
- Battery Life: >2 years
- Dimensions: 15mm (diameter) x 23mm (height)
- Weight: 10g
9. Warranty and Support
For warranty information or technical support, please refer to the documentation included with your product or contact INFITARY customer service directly. Keep your purchase receipt for warranty claims.