Introduction
This manual provides essential information for the safe and effective operation of your RASTAR 1/14 Scale Land Rover Defender Remote Control Model Car. Please read this manual thoroughly before use to ensure proper setup, operation, and maintenance of your vehicle. Retain this manual for future reference.
Safety Information
- This product is recommended for ages 14 years and up. Adult supervision is advised for younger users.
- Do not operate the RC car near people, pets, or obstacles to prevent injury or damage.
- Avoid operating the RC car in wet conditions or on wet surfaces to prevent damage to electronic components.
- Always turn off the RC car and remote control when not in use.
- Remove batteries from both the car and remote control if storing for extended periods.
- Use only the specified battery types and ensure correct polarity during installation.
- Do not mix old and new batteries, or different types of batteries.
- Keep fingers, hair, and loose clothing away from moving parts, such as wheels.
Package Contents
- 1 x RASTAR 1/14 Scale Land Rover Defender RC Model Car
- 1 x Remote Control Transmitter
- 1 x Instruction Manual
Note: Batteries are not included and must be purchased separately.
Setup
1. Battery Installation (RC Car)
- Locate the battery compartment on the underside of the RC car.
- Use a screwdriver to open the battery compartment cover.
- Insert 5 x AA batteries (not included) into the compartment, ensuring correct polarity (+/-).
- Replace the battery compartment cover and secure it with the screw.

Image: The underside of the RC car where the battery compartment is typically located.
2. Battery Installation (Remote Control)
- Locate the battery compartment on the back of the remote control.
- Open the battery compartment cover.
- Insert 2 x AA batteries (not included) into the compartment, ensuring correct polarity (+/-).
- Replace the battery compartment cover.
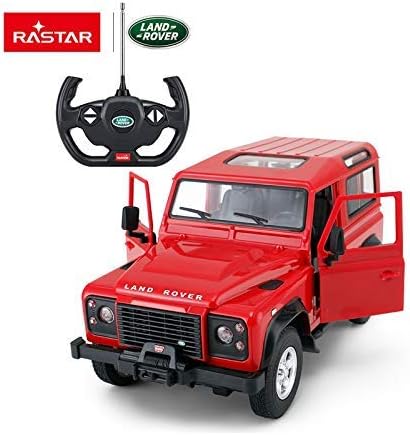
Image: The remote control, with the battery compartment typically found on its rear side.
3. Pairing the Remote Control
The RC car and remote control are usually pre-paired. If they do not connect automatically:
- Ensure both the car and remote control have fresh batteries installed.
- Turn on the RC car using the ON/OFF switch located on its underside.
- Turn on the remote control.
- The remote control and car should automatically connect. If not, turn both off and repeat the process.
Operating the Vehicle
1. Basic Controls
- Forward: Push the forward lever/button on the remote control.
- Reverse: Push the reverse lever/button on the remote control.
- Turn Left: Turn the steering wheel/left control on the remote control while moving forward or reverse.
- Turn Right: Turn the steering wheel/right control on the remote control while moving forward or reverse.
- Stop: Release the forward/reverse control.
Image: The remote control, showing the steering wheel and control buttons for movement.
2. Headlights and Taillights
The RC car features working headlights and taillights:
- The front headlights automatically illuminate when the car moves forward.
- A red light glows at the rear when the car moves in reverse.
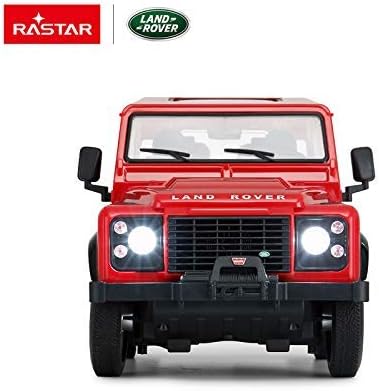
Image: Front view of the RC car with its headlights on, demonstrating the automatic illumination feature.
3. Adjusting Wheel Alignment
If the RC car does not drive in a straight line, you can adjust the front wheel alignment:
- Locate the trim dial or lever on the bottom of the RC car, near the front wheels.
- Adjust this control incrementally until the car maintains a straight path when moving forward.
4. Driving Surface Recommendations
For optimal performance and to prevent damage, operate the RC car on smooth, hard surfaces such as:
- Concrete
- Wood
- Asphalt
Avoid driving on carpet or other soft, uneven surfaces, as this can hinder movement and potentially damage the vehicle's components.
Maintenance
1. Cleaning
- Wipe the car and remote control with a soft, dry cloth after each use.
- Do not use water or chemical cleaners, as they may damage electronic components.
- Remove any debris (dust, hair, etc.) from the wheels and axles to ensure smooth operation.
2. Storage
- Store the RC car and remote control in a cool, dry place away from direct sunlight and extreme temperatures.
- Always remove batteries from both devices before storing for extended periods to prevent leakage and damage.
Troubleshooting
- Car not responding: Ensure both the car and remote control are turned on and have fresh batteries installed with correct polarity. Check for interference from other RC devices.
- Car moves slowly or erratically: Replace batteries in both the car and remote control. Ensure the driving surface is smooth and free of obstacles.
- Car does not drive straight: Adjust the wheel alignment trim dial on the underside of the car.
- Lights not working: Check car batteries. Ensure the car is moving (headlights for forward, taillights for reverse).
Specifications
| Feature | Detail |
|---|---|
| Model Number | S00078400-01 |
| Scale | 1/14 |
| Product Dimensions | 5.1 x 6.1 x 11.2 inches |
| Item Weight | 2.95 pounds |
| Car Batteries Required | 5 x AA (not included) |
| Remote Control Batteries Required | 2 x AA (not included) |
| Recommended Age | 14 years and up |
| Functions | Forward, Reverse, Stop, Left, Right, Working Head & Tail Lights, Adjustable Front Wheel Alignment |
Warranty and Support
For warranty information or technical support, please refer to the contact details provided on the product packaging or visit the official RASTAR website. Keep your purchase receipt as proof of purchase.


