1. Product Overview
The Geekpure HIDROTEK 2.8 Gallon RO Water Storage Tank (Model HZ-2.8G) is designed to store purified water from a Reverse Osmosis (RO) filtration system. This compact tank ensures a continuous supply of purified water, making it suitable for various applications including under-sink installations, refrigerators, and ice makers. It is NSF certified, ensuring compliance with material and structural integrity requirements.

Image 1: The HIDROTEK 2.8 Gallon RO Water Storage Tank. This image displays the white cylindrical tank with a blue cap and black base, featuring the HIDROTEK logo and warning labels.
Key Features:
- Compact Size: Measures 8.8 x 8.8 x 14.2 inches, designed to fit in most cabinets.
- High Quality Materials: Features a stainless steel interface, food-grade polypropylene liner, and butyl diaphragm to prevent chemical contamination.
- NSF Certified: Tested and certified by NSF to meet NSF/ANSI 58 Standard for material and structural integrity.
- Standard Connection: Equipped with a stainless steel 1/4" thread inlet/outlet.
- Pre-pressurized: Comes pre-pressurized between 5-7 psi when empty for optimal performance.
2. Installation and Setup
Follow these steps for proper installation of your RO water storage tank. Ensure all connections are secure to prevent leaks.
2.1 Unpacking and Inspection
- Carefully remove the tank from its packaging.
- Inspect the tank for any visible damage. If damage is found, contact customer support immediately.
- Verify that the tank's pre-charge pressure is between 5-7 psi when empty. Do not alter this pressure for a new tank unless instructed by a professional.

Image 2: Diagram showing the water valve and air valve of the RO tank. The water valve is a stainless steel 1/4" NPT thread at the top, and the air valve is for internal pressure adjustment at the bottom.
2.2 Connecting the Tank
- Locate the stainless steel 1/4" thread inlet/outlet on the top of the tank.
- Connect the tank to your Reverse Osmosis system using appropriate fittings. A tank ball valve (not included) is typically required for this connection. For a compatible 3/8" tube tank ball valve, search ASIN: B078W6CFRH on Amazon.
- Ensure all connections are tightened securely to prevent leaks. Avoid over-tightening.
2.3 Initial System Pressurization
- After connecting the tank, allow the entire RO system to pressurize.
- Carefully check all connections for any leaks. It is recommended to re-check for leaks before leaving the installation site.
- Important: The first two tanks of water produced by the system should not be consumed. This allows for flushing of any manufacturing residues.

Image 3: An example installation of the RO tank under a kitchen sink, connected to a full Reverse Osmosis water filtration system. Note that only the storage tank is included in the product package.
3. Operation
The HIDROTEK RO Water Storage Tank operates in conjunction with your Reverse Osmosis system to provide on-demand purified water.
- The tank stores purified water from the RO membrane.
- When you open your RO faucet, the stored water is dispensed under pressure.
- The RO system will automatically refill the tank as water is consumed, maintaining a balanced pressure.
- The tank's pre-pressurized air bladder helps push water out when the faucet is opened.
The system is designed for automatic operation. Avoid manually changing the tank pressure unless troubleshooting specific issues, as this can disrupt the system's balance.
4. Maintenance
Regular maintenance ensures the longevity and optimal performance of your RO water storage tank.
4.1 Periodic Checks
- Leak Inspection: Periodically check all connections for any signs of water leaks. Address any leaks immediately.
- Water Flow Monitoring: If you notice unusual water flow from your RO faucet after several months of use, it may indicate an issue with the tank's pressure or integrity.
4.2 Pressure Adjustment (If Necessary)
If the faucet water flow is unusual and there are no visible leaks, the internal air pressure of the tank might need adjustment. This should only be done if the tank is empty of water.
- Turn off the water supply to the RO system.
- Drain all water from the RO tank by opening the RO faucet.
- Once the tank is empty, check the air pressure using a low-pressure gauge at the air valve (typically located at the bottom of the tank, under a blue cap).
- The standard empty tank pressure should be 5-7 psi.
- If the pressure is outside this range, use a bicycle pump or air compressor to adjust it.
- After adjustment, close the RO faucet and turn on the water supply to the RO system. Allow the tank to refill and the system to repressurize.

Image 4: Close-up view of the air valve on the RO tank, indicating the point for pressure adjustment. The standard pressure for an empty tank is 7 psi.
5. Troubleshooting
This section addresses common issues you might encounter with your RO water storage tank.
5.1 Low Water Flow from Faucet
- Check Tank Pressure: If the tank's internal air pressure is too low, it cannot effectively push water out. Refer to Section 4.2 for pressure adjustment.
- Tank Diaphragm Failure: If water leaks from the bottom air charge position or the top thread, the internal rubber diaphragm may have failed. In this case, the tank needs to be replaced.
- RO System Issues: Ensure your overall RO filtration system is functioning correctly, including filters and membrane.
5.2 Leaks
- Connection Points: Most leaks occur at connection points. Tighten fittings, ensuring not to overtighten. Check for damaged O-rings or threads.
- Tank Body: If the tank itself is leaking from the body, it indicates a manufacturing defect or damage, and the tank should be replaced.
5.3 Tank Not Filling
- RO System Function: Verify that your RO system is producing water. Check the pre-filters and RO membrane.
- Auto Shut-Off Valve: Ensure the auto shut-off valve (if present in your RO system) is functioning correctly and allowing water to flow into the tank.
- Tank Pressure: If the tank pressure is too high when empty, it may prevent the RO system from filling it. Adjust pressure to 5-7 psi.
6. Product Specifications
| Feature | Detail |
|---|---|
| Model Number | HZ-2.8G |
| Capacity | 2.8 Gallons |
| Product Dimensions (L x W x H) | 8.8" x 8.8" x 14.2" |
| Item Weight | 5.5 Pounds |
| Inlet/Outlet Thread Size | 1/4" NPT (Stainless Steel) |
| Pre-charge Pressure (Empty Tank) | 5-7 psi |
| Maximum Working Pressure | 100 PSI (as per tank label) |
| Material | Stainless steel interface, food grade polypropylene liner, butyl diaphragm |
| Certifications | NSF/ANSI 58 Standard |
| Installation Type | Connected with RO system |
| Lower Temperature Rating | 45 Degrees Fahrenheit |
| Maximum Flow Rate | 2 Liters Per Minute |
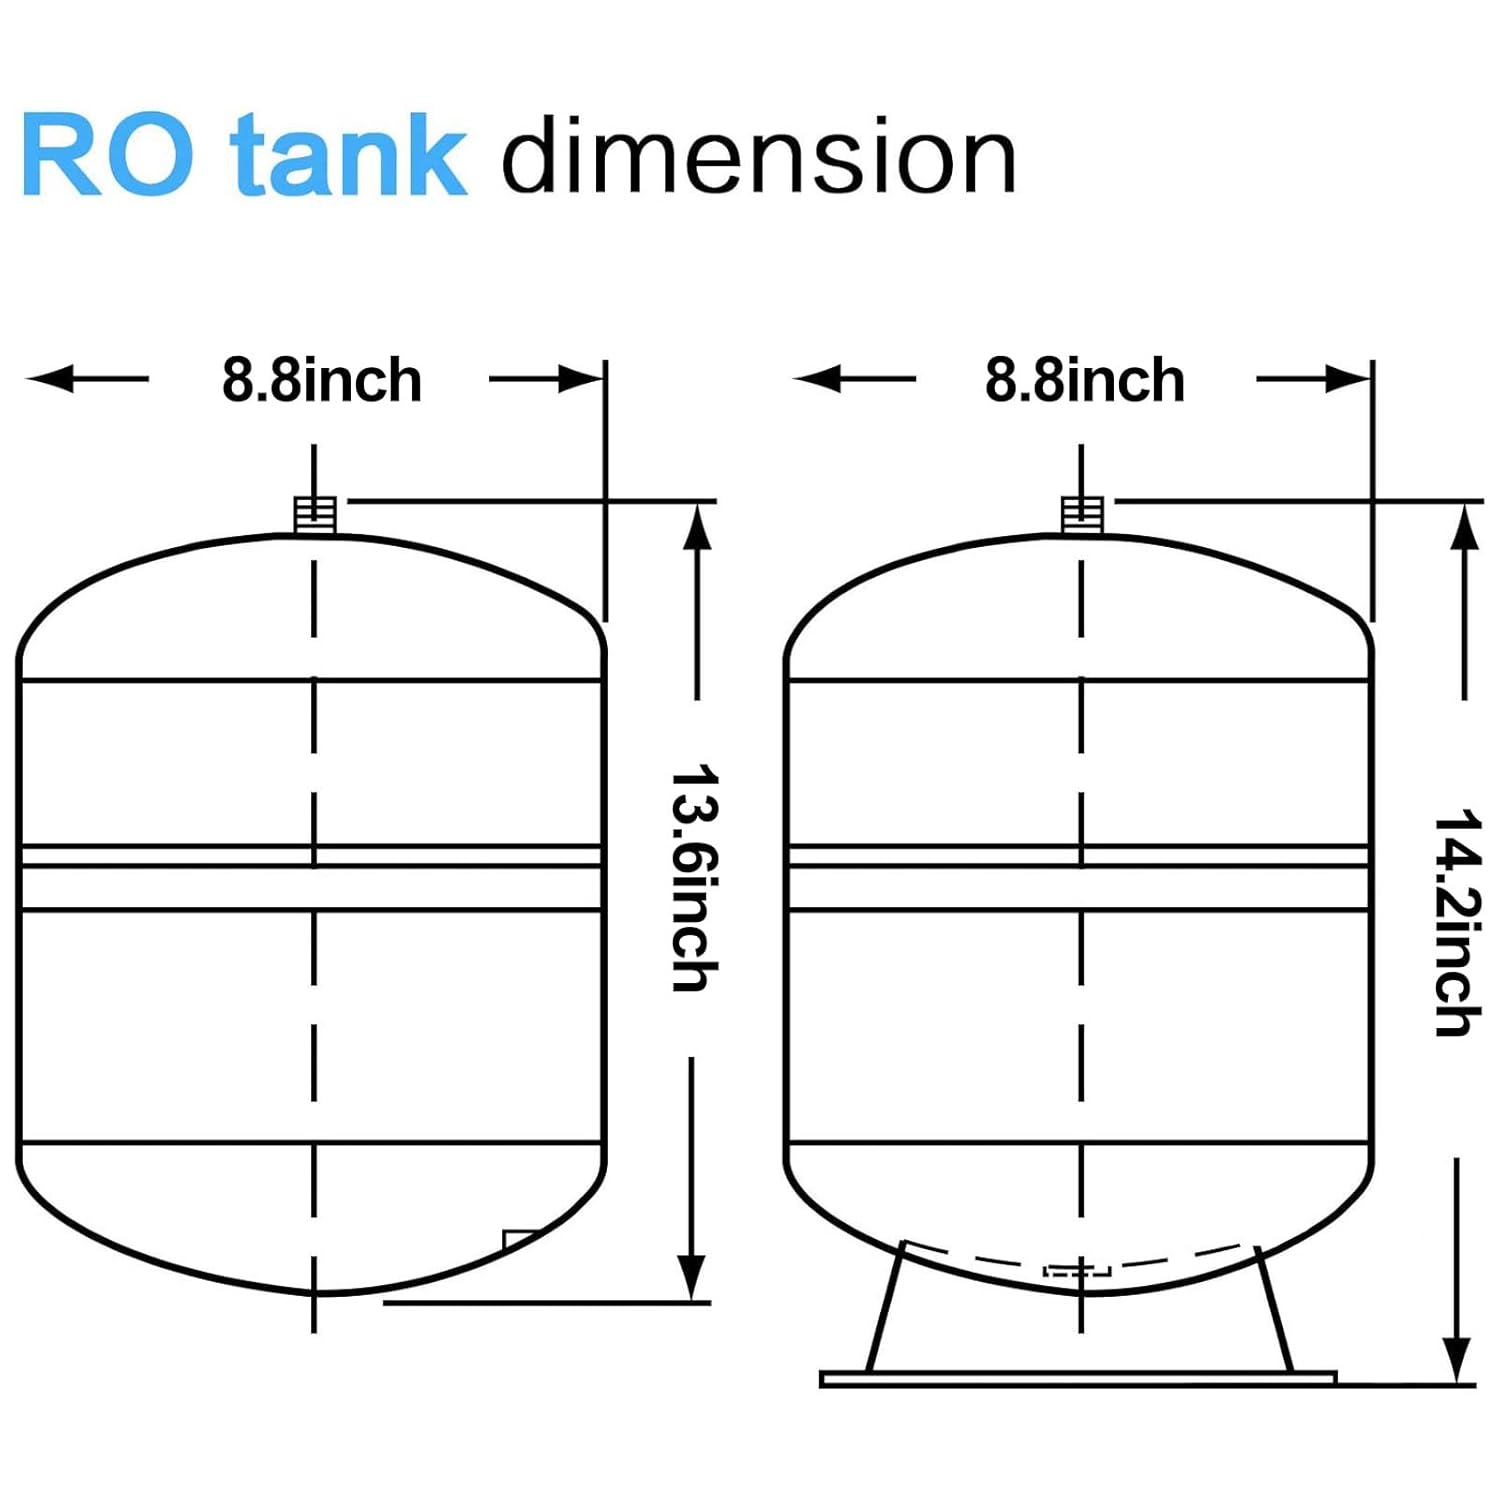
Image 5: Technical diagram illustrating the dimensions of the RO tank, showing a width of 8.8 inches and a height of 14.2 inches.

Image 6: A copy of the NSF International certification for Ningbo Hidrotek Co Ltd, confirming compliance with NSF/ANSI 58 for the water storage tank.
7. Warranty and Support
7.1 Return Policy
This unit is eligible for return and replacement within 30 days from the date of purchase. For any needs or issues, please contact the seller directly. Provide details regarding the tank's performance and condition to facilitate assistance.
7.2 Customer Support
For further assistance, technical support, or inquiries regarding your HIDROTEK RO Water Storage Tank, please refer to the contact information provided by your retailer or the manufacturer, Geekpure.
You can also visit the Geekpure Store on Amazon for more product information and support resources.


