1. Introduction
Thank you for purchasing the CAIWEI A8AB-NEW Video Projector. This manual provides essential information for the safe and efficient operation of your device. Please read it thoroughly before use and retain it for future reference.
2. Safety Instructions
- Do not look directly into the projector lens when the lamp is on.
- Ensure proper ventilation around the projector to prevent overheating.
- Do not expose the projector to rain or moisture.
- Use only the power adapter provided with the projector.
- Keep the projector away from flammable materials.
- Unplug the projector during lightning storms or when unused for long periods.
- Do not attempt to repair the projector yourself. Refer all servicing to qualified personnel.
3. Package Contents
Please check that all items are present upon unpacking:
- CAIWEI A8AB-NEW Video Projector
- Power Cable
- Remote Control
- HDMI Cable
- VGA Cable
- AV Cable
- User Manual
4. Product Overview
Familiarize yourself with the projector's components:
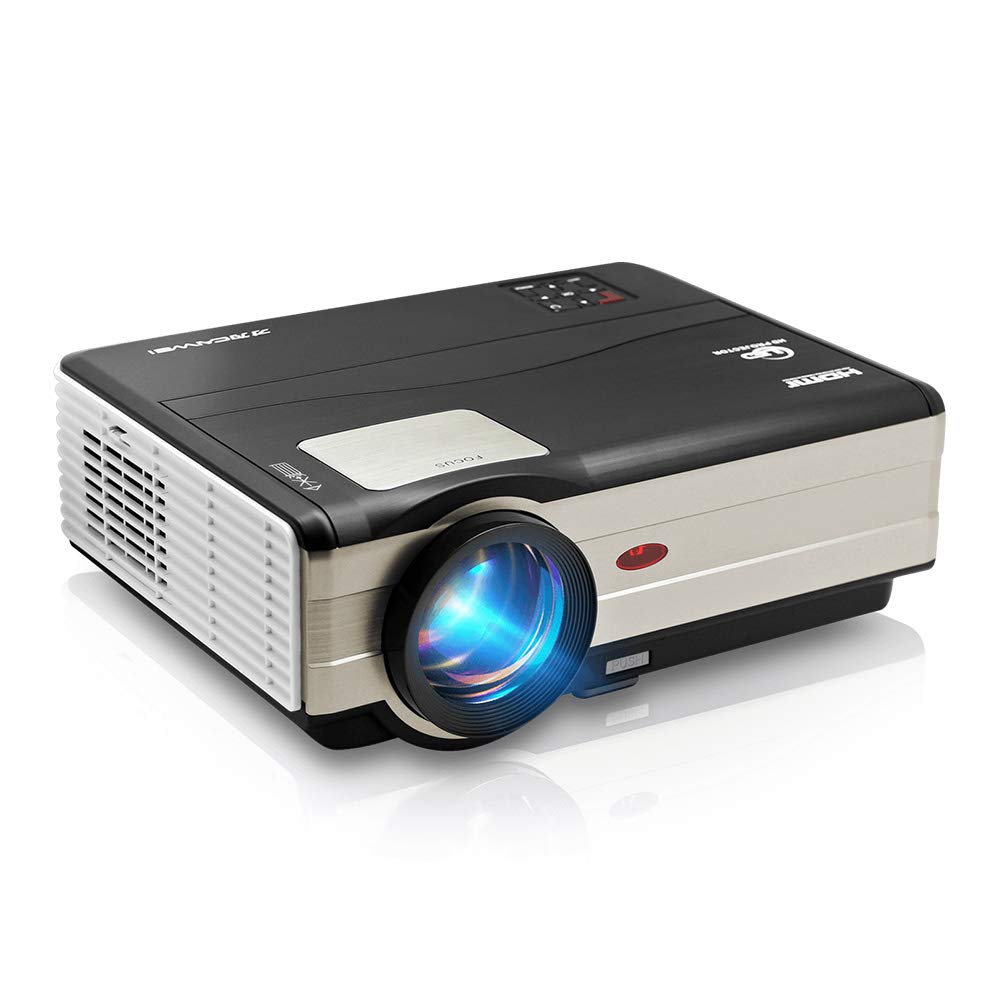
Figure 1: Front view of the CAIWEI A8AB-NEW Video Projector, showing the lens and ventilation.
Front Panel
- Projection Lens: Emits the image.
- Focus Ring: Adjusts image clarity.
- Keystone Correction: Corrects trapezoidal image distortion.
Rear Panel
- Power Port: Connects to the power cable.
- HDMI Ports (x2): Connects to HDMI-enabled devices (e.g., Blu-ray player, game console).
- USB Ports (x2): Connects to USB storage devices or other USB peripherals.
- VGA Port: Connects to computers or laptops with VGA output.
- AV Port: Connects to older devices using composite video and stereo audio.
- Audio Out (3.5mm): Connects to external speakers or headphones.
5. Setup
5.1 Placement
Place the projector on a stable, flat surface or mount it to a ceiling. Ensure the projector is perpendicular to the projection screen or wall. The optimal projection distance varies, but generally, a larger distance yields a larger image.
5.2 Power Connection
- Connect the power cable to the projector's power port.
- Plug the other end of the power cable into a power outlet.
- The power indicator light will illuminate.
5.3 Connecting Input Devices
The projector supports various input sources:
- HDMI: Connect an HDMI cable from your device (e.g., laptop, game console, streaming stick) to one of the projector's HDMI ports.
- USB: Insert a USB flash drive into a USB port to play media files directly.
- VGA: Connect a VGA cable from your computer to the projector's VGA port.
- AV: Use the provided AV cable to connect to devices with composite video output.
- Wireless (WiFi): For screen mirroring from smartphones or tablets, navigate to the 'Wireless Display' or 'Screen Mirroring' option in the projector's menu and follow the on-screen instructions. Ensure your device and the projector are on the same Wi-Fi network.
- Bluetooth: To connect external Bluetooth speakers, go to the Bluetooth settings in the projector's menu, enable Bluetooth, and pair with your desired audio device.
5.4 Focus and Keystone Adjustment
- Turn on the projector and display an image.
- Rotate the Focus Ring on the lens until the image appears sharp and clear.
- If the image is trapezoidal (wider at the top or bottom), adjust the Keystone Correction dial or setting until the image is rectangular.
6. Operating Instructions
6.1 Power On/Off
- Power On: Press the power button on the projector or the remote control.
- Power Off: Press the power button again. Confirm shutdown if prompted.
6.2 Menu Navigation
Use the navigation buttons (Up, Down, Left, Right, OK) on the projector or remote control to browse the on-screen menu. The 'Menu' button typically opens the main settings, and 'Exit' or 'Back' closes sub-menus.
6.3 Input Source Selection
Press the 'Source' or 'Input' button on the remote control or projector. A list of available input sources (HDMI1, HDMI2, USB1, USB2, VGA, AV, Wireless Display) will appear. Select the desired source using the navigation buttons and press 'OK'.
6.4 Audio Settings
Access the audio settings through the main menu to adjust volume, select audio output (internal speaker, external via 3.5mm jack, or Bluetooth), and modify sound modes.
6.5 Wireless/Bluetooth Connection
Refer to section 5.3 for detailed instructions on connecting via Wi-Fi for screen mirroring or Bluetooth for audio output.
7. Maintenance
7.1 Cleaning the Lens
Use a soft, lint-free cloth specifically designed for optical lenses. Gently wipe the lens surface. Avoid using abrasive cleaners or excessive force, which can scratch the lens.
7.2 Cleaning the Air Filter/Vents
Regularly check the air intake and exhaust vents for dust accumulation. Use a soft brush or a can of compressed air to gently clean the vents. This helps maintain proper airflow and prevents overheating.
7.3 Storage
When not in use, store the projector in a cool, dry, and dust-free environment. Use the original packaging or a protective case to prevent damage.
8. Troubleshooting
| Problem | Possible Cause | Solution |
|---|---|---|
| No image on screen | Power not connected; Incorrect input source; Device not powered on. | Check power cable; Select correct input source; Ensure connected device is on. |
| Image is blurry | Focus not adjusted; Projector too far/close. | Adjust the focus ring; Reposition the projector. |
| Image is trapezoidal | Keystone not adjusted. | Adjust the keystone correction. |
| No sound | Volume too low; Muted; Incorrect audio output; Cable issue. | Increase volume; Unmute; Check audio settings; Verify cable connections. |
| Remote control not working | Batteries dead; Obstruction; Out of range. | Replace batteries; Remove obstructions; Ensure line of sight to IR receiver. |
| Overheating warning | Blocked vents; Poor ventilation. | Clear vents; Ensure adequate space around projector. |
9. Specifications
- Model: A8AB-NEW
- Brand: CAIWEI
- Display Resolution: 1280 x 800
- Connectivity Technology: Bluetooth, HDMI, USB, VGA, Wireless
- Special Features: Built-In Wi-Fi, Portable, Wireless
- Recommended Uses: Gaming, Home Theater
- Item Weight: 6.1 pounds
- Product Dimensions: 11.2 x 14.7 x 5 inches
10. Warranty and Support
CAIWEI products are designed for reliability and performance. For specific warranty details, please refer to the warranty card included with your purchase or contact CAIWEI customer support. If you encounter any issues not covered in this manual, please reach out to our support team for assistance.
Customer Support: Please visit the official CAIWEI website or contact your retailer for support information.


