
Introduction
The NZXT H700 is an ATX mid-tower PC gaming case designed for enthusiasts and builders seeking a clean aesthetic and efficient internal layout. It features an all-steel construction, a tempered glass side panel, and an integrated cable management system to simplify the building process. This manual provides detailed instructions for setting up, operating, maintaining, and troubleshooting your NZXT H700 case.

Figure 1: Front-left view of the NZXT H700 PC Case, showcasing the tempered glass side panel and internal layout.
Key Features
- Premium Quality: All-steel construction with the sleek H Series design, available in various color combinations.
- Full Tempered Glass Panel: Features a signature PSU shroud to showcase your build with crisp clarity.
- All-New Cable Management System: Installation and expansion are made easy with pre-installed channels and straps.
- Water-Cooling Ready: Installation simplified for both All-in-One (AIO) and custom loop configurations.
- Included Fans: Four Aer F120mm fans are included for optimal airflow.
- Motherboard Support: Compatible with Mini-ITX, Micro-ATX, and EATX motherboards (up to 272mm or 10.7 inches).
Package Contents
Upon unpacking, please ensure all the following items are present:
- 1 x NZXT H700 PC Case
- 1 x Fixings Pack (screws, standoffs, zip ties)
- 1 x Instruction Manual (this document)
Setup and Installation
Follow these steps to install your components into the NZXT H700 case.
1. Preparing the Case
- Carefully remove the case from its packaging.
- Place the case on a stable, flat surface.
- Remove the tempered glass side panel by unscrewing the thumbscrews located at the rear of the case. Gently pull the panel away and set it aside on a soft, non-abrasive surface to prevent scratches.
- Remove the solid steel side panel by unscrewing the thumbscrews and sliding it off.
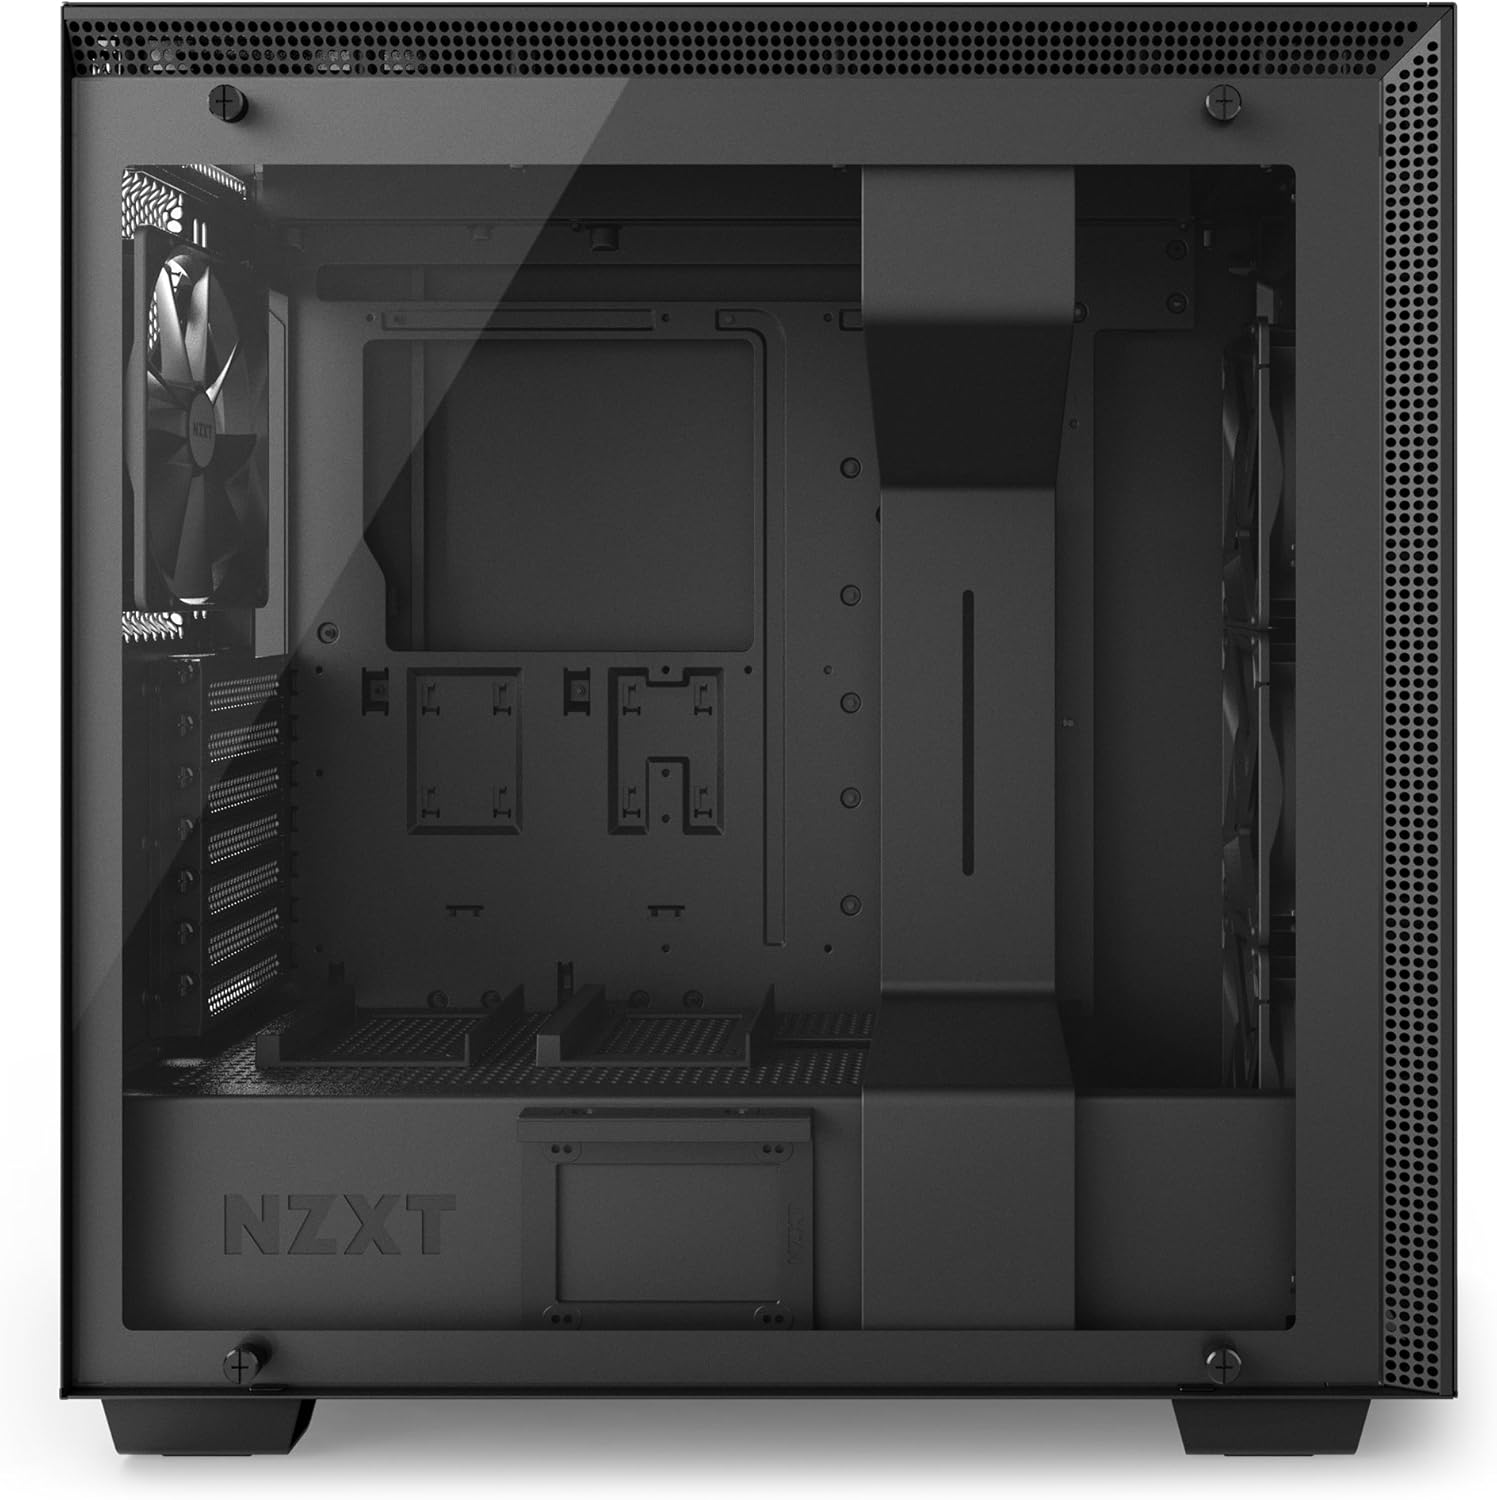
Figure 2: Interior view of the NZXT H700 case with the tempered glass panel removed, showing the main compartment.
2. Motherboard Installation
- Ensure the correct standoffs are installed for your motherboard form factor (ATX, Micro-ATX, Mini-ITX). The H700 comes with pre-installed standoffs for ATX.
- Carefully align your motherboard with the standoffs and the I/O shield opening at the rear of the case.
- Secure the motherboard using the provided screws from the fixings pack.
3. Power Supply Unit (PSU) Installation
- The PSU mounts at the bottom rear of the case. Slide your PSU into the dedicated compartment from the rear.
- Align the PSU with the screw holes and secure it with the provided screws.
4. Storage Drive Installation
- 2.5" SSDs: Mount SSDs onto the dedicated trays located behind the motherboard tray or on top of the PSU shroud. Secure with screws.
- 3.5" HDDs: Install HDDs into the drive cage located beneath the PSU shroud. Slide the drive into a tray and secure it.

Figure 3: Rear interior view of the NZXT H700, highlighting the cable management channels and drive mounting locations.
5. Cable Management
- Utilize the pre-installed cable routing channels and straps behind the motherboard tray to neatly route all power and data cables.
- Connect the front panel I/O cables (USB, audio, power/reset buttons) to their respective headers on the motherboard.
6. Graphics Card and Expansion Cards
- Remove the necessary PCIe slot covers at the rear of the case.
- Insert your graphics card or other expansion cards into the appropriate PCIe slots on the motherboard.
- Secure the cards with the provided screws.
7. Cooling System (Fans/Radiators)
- The H700 supports various fan and radiator configurations. The case comes with four pre-installed Aer F120mm fans.
- For additional fans or radiators, refer to the specifications section for supported sizes and locations (front, top, rear).
- Mount fans/radiators using the appropriate screws.

Figure 4: Top-down view of the NZXT H700, illustrating the front I/O panel with USB ports and audio jacks.
Operating Considerations
While a PC case does not "operate" in the traditional sense, proper usage ensures optimal performance and longevity of your components.
- Airflow: Ensure adequate space around the case for proper air intake and exhaust. Do not block the front, top, or rear vents.
- Temperature Monitoring: Regularly monitor your system's temperatures using software to ensure components are operating within safe limits.
- Cable Management: Maintain tidy cable routing to prevent obstruction of airflow and improve aesthetics.
Maintenance
Regular maintenance helps preserve the performance and appearance of your NZXT H700 case and the components within.
- Dust Filters: The H700 features removable dust filters on the front and bottom. Periodically remove and clean these filters with compressed air or water (ensure they are completely dry before re-installation).
- Exterior Cleaning: Wipe down the exterior surfaces with a soft, damp cloth. Avoid abrasive cleaners or solvents.
- Interior Dusting: Every few months, open the case and use compressed air to remove dust buildup from fans, heatsinks, and other components.
Troubleshooting
This section addresses common issues you might encounter.
| Problem | Possible Cause | Solution |
|---|---|---|
| Poor Airflow / High Temperatures | Blocked vents, dusty filters, incorrect fan orientation, poor cable management. | Ensure case is in an open area. Clean dust filters. Verify fan direction (intake/exhaust). Re-route cables for better airflow. |
| Front Panel USB/Audio Not Working | Cables not properly connected to motherboard headers. | Check motherboard manual for correct header locations and ensure cables are securely plugged in. |
| Side Panel Difficult to Close | Cables obstructing the panel, components not fully seated. | Re-route cables to ensure they are within the cable management channels. Check that all components (e.g., CPU cooler, GPU) are fully seated and not protruding. |
Specifications
Detailed specifications for the NZXT H700 PC Case.
| Brand | NZXT |
| Model Name | CA-H700B-B1 |
| Case Type | Mid Tower |
| Motherboard Compatibility | ATX, Micro-ATX, Mini-ITX, EATX (up to 272mm) |
| Material | Alloy Steel, Tempered Glass |
| Color | Black |
| Dimensions (LxWxH) | 20.31 x 9.06 x 19.45 inches (51.6 x 23.0 x 49.4 cm) |
| Item Weight | 27 pounds (12.25 kg) |
| Front I/O Ports | 2 x USB 2.0, 2 x USB 3.0, Audio In/Out |
| Drive Bays | 2.5" SSD, 3.5" HDD |
| Included Fans | 4 x Aer F120mm (3 front, 1 rear) |
| Radiator Support | Front: Up to 360mm, Top: Up to 360mm, Rear: 120mm/140mm |
| Cooling Method | Air, Water |
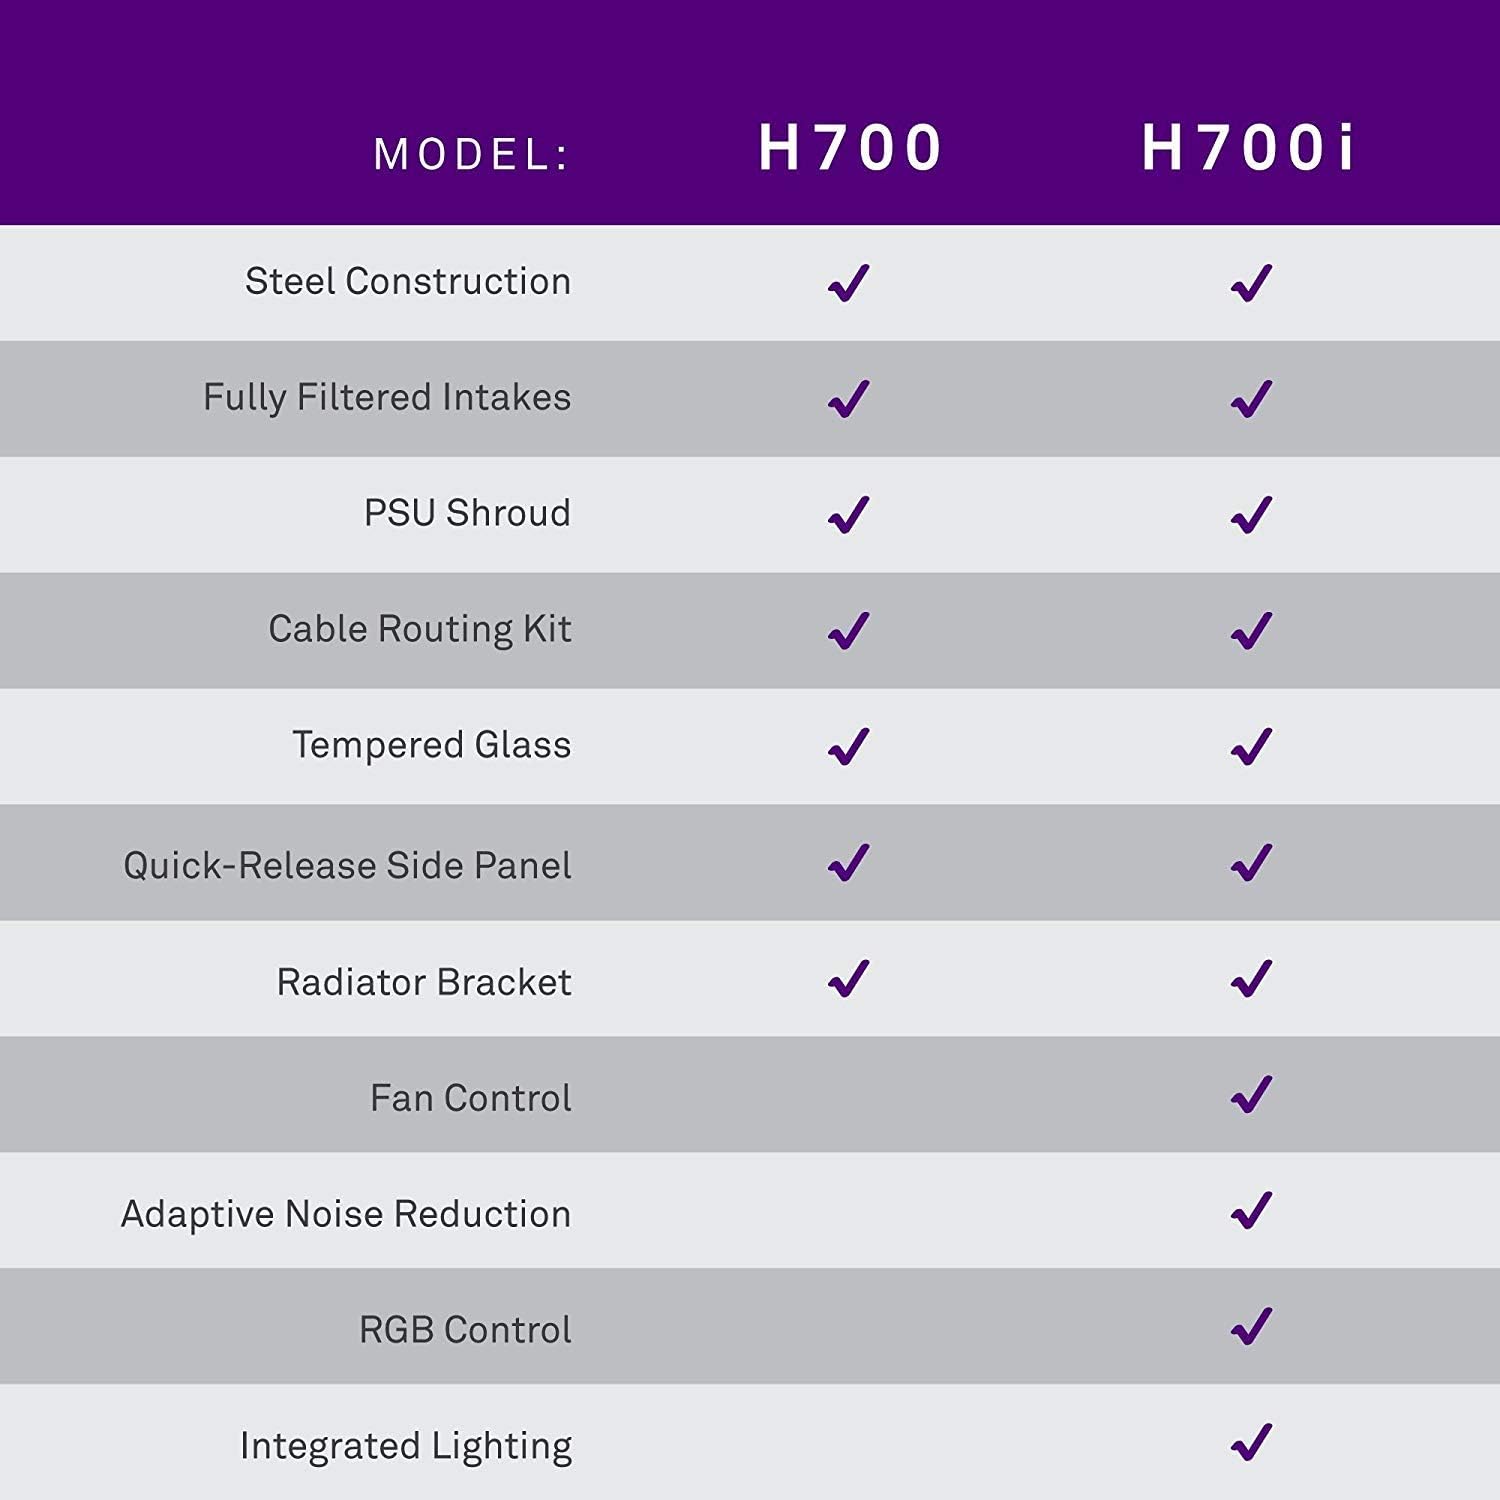
Figure 5: Feature comparison between NZXT H700 and H700i models.
Warranty and Support
For detailed warranty information and technical support, please refer to the official NZXT website or contact their customer service directly.
- Official Website: www.nzxt.com
- Support: Visit the support section on the NZXT website for FAQs, troubleshooting guides, and contact options.