
Introduction
This instruction manual provides guidance for installing and operating the 3-piece conversion kit for Leggett & Platt Scape 1.0, Scape 1.0+, and 700 Series adjustable beds. This kit is designed to replace lost or broken original remotes, which have been discontinued. The kit includes a new control box, power cord, and remote with a USB charger.
Important Note: Due to the conversion, the original presets and one-touch flat buttons on your adjustable bed may not function with this new system. However, all other massage and triple motor functions will transfer and operate as intended.
Safety Information
- Always disconnect power to the adjustable bed frame before performing any installation or maintenance.
- Ensure all electrical connections are secure and properly insulated.
- Keep children and pets away from the adjustable bed during installation.
- Do not operate the bed if any wires are damaged or exposed.
- This kit is intended for use with Leggett & Platt Scape 1.0, 1.0+, and 700 Series adjustable beds only.
Package Contents
Verify that all components are present in your conversion kit:
- New Control Box
- Power Cord
- Remote Control with USB Charger
Setup and Installation
This conversion requires modifying the existing wiring under your bed. Please follow these steps carefully.
- Disconnect Power: Unplug the adjustable bed from the wall outlet to ensure no power is supplied during installation.
- Locate Existing Control Box: Identify the current control box under your adjustable bed frame.
- Prepare Wiring: Carefully cut the wires leading from your bed's motors to the existing control box. Ensure you leave enough slack on both sides for connection.
- Connect to New Harness: Slide the cut wires into the new harness provided with the conversion kit. Ensure each wire is securely connected according to the instructions provided with the kit (specific wiring diagrams may vary, refer to included documentation).
- Install New Control Box: Mount the new control box securely under the bed frame. Connect the newly wired harness to the appropriate ports on the new control box.

Figure 1: New Control Box (Front View)

Figure 2: New Control Box (Rear View with Wiring)
- Connect Power: Plug the new power cord into the new control box and then into a wall outlet.
- Pair Remote Control:
- Ensure the bed is plugged in.
- Locate the pairing button on the new control box (refer to Figure 2). Press and hold this button for approximately 3-5 seconds until the pairing LED light begins to flash.
- Within 10 seconds, press and hold any button on the new remote control. The pairing LED on the control box should stop flashing and remain solid, indicating successful pairing.
- Test all functions on the remote to ensure proper operation.
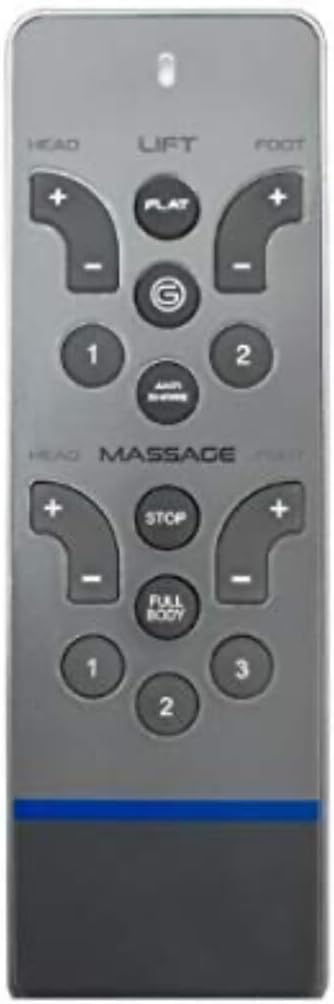
Figure 3: New Remote Control
Operating Instructions
Once the remote is paired, you can operate your adjustable bed using the new remote control:
- Head Up/Down: Use the 'HEAD +' and 'HEAD -' buttons to adjust the head section of the bed.
- Foot Up/Down: Use the 'FOOT +' and 'FOOT -' buttons to adjust the foot section of the bed.
- Lift: Use the 'LIFT +' and 'LIFT -' buttons for overall bed height adjustment (if applicable to your model).
- Flat: Press the 'FLAT' button to return the bed to a flat position.
- Massage: Use the 'MASSAGE' buttons (e.g., '1', '2', '3', 'FULL BODY', 'STOP') to control the massage functions and intensity.
- USB Charger: The remote includes a USB charging port for convenience.
Note: As mentioned, original preset and one-touch flat buttons may not function with this conversion kit.
Maintenance
- Keep the control box and remote clean and dry. Avoid exposure to liquids.
- Regularly check all cables and connections for any signs of wear or damage.
- Do not attempt to open or repair the control box or remote yourself. Contact customer support for assistance.
Troubleshooting
- Bed does not respond to remote:
- Ensure the bed is plugged into a working power outlet.
- Check that the power cord is securely connected to the control box.
- Re-attempt the remote pairing process (refer to 'Setup and Installation' section).
- Verify that the remote control has working batteries (if applicable, though the kit remote often uses internal rechargeable batteries).
- Partial functions not working:
- Confirm all motor wires are correctly and securely connected to the new control box harness.
- Remember that original presets and one-touch flat buttons may not be functional with this conversion kit.
- Unusual noises or movements:
- Immediately disconnect power to the bed.
- Inspect for any obstructions under the bed frame.
- Contact customer support if the issue persists after checking for obstructions.
Specifications
- Product Type: 3-Piece Conversion Kit for Adjustable Beds
- Compatibility: Leggett & Platt Scape 1.0, Scape 1.0+, 700 Series Adjustable Beds
- Kit Includes: New Control Box, Power Cord, Remote Control with USB Charger
- Batteries Required: No (for the kit itself, remote may have internal rechargeable battery)
- Manufacturer: Leggett Adjustable Remotes
Warranty and Support
Specific warranty information for this conversion kit is not provided in the product details. For warranty inquiries or technical support, please contact the manufacturer, Leggett Adjustable Remotes, or your original point of purchase. Keep your purchase receipt as proof of purchase.