
Janome jano-HD3000-BE
Janome HD 3000 BE Black Edition Sewing Machine Instruction Manual
Model: jano-HD3000-BE
1. Introduction
The Janome HD-3000 Black Edition is a robust and versatile heavy-duty sewing machine, designed for both beginners and experienced sewists tackling a wide range of projects. Its durable all-metal construction ensures reliability, while user-friendly features make complex tasks manageable. This manual provides essential information for setting up, operating, maintaining, and troubleshooting your machine to ensure optimal performance and longevity.
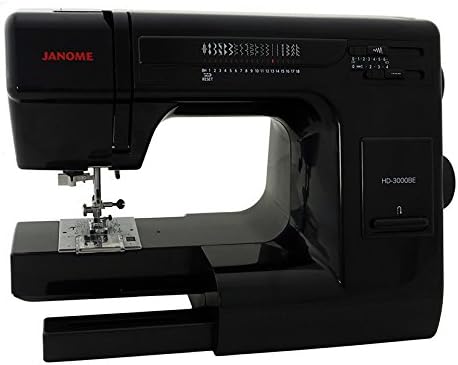
Figure 1: Janome HD 3000 BE Black Edition Sewing Machine
This image displays the Janome HD 3000 BE Black Edition sewing machine from a front-right angle, showcasing its sleek black finish and control panel. The machine features a sturdy build, suitable for heavy-duty sewing tasks.
2. Setup
2.1 Unpacking and Placement
Carefully remove the machine from its packaging. Place the machine on a stable, flat surface with adequate lighting. Ensure there is enough space around the machine for comfortable operation and material handling.
2.2 Power Connection
Connect the power cord to the machine and then to a suitable electrical outlet. Ensure the machine's power switch is in the "Off" position before plugging it in.
2.3 Threading the Machine
The Janome HD 3000 BE features an intuitive threading system with clearly marked thread guides. Follow the numbered path from the spool pin through the tension discs, take-up lever, and down to the needle. The built-in needle threader simplifies the final step of threading the needle eye.
2.4 Winding and Inserting the Bobbin
To wind a bobbin, place an empty bobbin on the bobbin winder spindle and follow the designated thread path for winding. Once wound, insert the bobbin into the top drop-in bobbin case. The clear cover allows for easy monitoring of the bobbin thread supply. Ensure the thread is correctly routed through the tension spring.
3. Operating Instructions
3.1 Stitch Selection and Adjustment
The machine offers 18 built-in stitches, including a one-step buttonhole. Select your desired stitch using the stitch selector dial. Adjust stitch length and width using the dedicated dials on the front of the machine to suit your fabric and project requirements. An instructional guide located in the top tray door provides recommended feet and stitch settings for various tasks.
3.2 Presser Foot Operation
The Janome HD 3000 BE features an extra-high presser foot lift, allowing for a half-inch clearance. This is particularly useful when sewing through multiple layers of thick fabric or bulky materials, ensuring smooth feeding and preventing strain on the machine. The machine comes with a premium accessory kit including an Ultraglide Foot, Even Feed / Walking Foot, Open Toe Satin Stitch Foot, 1/4" Seam Foot, and Darning Foot.
3.3 Free Arm and Removable Storage
The machine includes a removable storage compartment that, when detached, reveals a free arm. This feature is ideal for sewing cylindrical items such as pant legs, shirt sleeves, cuffs, and small curves, providing easier access and control.
3.4 Drop Feed Function
For specialized techniques like quilting, free-motion stitching, or darning, the feed dogs can be lowered using the drop feed mechanism. This allows you to freely move the fabric under the needle in any direction, offering greater creative control.
3.5 Reverse Stitching
To secure stitches at the beginning and end of a seam, press and hold the reverse lever. The machine will sew backward, reinforcing the seam and preventing unraveling.
4. Maintenance
4.1 Cleaning
Regular cleaning is crucial for maintaining your sewing machine's performance. Use a small brush to remove lint and dust from the bobbin area, feed dogs, and needle plate. It is recommended to clean these areas after every few hours of sewing or after completing a large project.
4.2 Lubrication
Refer to your machine's detailed manual for specific lubrication points and recommended oil. Proper lubrication ensures smooth operation of moving parts and extends the life of your machine.
4.3 Needle Replacement
Replace your needle regularly, especially when starting a new project or if you notice skipped stitches or fabric damage. Use the correct needle type and size for your fabric to achieve the best results.
5. Troubleshooting
If you encounter issues with your Janome HD 3000 BE, consider the following common solutions before seeking professional assistance:
- Skipped Stitches: Check if the needle is bent, dull, or inserted incorrectly. Ensure the correct needle type is used for the fabric. Re-thread the machine completely, including the bobbin.
- Thread Breakage: Verify that the machine is threaded correctly and that the tension settings are appropriate for your thread and fabric. Check for burrs on the needle plate or bobbin case. Use good quality thread.
- Fabric Jamming: Ensure the presser foot is lowered before sewing. Check for tangled threads in the bobbin area. Adjust presser foot pressure if necessary.
- No Power: Confirm the power cord is securely plugged into both the machine and the electrical outlet. Check the power switch.
For more detailed troubleshooting steps, please refer to the comprehensive manual provided with your machine or contact Janome customer support.
6. Specifications
| Feature | Detail |
|---|---|
| Brand | Janome |
| Model Number | jano-HD3000-BE |
| Product Dimensions | 16 x 7.2 x 11.3 inches (7.2"D x 16"W x 11.3"H) |
| Item Weight | 18.7 pounds |
| Color | Black |
| UPC | 675900959736 |
| Stitch Count | 18 (including one-step buttonhole) |
| Body Construction | Heavy-duty, all-aluminum body |
| Presser Foot Lift | Extra-high (up to 0.5 inch clearance) |
| Bobbin Type | Top drop-in with clear cover |
| Included Accessories | Ultraglide Foot, Even Feed / Walking Foot, Open Toe Satin Stitch Foot, 1/4" Seam Foot, Darning Foot, Hard Cover |

Figure 2: Janome HD 3000 BE Black Edition with Key Dimensions
This image provides a perspective view of the Janome HD 3000 BE, highlighting its key dimensions: 11.3 inches in height, 7.2 inches in depth, and 16 inches in width. These measurements are crucial for planning placement and storage.
7. Warranty and Support
For information regarding your product's warranty, please refer to the warranty card included with your purchase or visit the official Janome website. If you require technical assistance, have questions about operation, or need to order replacement parts, please contact Janome customer support through their official channels.
Always use genuine Janome parts and accessories to ensure compatibility and maintain your machine's performance and warranty validity.
Ask a question about this manual
Ask about setup, troubleshooting, compatibility, parts, safety, or missing instructions. Manuals+ will review the question and use this page’s manual context to help answer it.