1. Introduction
This manual provides essential information for the setup, operation, maintenance, and troubleshooting of your HP Elitebook 840 G1 laptop. Please read this manual thoroughly to ensure proper use and longevity of your device.

Image 1.1: HP Elitebook 840 G1 Laptop
The HP Elitebook 840 G1 is a 14-inch high-performance laptop featuring an Intel Core i5-4300U processor, 8GB of memory, and a 1TB HDD, running Windows 10 Professional. It is designed for productivity and includes various connectivity options.
2. What's in the Box
Upon unpacking your HP Elitebook 840 G1, verify that all the following items are present:
- HP Elitebook 840 G1 Laptop
- AC Power Adapter
- Battery (may be pre-installed)
- Documentation (this manual and other guides)

Image 2.1: AC Power Adapter
3. Setup
3.1 Initial Power-on and Charging
- Connect the AC power adapter to the laptop's power port and then to a wall outlet.
- Press the power button located on the top right of the keyboard to turn on the laptop.
- Follow the on-screen instructions to complete the initial Windows 10 Professional setup, including language, region, and user account creation.
3.2 Connecting Peripherals
The HP Elitebook 840 G1 offers various ports for connecting external devices:
- USB 3.0 Ports (4x): For connecting USB devices such as external hard drives, keyboards, and mice.
- VGA Port (1x): For connecting to older external monitors or projectors.
- DisplayPort (1x): For connecting to modern external monitors or TVs.
- RJ-45 (Ethernet) Port (1x): For wired network connection.
- Headphone-out/Microphone-in Combo Jack (1x): For connecting headphones or an external microphone.
- Multi-Format Digital Media Card Reader: For inserting SD, SDHC, or SDXC memory cards.

Image 3.1: Left Side Ports
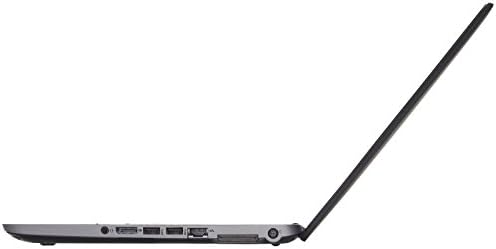
Image 3.2: Right Side Ports
3.3 Network Connection
- Wi-Fi: To connect to a wireless network, click the Wi-Fi icon in the taskbar, select your network, and enter the password if required.
- Ethernet: Connect an Ethernet cable from your router or modem to the RJ-45 port on the laptop.
4. Operating Instructions
4.1 Power Management
- Power On: Press the power button.
- Shut Down: Click the Start button, then Power > Shut down.
- Sleep: Click the Start button, then Power > Sleep, or close the laptop lid.
- Restart: Click the Start button, then Power > Restart.
4.2 Keyboard and Touchpad
The laptop features a full-size keyboard and a multi-touch touchpad for navigation.

Image 4.1: Keyboard and Touchpad Layout
- Touchpad Gestures: Refer to Windows settings for customizable multi-touch gestures (e.g., two-finger scroll, pinch-to-zoom).
- Function Keys (Fn): Use the 'Fn' key in combination with the F1-F12 keys for special functions like adjusting brightness, volume, or enabling/disabling Wi-Fi.
4.3 Display and Audio
- Adjusting Brightness: Use the dedicated function keys (e.g., Fn + F2/F3) or Windows display settings.
- Volume Control: Use the dedicated function keys (e.g., Fn + F6/F7/F8) or the volume icon in the Windows taskbar.
- External Display: Connect an external monitor to the VGA or DisplayPort. Press Windows key + P to select display mode (Duplicate, Extend, Second screen only).
5. Maintenance
5.1 Cleaning the Laptop
- Use a soft, lint-free cloth slightly dampened with water or a screen cleaner for the display.
- For the keyboard and chassis, use a soft cloth. Avoid harsh chemicals.
- Periodically clean the vents to prevent dust buildup, which can affect cooling.
5.2 Battery Care
- Avoid fully discharging the battery frequently.
- Store the laptop in a cool, dry place when not in use for extended periods.
- If the laptop will not be used for a long time, charge the battery to about 50% before storage.
5.3 Software Updates
Regularly update your Windows operating system and drivers to ensure optimal performance and security. Access Windows Update through the Settings menu.
6. Troubleshooting
This section addresses common issues you might encounter with your HP Elitebook 840 G1.
6.1 Laptop Not Powering On
- Ensure the AC adapter is securely connected to both the laptop and a working power outlet.
- Verify the power outlet is functional by plugging in another device.
- If the battery is removable, try removing it, connecting the AC adapter, and then powering on.
6.2 No Wi-Fi Connection
- Check if Wi-Fi is enabled via the function keys or Windows settings.
- Restart your router and modem.
- Ensure you are selecting the correct Wi-Fi network and entering the correct password.
6.3 Display Issues
- If the screen is blank, try connecting an external monitor to check if the issue is with the laptop's internal display.
- Adjust screen brightness using function keys.
- Update graphics drivers through Windows Update or HP's support website.
6.4 Slow Performance
- Close unnecessary applications running in the background.
- Run a disk cleanup and defragmentation (for HDD).
- Check for malware or viruses.
- Ensure Windows and drivers are up to date.
7. Specifications
Key technical specifications for the HP Elitebook 840 G1 laptop:
| Processor | Intel Core i5-4300U (1.9GHz, up to 2.9GHz Turbo) |
| Memory (RAM) | 8GB DDR3 SDRAM |
| Storage | 1TB HDD |
| Display | 14-inch HD (1366 x 768) LED-backlit |
| Graphics | Intel HD Graphics 4400 (Integrated) |
| Operating System | Windows 10 Professional (64-bit) |
| Wireless Connectivity | 802.11ac (1x1) Wi-Fi, Bluetooth |
| Ports | 4x USB 3.0, 1x VGA, 1x DisplayPort, 1x RJ-45, 1x Headphone/Mic Combo, 1x Media Card Reader |
| Webcam | HP TrueVision HD Webcam |
| Dimensions (HxWxL) | 0.8" x 13.3" x 9.3" (2.03 cm x 33.78 cm x 23.62 cm) |
| Weight | 3.68 lbs (1.67 kg) |
8. Warranty and Support
This product is a Certified Refurbished item. It has been tested and certified to function like new. The refurbishing process includes functionality testing, basic cleaning, inspection, and repackaging. The product ships with all relevant accessories and includes a minimum 90-day warranty.
For technical support or warranty claims, please refer to the documentation provided with your purchase or contact the seller directly. Ensure you have your purchase details and product model number available when seeking support.