1. Introduction
Thank you for choosing the Mabe EMDPCCB2 Water Dispenser. This manual provides essential information for the safe and efficient use of your new appliance. Please read these instructions carefully before installation and operation, and retain them for future reference.
Important Safety Information
- Always connect the dispenser to a grounded electrical outlet.
- Do not operate the dispenser if the power cord is damaged.
- Keep the dispenser away from direct sunlight and heat sources.
- Ensure proper ventilation around the unit.
- This appliance is not intended for use by persons with reduced physical, sensory, or mental capabilities unless supervised.
- The hot water function includes a child safety lock. Always supervise children around the dispenser.
2. Product Overview
The Mabe EMDPCCB2 Water Dispenser provides convenient access to cold, room temperature, and hot water. It features a sleek design and a bottom storage cabinet.

Image 2.1: Front view of the Mabe EMDPCCB2 Water Dispenser, showing the dispensing area and controls.
Key Features:
- Three Temperature Taps: Dispenses cold, room temperature, and hot water.
- Cooling Switch: Allows control over the cooling function.
- Heating Switch: Allows control over the heating function.
- Child Safety Lock: Prevents accidental hot water dispensing.
- Storage Cabinet: Integrated cabinet for convenient storage.
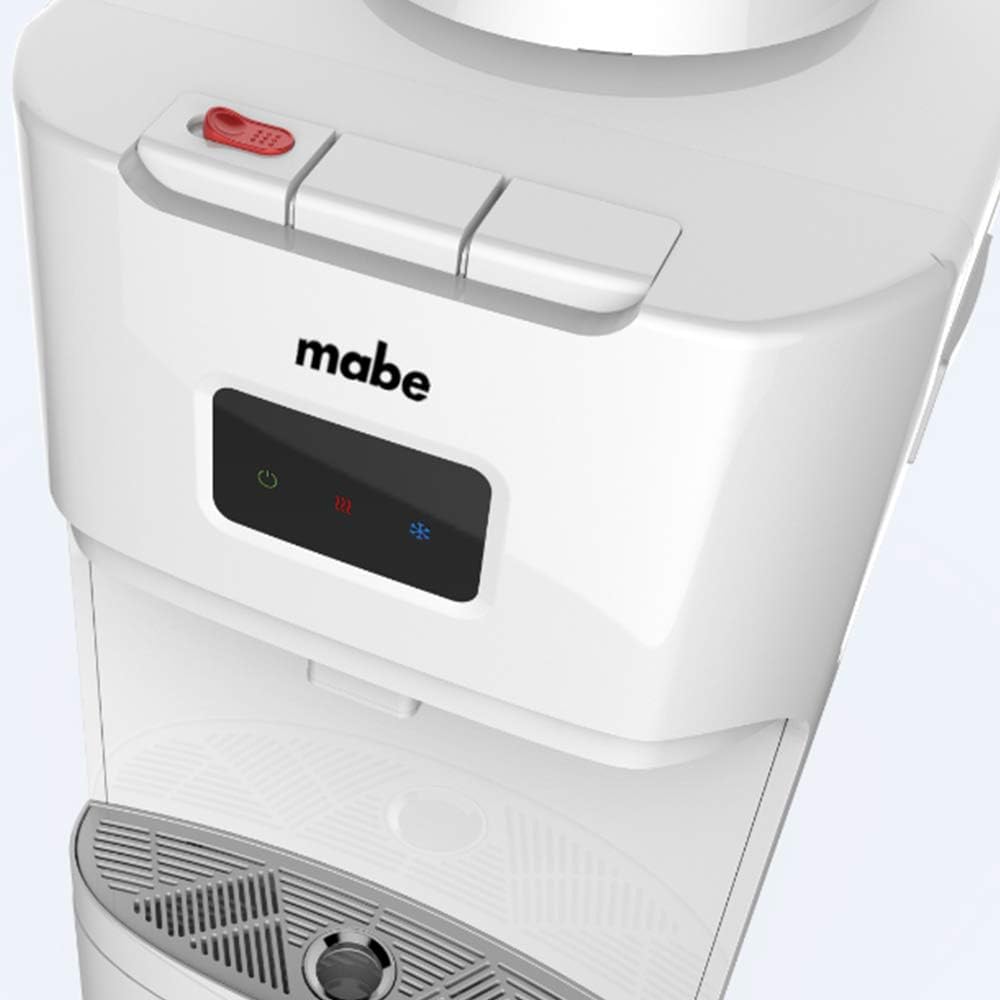
Image 2.2: Close-up view of the control panel and dispensing buttons, including the red child safety lock button for hot water.
3. Setup
3.1 Unpacking
- Carefully remove the dispenser from its packaging.
- Remove all packing materials, including any tape or protective films.
- Inspect the dispenser for any signs of damage. If damaged, do not use and contact customer support.
3.2 Placement
- Place the dispenser on a firm, level surface capable of supporting its weight when full.
- Ensure there is at least 10 cm (4 inches) of space around the back and sides for proper ventilation.
- Avoid placing the dispenser in direct sunlight or near heat-generating appliances.
- Position the dispenser near a grounded electrical outlet.
3.3 Water Bottle Installation
- Clean the neck of the water bottle before placing it on the dispenser.
- Carefully invert the water bottle and place it firmly onto the support collar on top of the dispenser. Ensure it is seated correctly to prevent leaks.
3.4 Initial Use
- After installing the water bottle, allow approximately 5 minutes for the water reservoirs to fill.
- Plug the power cord into a grounded electrical outlet.
- Activate the cooling and heating switches located at the back of the unit (if not already on).
- Dispense a small amount of water from each tap (cold, room temperature, hot) to ensure proper flow and to prime the system.
- Allow 15-30 minutes for the water to reach optimal cold and hot temperatures before first use.
4. Operating Instructions
4.1 Dispensing Cold Water
- Place a cup under the cold water tap.
- Press the blue cold water button to dispense. Release the button to stop.
4.2 Dispensing Hot Water
- Place a heat-resistant cup under the hot water tap.
- To dispense hot water, first press and hold the red child safety lock button, then press the red hot water button.
- Release both buttons to stop dispensing.
- Caution: Hot water can cause burns. Always use the child safety lock and supervise children.
4.3 Dispensing Room Temperature Water
- Place a cup under the room temperature water tap.
- Press the black room temperature water button to dispense. Release the button to stop.
4.4 Temperature Control Switches
The cooling and heating functions can be controlled independently using the switches located on the back of the dispenser. Turn off these switches when the respective function is not needed to conserve energy.
- Cooling Switch: Controls the cold water function.
- Heating Switch: Controls the hot water function.
5. Maintenance
5.1 Exterior Cleaning
- Unplug the dispenser from the power outlet before cleaning.
- Wipe the exterior surfaces with a soft, damp cloth.
- Do not use abrasive cleaners, solvents, or harsh chemicals, as these can damage the finish.
5.2 Drip Tray Cleaning
- Regularly remove and empty the drip tray located below the dispensing taps.
- Wash the drip tray with mild soap and water, then rinse thoroughly and dry before replacing.
5.3 Condenser Coil Cleaning
Periodically clean the condenser coils located at the back of the unit to ensure efficient operation. Use a soft brush or vacuum cleaner to remove dust and debris.
6. Troubleshooting
Common Issues and Solutions:
- No Cold Water:
- Ensure the cooling switch is ON.
- Check if the dispenser is plugged in and receiving power.
- Allow sufficient time for cooling (15-30 minutes).
- No Hot Water:
- Ensure the heating switch is ON.
- Check if the dispenser is plugged in and receiving power.
- Allow sufficient time for heating.
- Ensure the child safety lock is properly engaged when dispensing.
- Water Leaking:
- Check if the water bottle is properly seated on the support collar.
- Inspect the water bottle for cracks or damage.
- Ensure the drip tray is not overflowing.
- Unusual Noise:
- Ensure the dispenser is on a level surface.
- Check for any obstructions around the compressor area.
If the problem persists after attempting these solutions, please contact Mabe customer support.
7. Specifications
| Feature | Detail |
|---|---|
| Model Number | EMDPCCB2 |
| Brand | Mabe |
| Color | White |
| Material | Plastic |
| Dimensions (L x W x H) | 34.8 x 31 x 100 cm (approx. 13.7 x 12.2 x 39.4 inches) |
| Weight | 16 kg (approx. 35.3 lbs) |
| Water Temperatures | Cold, Room Temperature, Hot |
| Installation Type | Floor Mount |
8. Warranty and Support
For warranty information, service, repairs, or maintenance, please contact Mabe customer service. Keep your purchase receipt as proof of purchase.

Image 8.1: Mabe Service contact information for installation, repair, and maintenance. Telephone: 461 471 7000, WhatsApp: 55 41635939.
When contacting support, please have your model number (EMDPCCB2) and purchase date available.


