1. Introduction
This user manual provides detailed instructions for the installation, operation, and maintenance of your LeeKooLuu RV Backup Camera Wireless HD 1080P LK5 system. Please read this manual thoroughly before using the product to ensure proper function and safety. This system is designed to enhance your driving and parking experience by providing a clear, wide-angle view of your vehicle's rear surroundings.
2. Package Contents
Please verify that all items listed below are included in your package:
- 1 x 7 Inch Monitor
- 1 x Wireless Backup Camera
- 2 x Power Cords
- 1 x Cigarette Lighter Adapter
- 1 x Sunshade
- 1 x Windshield Mount
- 1 x U Bracket
- 4 x Antennas
- 1 x User Manual
- Other necessary installation parts
3. Safety Information
Always prioritize safety when installing and operating the backup camera system. Adhere to all local traffic laws and regulations. This system is an aid and should not replace careful driving and direct observation.
- Ensure all connections are secure and properly insulated to prevent short circuits.
- Do not obstruct your view of the road with the monitor.
- Regularly check the camera and monitor for damage or loose connections.
- Clean the camera lens periodically to maintain clear visibility.
- Professional installation is recommended if you are unsure about any steps.
4. Product Overview
The LeeKooLuu LK5 system features a 7-inch HD 1080P monitor and a durable wireless camera, designed for reliable performance in various vehicle types.

Figure 4.1: Overview of the LeeKooLuu LK5 wireless backup camera system, showing the 7-inch monitor and the camera unit with dual antennas.
4.1. Key Features
- HD 1080P Resolution: Provides clear and detailed images.
- Digital Wireless Signal: Dual antenna design for stable, uninterrupted signal up to 600ft in open areas.
- 7-Inch Touch Key Screen: Large display with responsive touch controls for easy operation.
- DVR Recording Function: Supports simultaneous recording of up to 4 cameras with loop recording.
- Split Screen Capability: Monitor can display dual or quad split views.
- IP69K Waterproof Camera: Full metal construction ensures durability in harsh weather conditions.
- Night Vision: 18 infrared lights for enhanced visibility in low-light environments.
- DIY Guide Lines: Customizable parking guide lines for precise maneuvering.
- Furrion Pre-Wired Compatibility: Includes adapter for easy integration with Furrion pre-wired RVs.
5. Setup and Installation
The LeeKooLuu LK5 system is designed for straightforward installation. Follow these steps for optimal performance.
5.1. Camera Installation
The camera can be wired to your vehicle's running lights, tail lights, or reverse lights, depending on whether you want it active continuously or only when reversing.
- Choose Mounting Location: Select a central location at the rear of your RV or vehicle that provides an unobstructed view.
- Wire Power: Connect the camera's red wire to a 12V power source (e.g., running light, tail light, or reverse light positive wire) and the black wire to a ground point.
- Furrion Pre-Wired RVs: If your RV is Furrion pre-wired, use the provided adapter and pigtail wire for a plug-and-play installation.
- Secure Camera: Mount the camera securely using the provided bracket and hardware. Ensure the antennas are positioned for optimal signal transmission.

Figure 5.1: Diagram illustrating the easy installation process, including wiring options for the camera and monitor, and compatibility with Furrion pre-installed mounting kits.

Figure 5.2: Information regarding the included bracket adapter and pigtail wire for compatibility with Furrion pre-wired RVs.
5.2. Monitor Installation
The 7-inch monitor can be mounted on your dashboard or windshield.
- Attach Mount: Secure the U bracket or windshield mount to the monitor.
- Position Monitor: Place the monitor in a location that does not obstruct your driving view but is easily accessible.
- Power Monitor: Connect the monitor's power cord to the cigarette lighter adapter or directly to an ACC/Fuse/Radio power source.
- Connect Antennas: Attach the two antennas to the monitor for stable signal reception.

Figure 5.3: Visual representation of the monitor mounted on a dashboard using the U-bracket and on a windshield using the suction cup mount.
6. Operation
Once installed, the system will automatically pair. If pairing is needed, refer to the monitor's menu settings.
6.1. Basic Functions
- Power On/Off: Press the power button on the monitor.
- Signal Stability: The dual antenna design ensures a stable signal, reducing lag and interruptions.
- Touch Key Operation: Use the touch keys on the monitor for navigation and settings adjustments.
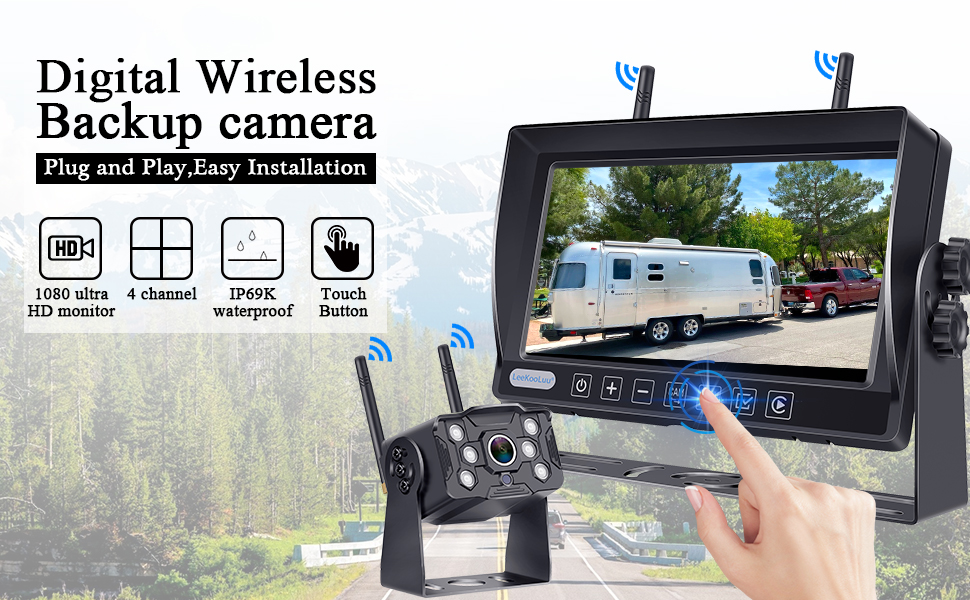
Figure 6.1: Illustration of the digital wireless backup camera system in operation, highlighting the touch button interface on the monitor.
6.2. Split Screen Monitoring
The monitor supports displaying multiple camera feeds simultaneously.
- Switch Views: Use the "Split" or "Quad" button on the monitor to cycle through single, dual, or quad-screen views.
- Adding Cameras: The system supports up to 4 wireless cameras. Additional cameras can be purchased separately and paired.

Figure 6.2: The 7-inch monitor displaying various split-screen configurations, demonstrating its ability to support up to four wireless camera inputs simultaneously.
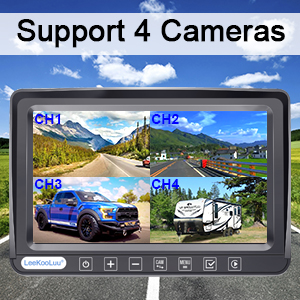
Figure 6.3: Visual confirmation that the system supports up to four cameras, showing a quad-view display on the monitor.
6.3. DIY Guide Lines
Customize the parking guide lines to match your vehicle and preferences.
- Adjustment: Access the guide line settings through the monitor's menu to adjust width, vertical position, and horizontal position.
- Enable/Disable: Guide lines can be turned on or off as needed.

Figure 6.4: Examples of customizable guide lines on the monitor, demonstrating adjustments for width, vertical movement, and horizontal movement.
7. Menu Settings
The monitor's menu allows for various adjustments and feature controls.

Figure 7.1: Icons representing various functions accessible through the monitor's menu, including Night Vision, Easy Install, Wireless, HD 1080P, 4 Channel, 7" Screen, Plug and Play, Touch Button, 170° Wide Angle, and Guide Lines DIY.
- Image Flip: Adjust the image orientation (Normal, Mirror, Vertical Normal, Vertical Mirror) to suit your mounting preference.
- Brightness/Saturation/Contrast: Fine-tune display quality.
- Pairing: Re-pair cameras to the monitor if needed.
- System Settings: General system configurations.

Figure 7.2: Display showing the four image flip modes: Normal, Mirror, Vertical Normal, and Vertical Mirror, allowing users to adjust the view based on camera orientation.
8. Recording Function (DVR)
The LK5 system includes a DVR function, allowing you to record video footage from the connected cameras.
- Loop Recording: Videos are automatically saved and overwrite the oldest files when the storage is full.
- Playback: Review recorded footage directly on the monitor.
- Storage: An SD card (not included) is required for recording.

Figure 8.1: Illustration of the loop recording feature, showing video playback on the monitor and the ability to search recorded video by time and mode.
9. Maintenance
Proper maintenance ensures the longevity and optimal performance of your LeeKooLuu backup camera system.
- Cleaning the Camera Lens: Regularly wipe the camera lens with a soft, damp cloth to remove dirt, dust, or water spots that may obscure the view. Avoid abrasive cleaners.
- Cleaning the Monitor Screen: Use a microfiber cloth to gently clean the monitor screen. Do not spray cleaning solutions directly onto the screen.
- Checking Connections: Periodically inspect all power cables and antenna connections for any signs of wear, corrosion, or looseness. Ensure they are securely fastened.
- Weather Protection: While the camera is IP69K waterproof, extreme weather conditions (e.g., heavy snow, ice) may temporarily affect performance. Clear any obstructions from the camera lens.
- Storage: If storing the vehicle for an extended period, consider disconnecting the system from power to prevent battery drain.
10. Troubleshooting
If you encounter issues with your LeeKooLuu RV Backup Camera system, refer to the following common problems and solutions:
| Problem | Possible Cause | Solution |
|---|---|---|
| No image on monitor |
|
|
| Image flickering or unstable |
|
|
| Poor image quality (blurry, dark) |
|
|
| Recording not working |
|
|
11. Specifications
| Feature | Detail |
|---|---|
| Model Number | M1 |
| Monitor Size | 7 Inches |
| Video Capture Resolution | 1080p |
| Wireless Range | Up to 600ft (open area), 270ft (in vehicles) |
| Waterproof Rating | IP69K (Camera) |
| Voltage | 12 Volts |
| Display Technology | LED |
| Special Features | 7 Inch Screen, Powerful Digital Wireless Signal, Real 1080P Resolution, Recording Ability, Split Screen (Support 2 wireless Cameras) |
| Connectivity Technologies | Wireless |
| Optical Sensor Technology | CMOS |
| Lens Type | Wide Angle |
| Product Dimensions | 8 x 2 x 8 inches |
| Item Weight | 3.21 pounds |
12. Warranty and Support
LeeKooLuu is committed to providing high-quality products and excellent customer service. While specific warranty terms are not detailed in this manual, the manufacturer offers dedicated support for their products.
- Customer Service: For any questions, technical assistance, or support needs, please contact LeeKooLuu customer service.
- Online Resources: Check the official LeeKooLuu website or product page for FAQs, updated manuals, or video tutorials.

Figure 12.1: Image representing the availability of 24-hour customer service for support and inquiries.


