1. Introduction
Thank you for choosing the DEWALT DCE571N-XJ 18V Cordless Caulking Gun. This tool is designed for professional applications requiring precise and controlled material dispensing. Please read this manual carefully before operating the tool to ensure safe and efficient use. Keep this manual for future reference.
General Safety Instructions
- Always wear appropriate personal protective equipment (PPE) such as safety glasses.
- Ensure the work area is well-lit and clear of obstructions.
- Do not operate the tool in explosive atmospheres, such as in the presence of flammable liquids, gases, or dust.
- Keep children and bystanders away while operating the tool.
- Disconnect the battery pack before making any adjustments, changing accessories, or storing the tool.
- Use only DEWALT recommended accessories and battery packs.
2. Product Overview
The DEWALT DCE571N-XJ is an 18V cordless caulking gun designed for efficient and precise application of sealants and adhesives. Key features include:
- Variable Speed Dial: Allows for precise control over material flow rate.
- Ergonomic Grip: Contoured handle with rubber overmold for enhanced comfort and maneuverability.
- Anti-Drip Feature: Durable piston rod with an automatic retraction mechanism to prevent dripping.
- Integrated LED Light: Illuminates the work area for improved visibility during application.
- Cartridge Holder: Compatible with 300-400ml cartridges.
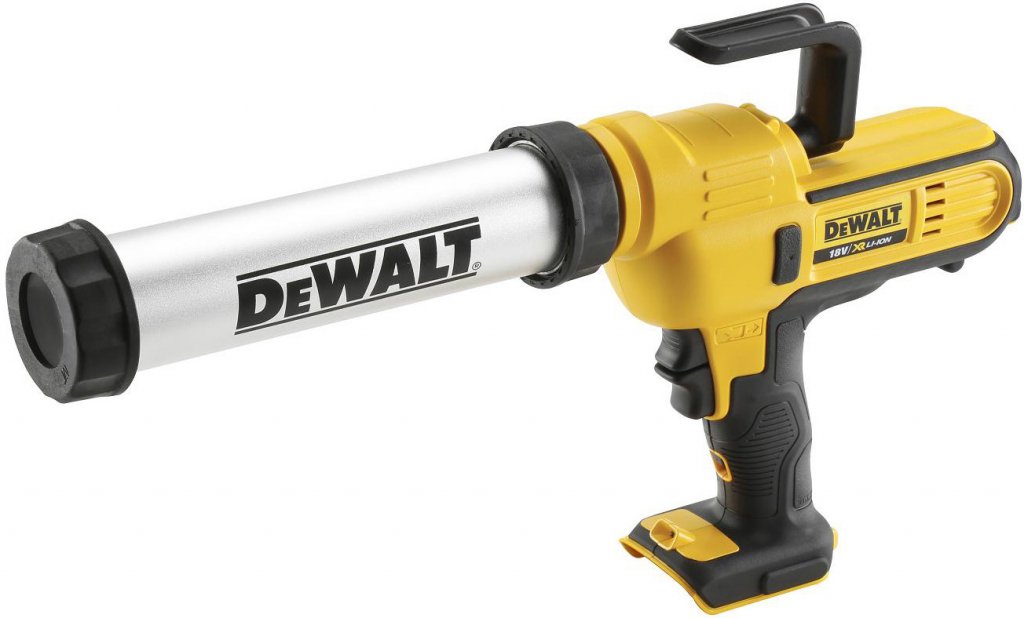
Figure 1: DEWALT DCE571N-XJ 18V Cordless Caulking Gun. This image shows the tool's main body, handle, trigger, and cartridge holder.
3. Setup
3.1 Battery Installation (Battery and Charger Sold Separately)
- Ensure the tool is switched off.
- Align the battery pack with the battery port on the tool's base.
- Slide the battery pack into the port until it clicks securely into place.
- To remove, press the battery release button and slide the battery pack out.
3.2 Loading a Cartridge (300-400ml)
- Ensure the battery is removed for safety.
- Press the plunger release lever (if applicable) to retract the plunger rod fully.
- Remove the front cap of the cartridge holder.
- Insert the sealant or adhesive cartridge into the holder, nozzle end first.
- Replace the front cap, ensuring it is securely fastened.
- Cut the tip of the cartridge nozzle to the desired bead size at a 45-degree angle.
- Puncture the inner seal of the cartridge using a long nail or wire, if necessary.
4. Operating Instructions
4.1 Powering On/Off
- To turn on the tool, depress the trigger switch. The LED light will activate.
- To turn off, release the trigger switch.
4.2 Adjusting Material Flow (Variable Speed Dial)
- Locate the variable speed dial, typically near the trigger.
- Rotate the dial to select the desired speed setting. Lower numbers indicate slower flow, higher numbers indicate faster flow.
- Start with a lower setting and gradually increase as needed for optimal control and bead consistency.
4.3 Applying Sealant/Adhesive
- Position the nozzle at the starting point of your application.
- Depress the trigger to begin dispensing material.
- Maintain a consistent speed and angle as you move the tool along the desired path.
- Release the trigger to stop the flow. The anti-drip feature will retract the plunger slightly to prevent excess material from oozing out.
- Use the integrated LED light for enhanced visibility in dimly lit areas.
5. Maintenance
5.1 Cleaning
- After each use, remove the cartridge and clean any excess material from the plunger rod and cartridge holder.
- Use a damp cloth to wipe down the exterior of the tool. Do not use harsh solvents or abrasive cleaners.
- Ensure no material dries inside the cartridge holder or on the plunger rod, as this can impede future operation.
5.2 Storage
- Store the tool in a clean, dry place, out of reach of children.
- Remove the battery pack before storing for extended periods.
- Avoid storing in direct sunlight or extreme temperatures.
6. Troubleshooting
| Problem | Possible Cause | Solution |
|---|---|---|
| Tool does not operate. | Battery not installed correctly or discharged. | Ensure battery is fully charged and properly seated. |
| Material flow is inconsistent or stops. | Cartridge empty, nozzle clogged, or inner seal not punctured. | Replace cartridge, clear nozzle, or puncture inner seal. |
| Excessive dripping after releasing trigger. | Anti-drip mechanism obstructed or material too thin. | Clean plunger rod and mechanism. Allow more time for retraction. |
| Plunger rod does not retract fully. | Material buildup on rod or mechanism. | Clean the plunger rod and surrounding area thoroughly. |
7. Specifications
| Feature | Specification |
|---|---|
| Model Number | DCE571N-XJ |
| Voltage | 18 Volts |
| Product Dimensions (L x W x H) | 53 x 29.2 x 8.5 cm |
| Weight | 2.76 kg |
| Cartridge Capacity | 300-400ml (holder included) |
| Battery Included | No (Sold Separately) |
| Charger Included | No (Sold Separately) |
8. Warranty and Support
DEWALT products are engineered to the highest standards. For detailed warranty information, please refer to the warranty card included with your product or visit the official DEWALT website. For technical support, spare parts, or service inquiries, please contact your local DEWALT service center or authorized dealer.
Note: Availability of spare parts information is not provided in the product data.


