
1. Product Overview
The ChiliTec CTW-902 WiFi Digital Wireless Weather Station is a multi-functional device designed to provide comprehensive weather data. It features a DCF radio-controlled clock, a rain and wind sensor, and displays indoor and outdoor temperature and humidity. The station supports WiFi connectivity for data viewing on mobile applications.
Key Features:
- DCF Radio-Controlled Clock with Calendar
- Indoor and Outdoor Temperature and Humidity Display
- Precipitation Measurement and Statistics
- Wind Speed and Direction Display
- Atmospheric Pressure Display
- Min/Max Temperature, Humidity, and Wind Speed Records
- Clear Color LCD Display (157mm x 76mm)
- WiFi Connectivity for Smartphone App Integration (Android, iPhone, iPad)
- Weather-Resistant Outdoor Sensor Unit
- Wall or Table Mounting Options

Figure 1.1: Overview of the ChiliTec CTW-902 WiFi Weather Station, showing the main display unit, the multi-sensor outdoor unit, and a smartphone app interface displaying current conditions.
2. Safety Information
Please read all safety instructions before operating the device. Failure to follow these instructions may result in electric shock, fire, or damage to the device.
- Do not expose the main unit to direct sunlight, extreme temperatures, or high humidity.
- Ensure the outdoor sensor is mounted securely to prevent damage from wind or falling.
- Use only the specified power adapter for the main unit.
- Batteries for the outdoor sensor should be inserted with correct polarity. Do not mix old and new batteries or different types of batteries.
- Keep the device away from strong magnetic fields.
- Do not attempt to disassemble or repair the device yourself. Contact qualified service personnel.
3. Setup Guide
3.1 Unpacking and Components
Carefully unpack all components and check against the packing list:
- Main Display Unit
- Multi-Sensor Outdoor Unit (Rain gauge, Wind vane, Anemometer, Temperature/Humidity sensor)
- Mounting Pole/Bracket for Outdoor Unit
- Power Adapter for Main Unit
- Cable Ties and Clamps
- User Manual (this document)

Figure 3.1: All components included with the weather station, showing the main display unit, the outdoor sensor, power adapter, and mounting accessories.
3.2 Outdoor Sensor Assembly and Placement
Assemble the outdoor sensor unit according to the diagrams. Ensure the wind vane and anemometer rotate freely. The rain gauge should be clear of obstructions.
- Attach the wind vane and anemometer to the main sensor body.
- Mount the assembled sensor unit in an open area, away from buildings, trees, and other obstructions that could affect wind or rain measurements.
- Ensure the sensor is level for accurate rain measurement. Use the included mounting pole/bracket and secure it firmly.
- The outdoor unit is weather-resistant, but avoid direct exposure to extreme conditions if possible.

Figure 3.2: Detailed view of the outdoor sensor unit, indicating the rain funnel for precipitation measurement, the sensitive wind direction sensor, the wind speed sensor (anemometer), and the solar cell for autonomous operation.
The outdoor unit requires 3 AAA batteries (not included). Insert them into the battery compartment, observing polarity.
3.3 Main Display Unit Setup
- Place the main display unit indoors, away from direct sunlight and heat sources.
- Connect the power adapter to the main unit and plug it into a power outlet.
- The display will light up, and the unit will begin searching for the outdoor sensor and DCF signal.
- Allow a few minutes for the main unit to establish connection with the outdoor sensor. Once connected, outdoor data will appear on the display.

Figure 3.3: The main display unit showing various weather parameters including time, indoor/outdoor temperature and humidity, atmospheric pressure, wind direction and speed, and rainfall. The display also indicates WiFi connectivity.
3.4 WiFi Configuration
To utilize the smartphone application features, the weather station needs to be connected to your home WiFi network.
- Download the recommended smartphone application (e.g., WS Tool, Ambient Weather) from your device's app store (Android, iOS).
- Follow the in-app instructions to connect your weather station to your WiFi network. This typically involves putting the station into a pairing mode and entering your WiFi credentials.
- Ensure your WiFi network is 2.4 GHz, as 5 GHz networks are not supported by this device.
- Once connected, you can view real-time weather data and historical graphs on your smartphone.
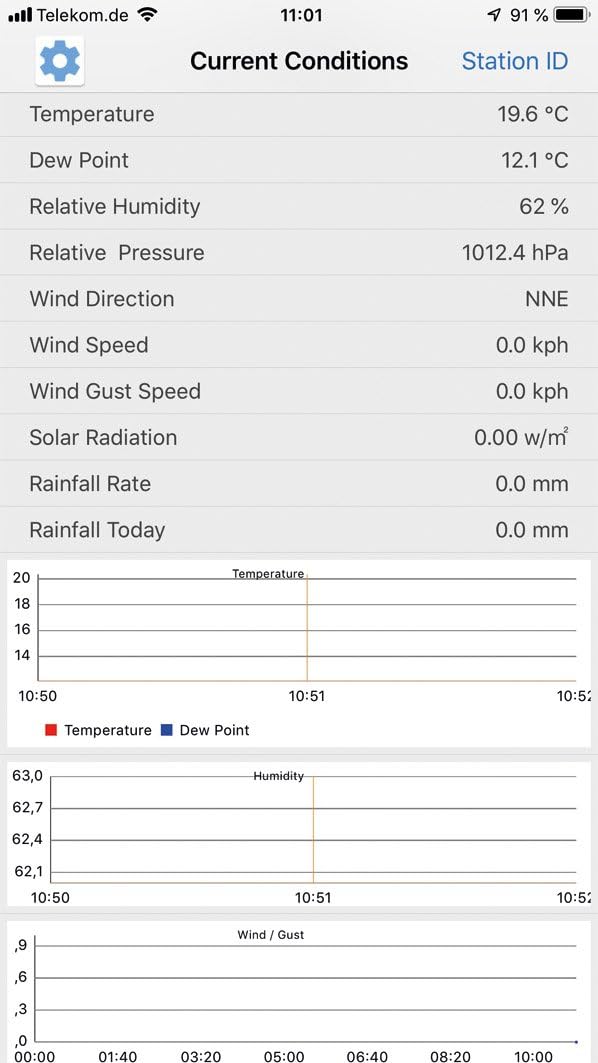
Figure 3.4: A smartphone application interface showing current weather conditions such as temperature, dew point, humidity, pressure, wind direction, wind speed, solar radiation, and rainfall rate. It also displays historical graphs for temperature, humidity, and wind/gust data over time.
4. Operating Instructions
4.1 Display Overview
The main display unit provides a comprehensive overview of current and historical weather data. The color display is divided into several sections:
- Time and Date: Located at the top left, synchronized via DCF radio signal.
- Indoor Temperature & Humidity: Top right section.
- Outdoor Temperature & Humidity: Middle right section.
- Atmospheric Pressure: Middle left section, with historical graph.
- Wind Data: Center section, showing speed, direction, and daily max.
- Rainfall: Bottom right section, showing current and monthly precipitation.
- UV Index & Light: Bottom left section (if applicable).
- Weather Forecast Icons: Top center, indicating sunny, cloudy, rainy, windy, or snowy conditions.

Figure 4.1: The vibrant color display of the weather station, clearly showing the layout of information including time, indoor and outdoor temperature and humidity, atmospheric pressure, wind data, and rainfall. Weather forecast icons are also visible.
4.2 Button Functions
The display unit features several touch-sensitive buttons for navigation and settings:
- SET: Enter settings mode, confirm selections.
- TEMP: Switch between temperature units (°C/°F), view min/max temperature records.
- RAIN: View different rainfall statistics (e.g., hourly, daily, weekly, monthly).
- WIND: Switch between wind speed units (km/h, mph, m/s), view wind gust records.
- PRESSURE: Switch between pressure units (hPa, inHg, mmHg), view historical pressure data.
- ALARM: Set time or weather alarms.
- MAX/MIN: Toggle between maximum and minimum recorded values for various parameters.
- LIGHT/SNOOZE: Adjust backlight brightness, activate snooze for alarms.
4.3 Data Logging and App Integration
The station continuously logs weather data. When connected to WiFi, this data is uploaded to cloud services (e.g., Weather Underground, Weathercloud.net) and can be accessed via the smartphone application.
- Open the installed weather station app on your smartphone.
- Ensure the station is online and connected to WiFi.
- Navigate through the app to view current conditions, historical graphs, and set alerts.
- Some apps allow sharing your weather data with a global network of personal weather stations.
5. Maintenance
Regular maintenance ensures accurate readings and extends the lifespan of your weather station.
- Outdoor Sensor Cleaning: Periodically clean the rain gauge funnel to remove leaves, debris, or insects that could obstruct water flow. Wipe down the wind vane and anemometer to ensure free rotation.
- Battery Replacement: Replace the outdoor sensor batteries (3 x AAA) annually or when the low battery indicator appears on the main display. Use high-quality alkaline batteries.
- Main Unit Cleaning: Wipe the display unit with a soft, dry cloth. Do not use abrasive cleaners or solvents.
- Firmware Updates: Check the manufacturer's website or the smartphone app for any available firmware updates for the weather station to ensure optimal performance and new features.
6. Troubleshooting
| Problem | Possible Cause | Solution |
|---|---|---|
| No outdoor data displayed. | Outdoor sensor not powered or out of range. Interference. | Check outdoor sensor batteries. Ensure sensor is within 50m (164 ft) of main unit. Reduce obstacles between units. Re-pair sensor if necessary (refer to specific pairing instructions in full manual). |
| Incorrect time/date. | DCF signal not received. | Ensure main unit is placed away from electronic interference. Allow time for signal reception (can take several hours). Manually set time if DCF signal is consistently weak. |
| WiFi connection issues. | Incorrect WiFi password. 5GHz network used. Router too far. | Double-check WiFi password. Ensure you are connecting to a 2.4 GHz network. Move station closer to router. Restart router and weather station. |
| Inaccurate rain readings. | Rain gauge obstructed or not level. | Clear any debris from the rain gauge funnel. Ensure the outdoor sensor is mounted perfectly level. |
| Wind data not updating. | Anemometer/wind vane obstructed or stuck. | Check for physical obstructions (e.g., spiderwebs, leaves) preventing rotation. Gently clean and ensure free movement. |
7. Specifications
- Model: CTW-902 WiFi (22515)
- Brand: ChiliTec
- Main Unit Dimensions: Approximately 20 x 15 x 3 cm (7.9 x 5.9 x 1.2 inches)
- Display: Color LCD, 157mm x 76mm
- Connectivity: Wi-Fi (2.4 GHz only), 433 MHz RF for outdoor sensor
- Outdoor Sensor Range: Up to 50 meters (164 feet) in open field
- Power Source: Main Unit: AC Adapter; Outdoor Sensor: 3 x AAA batteries (not included)
- Temperature Range: Indoor: 0°C to +50°C (32°F to 122°F); Outdoor: -40°C to +60°C (-40°F to 140°F)
- Humidity Range: 10% to 99% RH
- Wind Speed Range: 0 to 50 m/s (0 to 112 mph)
- Rainfall Display: 0 to 9999 mm (0 to 393.6 inches)
- Special Features: DCF Radio Clock, Min/Max Memory, Weather Forecast, App Integration
8. Warranty and Support
ChiliTec products are designed for reliability and performance. For warranty information, please refer to the documentation included with your purchase or visit the official ChiliTec website. Standard warranty terms typically cover manufacturing defects for a specified period from the date of purchase.
For technical support, troubleshooting assistance beyond this manual, or spare parts, please contact ChiliTec customer service. Contact details can usually be found on the product packaging or the official brand website.
Manufacturer: ChiliTec GmbH
