
Important Safety Information
Please read and understand all instructions before beginning installation. Failure to do so may result in electric shock, fire, or other injuries that could be fatal or cause property damage.
- WARNING: To avoid electric shock, ensure power is turned off at the circuit breaker or fuse box before installation.
- All electrical connections must be in accordance with local codes and ordinances, National Electric Code (NEC), and ANSI/NFPA 70-1999.
- Consult a qualified electrician if you are unsure about wiring procedures.
- This fixture is ETL LISTED for safety, ensuring it meets recognized safety standards.
- Do not exceed the maximum wattage specified for the bulbs.
- This product is designed for indoor use only.
What's Included
Carefully unpack the fixture and check that all parts are included. If any parts are missing or damaged, do not attempt to assemble or install the product.
- Chandelier Frame
- Glass Shades (5 pieces)
- Mounting Hardware (Canopy, Chain, Mounting Plate, Screws, Wire Nuts)

Image: Overview of the VINLUZ 5-Light Brushed Nickel Chandelier and its main components.
Specifications
| Brand | VINLUZ |
| Model Number | 355-5-13 |
| Color | Brushed Nickel |
| Material | Metal, Iron |
| Dimensions (L x W x H) | 24"L x 24"W x 90"H (Maximum) |
| Item Weight | 12 Pounds |
| Number of Lights | 5 |
| Bulb Base | E26 |
| Max Wattage per Bulb | 60 Watts |
| Voltage | 120 Volts |
| Dimmable | Yes (with compatible dimmer switch and dimmable bulbs) |
| Installation Type | Hardwired, Ceiling Mount (Hanging) |
| Indoor/Outdoor Usage | Indoor Only |
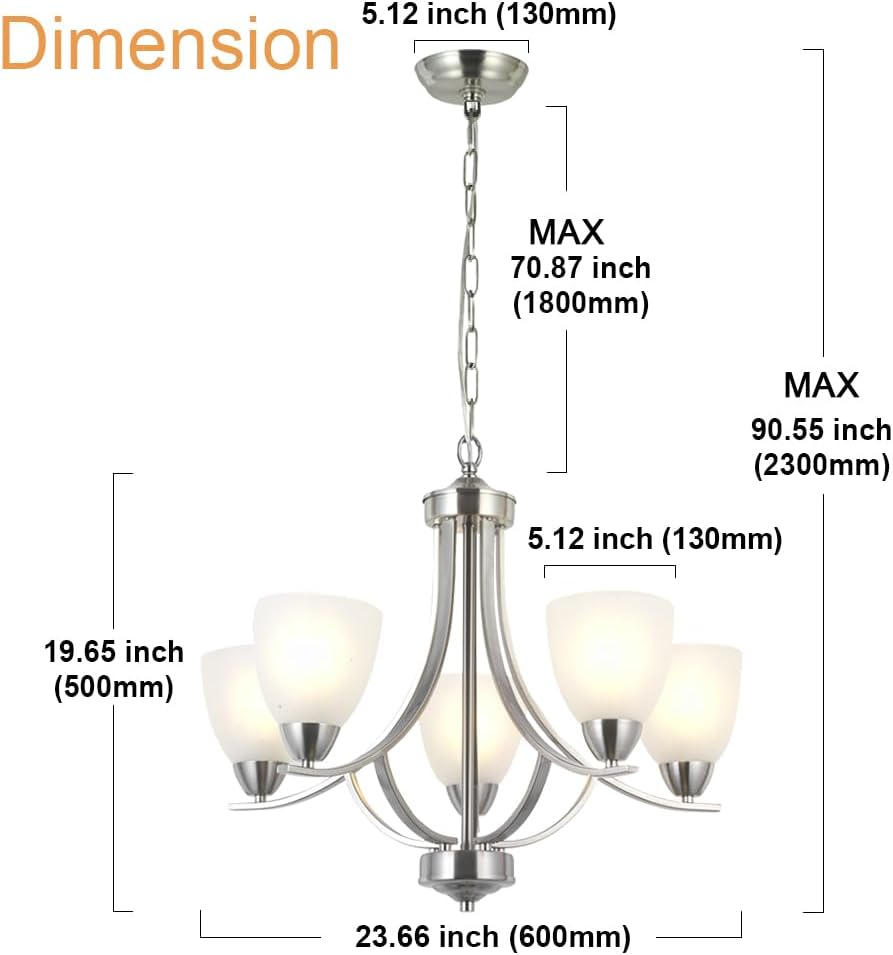
Image: Detailed dimensions of the chandelier, including maximum height and width.

Image: Close-up of the E26 bulb base, indicating compatibility.
Setup and Installation
Professional installation is recommended. If you are not familiar with electrical wiring, consult a qualified electrician.
- Turn Off Power: Before starting any electrical work, ensure the power supply to the junction box is turned off at the circuit breaker or fuse box.
- Prepare Mounting Plate: Attach the mounting plate to the junction box in the ceiling using the provided screws. Ensure it is securely fastened.
- Adjust Chain Length: Determine the desired hanging height for your chandelier. The chain is adjustable up to 70.87 inches (1800mm). Use pliers to open and remove excess chain links if necessary.
- Wire Connections:
- Connect the bare copper ground wire from the fixture to the ground wire from the junction box (usually green or bare copper). Secure with a wire nut.
- Connect the white wire from the fixture to the white (neutral) wire from the junction box. Secure with a wire nut.
- Connect the black wire from the fixture to the black (hot) wire from the junction box. Secure with a wire nut.
- Ensure all wire nuts are tightly secured and no bare wire is exposed.
- Mount Canopy: Carefully push the wired mounting plate and wires into the junction box. Secure the canopy to the mounting plate using the provided screws.
- Install Glass Shades: Gently attach each of the five glass shades to the fixture arms. Ensure they are seated properly and securely.
- Install Bulbs: Screw in five E26 base bulbs (not included) into the sockets. Do not exceed 60 watts per bulb. Compatible with incandescent, CFL, or LED bulbs.
- Restore Power: Once installation is complete, turn the power back on at the circuit breaker.


Images: Illustrations showing adjustable height and compatibility with flat or sloped ceilings.
Operating Instructions
This chandelier operates like a standard light fixture. Ensure it is properly installed and wired before use.
- Power On/Off: Use your wall switch to turn the chandelier on or off.
- Dimming Function: If you have installed dimmable E26 bulbs and a compatible dimmer switch (not included), you can adjust the light intensity by operating the dimmer switch.

Image: Visual guide for recommended E26 bulb types (Incandescent, CFL, LED).
Maintenance
Regular maintenance will help preserve the appearance and functionality of your chandelier.
- Cleaning: Always turn off the power before cleaning. Use a soft, dry cloth to wipe the fixture. Do not use abrasive cleaners or solvents, as they may damage the finish.
- Bulb Replacement: Ensure the power is off and bulbs have cooled before replacing. Unscrew the old bulb and screw in a new E26 base bulb, not exceeding 60 watts.
- Glass Shade Care: The glass shades can be carefully removed and washed with mild soap and water, then thoroughly dried before reattaching.
Troubleshooting
If you encounter issues with your chandelier, refer to the following common problems and solutions:
| Problem | Possible Cause | Solution |
|---|---|---|
| Light does not turn on. |
|
|
| Flickering light. |
|
|
| Glass shade is broken. | Accidental damage. | Contact VINLUZ customer support for a replacement. |
Warranty and Customer Support
VINLUZ is committed to providing high-quality products and customer satisfaction.
- Glass Shade Replacement: VINLUZ offers free glass shade replacement if your glass shade is broken.
- Contact Support: For any quality issues, skill problems, or to request replacement parts, please contact the manufacturer directly. You can typically find contact information on the seller's page or through your purchase platform.
For assistance, refer to the seller "LightingPlus" on your purchase platform and use the "Ask a question" feature to contact the original manufacturer quickly.