
Highwild Universal Game Feeder Digital Timer (B07CV676VH)
Highwild 6V/12V Universal Game Feeder Digital Timer User Manual
Model: Universal Game Feeder Digital Timer (B07CV676VH)
Product Overview
The Highwild 6V/12V Universal Game Feeder Digital Timer is designed to provide precise and customizable feeding schedules for wildlife feeders. This versatile timer is compatible with both 6-volt and 12-volt control units, making it a flexible addition to various feeder setups. Its intuitive visual interface simplifies programming, allowing users to easily manage feeding times and rates.
Key Features
- Versatile Compatibility: Compatible with 6 or 12 volt control units.
- Customizable Feeding: Up to 8 different feed times a day, with adjustable feed rates from 1 to 30 seconds.
- Visual Interface: Intuitive display for easy timer setup and operation.
- Easy Setup and Operation: User-friendly programming for effortless scheduling.
- Precise Time Control: Ensures accurate feeding schedules, with memory to preserve user settings.

Figure 1: Highwild 6V/12V Universal Game Feeder Digital Timer. This image shows the main unit with its digital display and control buttons, along with the attached wiring for battery and motor connections.
Setup and Installation
Proper setup ensures optimal performance and longevity of your Highwild Digital Timer. Follow these steps carefully.
1. Power Source Connection
The timer is designed to operate with either a 6-volt or 12-volt battery. Ensure your battery is fully charged before connection.
- Connect the red wire from the timer to the positive (+) terminal of your 6V or 12V battery.
- Connect the black wire from the timer to the negative (-) terminal of your 6V or 12V battery.
- Ensure the connections are secure to prevent power interruptions.
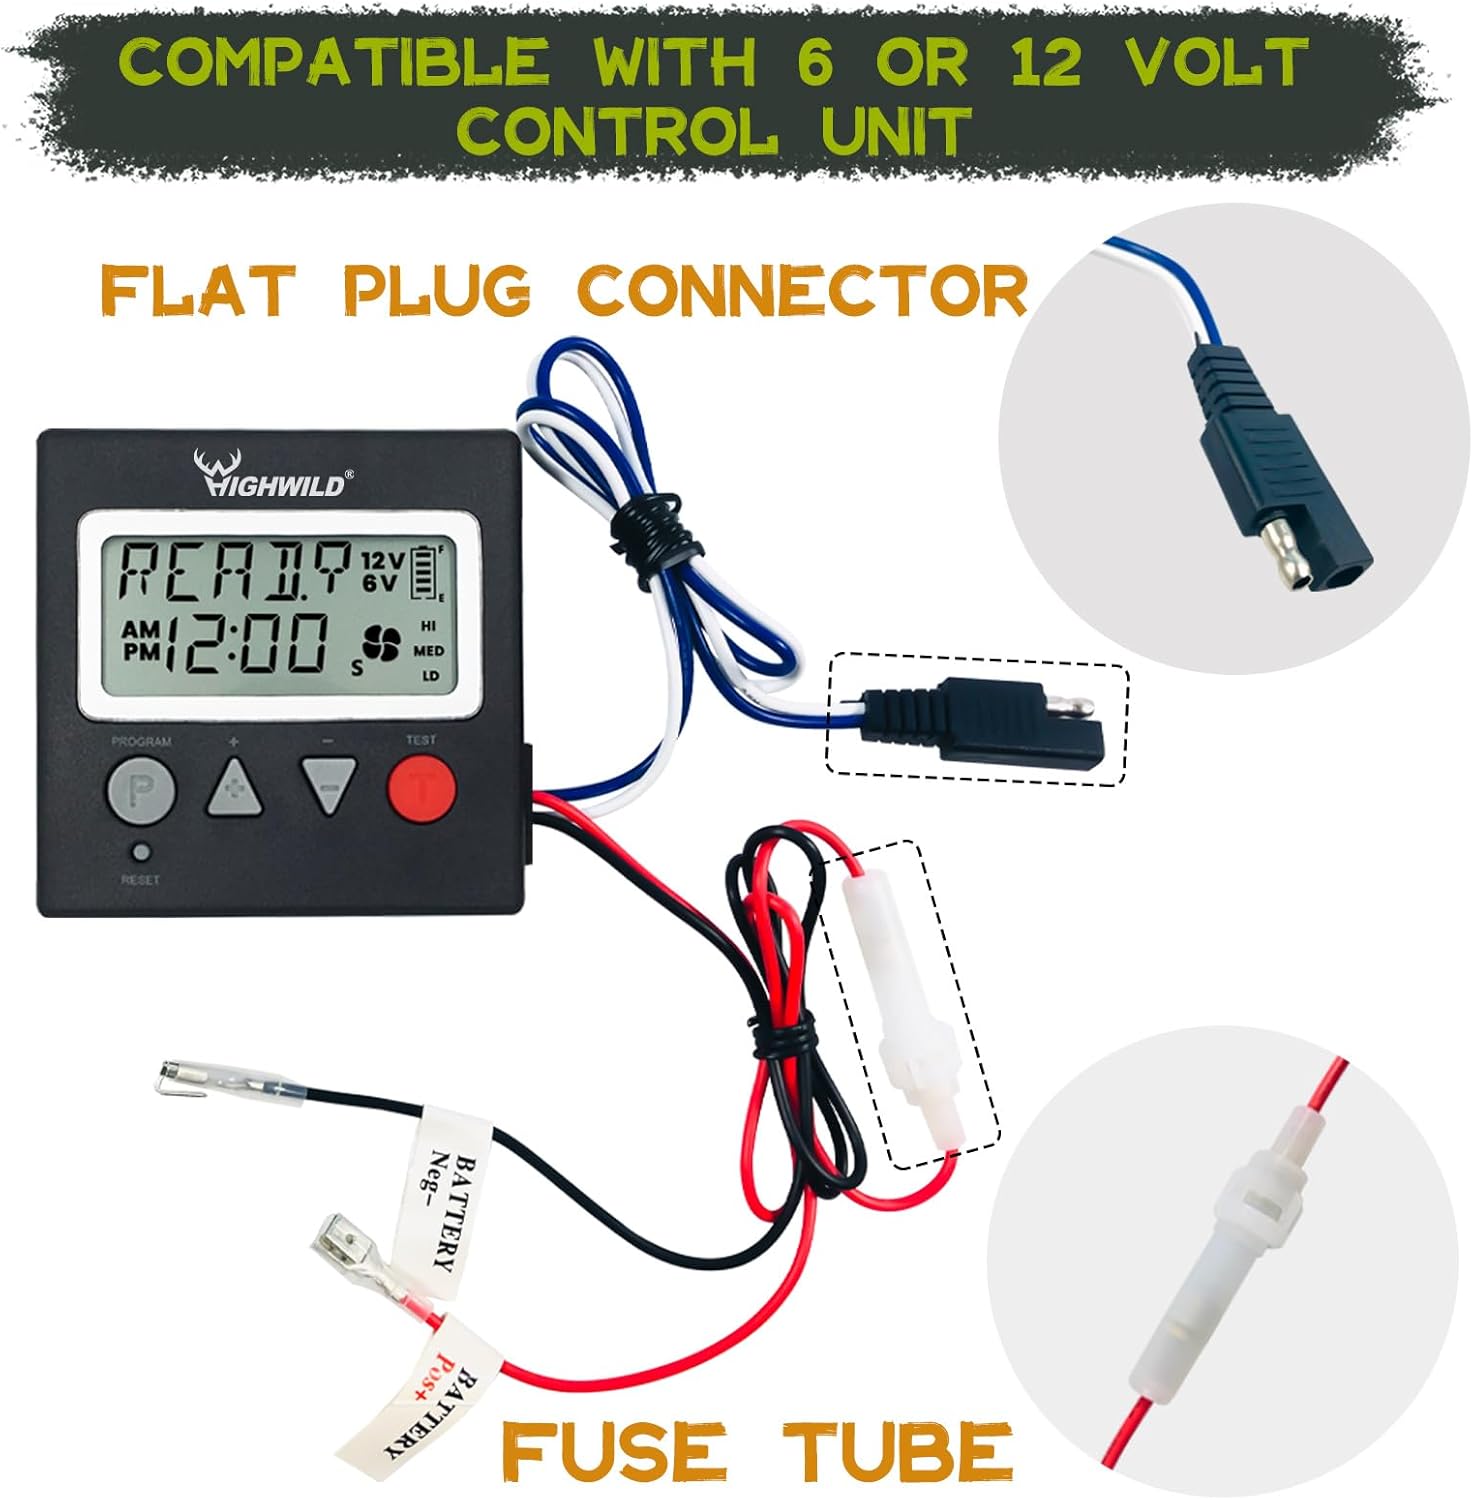
Figure 2: Timer wiring and fuse tube. This image illustrates the flat plug connector for the motor and the fuse tube on the battery positive wire, highlighting the compatibility with 6V or 12V control units.
2. Motor Connection
Connect the timer to your feeder's motor using the provided flat plug connector.
- Locate the motor connection port on your feeder unit.
- Insert the flat plug connector from the timer into the motor's corresponding port.
- Verify the connection is firm.

Figure 3: Example of a feeder motor. The timer connects to this component to control the feed dispensing mechanism.
3. Mounting the Timer
The timer is designed for pole mount installation. Ensure it is securely attached and protected from direct weather exposure.
- Attach the timer to a suitable pole or mounting surface on your feeder.
- Position the timer to allow easy access to the display and buttons for programming.
- Consider using a protective enclosure or positioning the timer under a cover to shield it from rain and direct sunlight, as recommended for longevity.

Figure 4: Digital timer installed on a game feeder. This image shows the timer unit integrated into a typical feeder setup, demonstrating its compact size and how it connects to the main feeder mechanism.
Operating Instructions
The Highwild Digital Timer features an intuitive interface for easy programming of feeding schedules.
1. Setting Current Time
- Press the PROGRAM (P) button to enter time setting mode.
- Use the + and - buttons to adjust the hour.
- Press PROGRAM (P) again to move to minutes, then adjust with + and -.
- Continue pressing PROGRAM (P) to cycle through AM/PM and save the current time.
2. Programming Feed Times
The timer supports up to 8 distinct feed times per day. Each feed time can have an adjustable duration from 1 to 30 seconds.
- From the main screen, press PROGRAM (P) repeatedly until you see "FEED 1" on the display.
- Use + and - to set the desired start time for FEED 1 (hour and minutes).
- Press PROGRAM (P) to move to the feed duration setting (seconds). Adjust with + and - (1-30 seconds).
- Repeat for FEED 2 through FEED 8 as needed. If a feed time is not set, it will be skipped.
- After setting all desired feed times, continue pressing PROGRAM (P) until the display returns to the main clock screen.
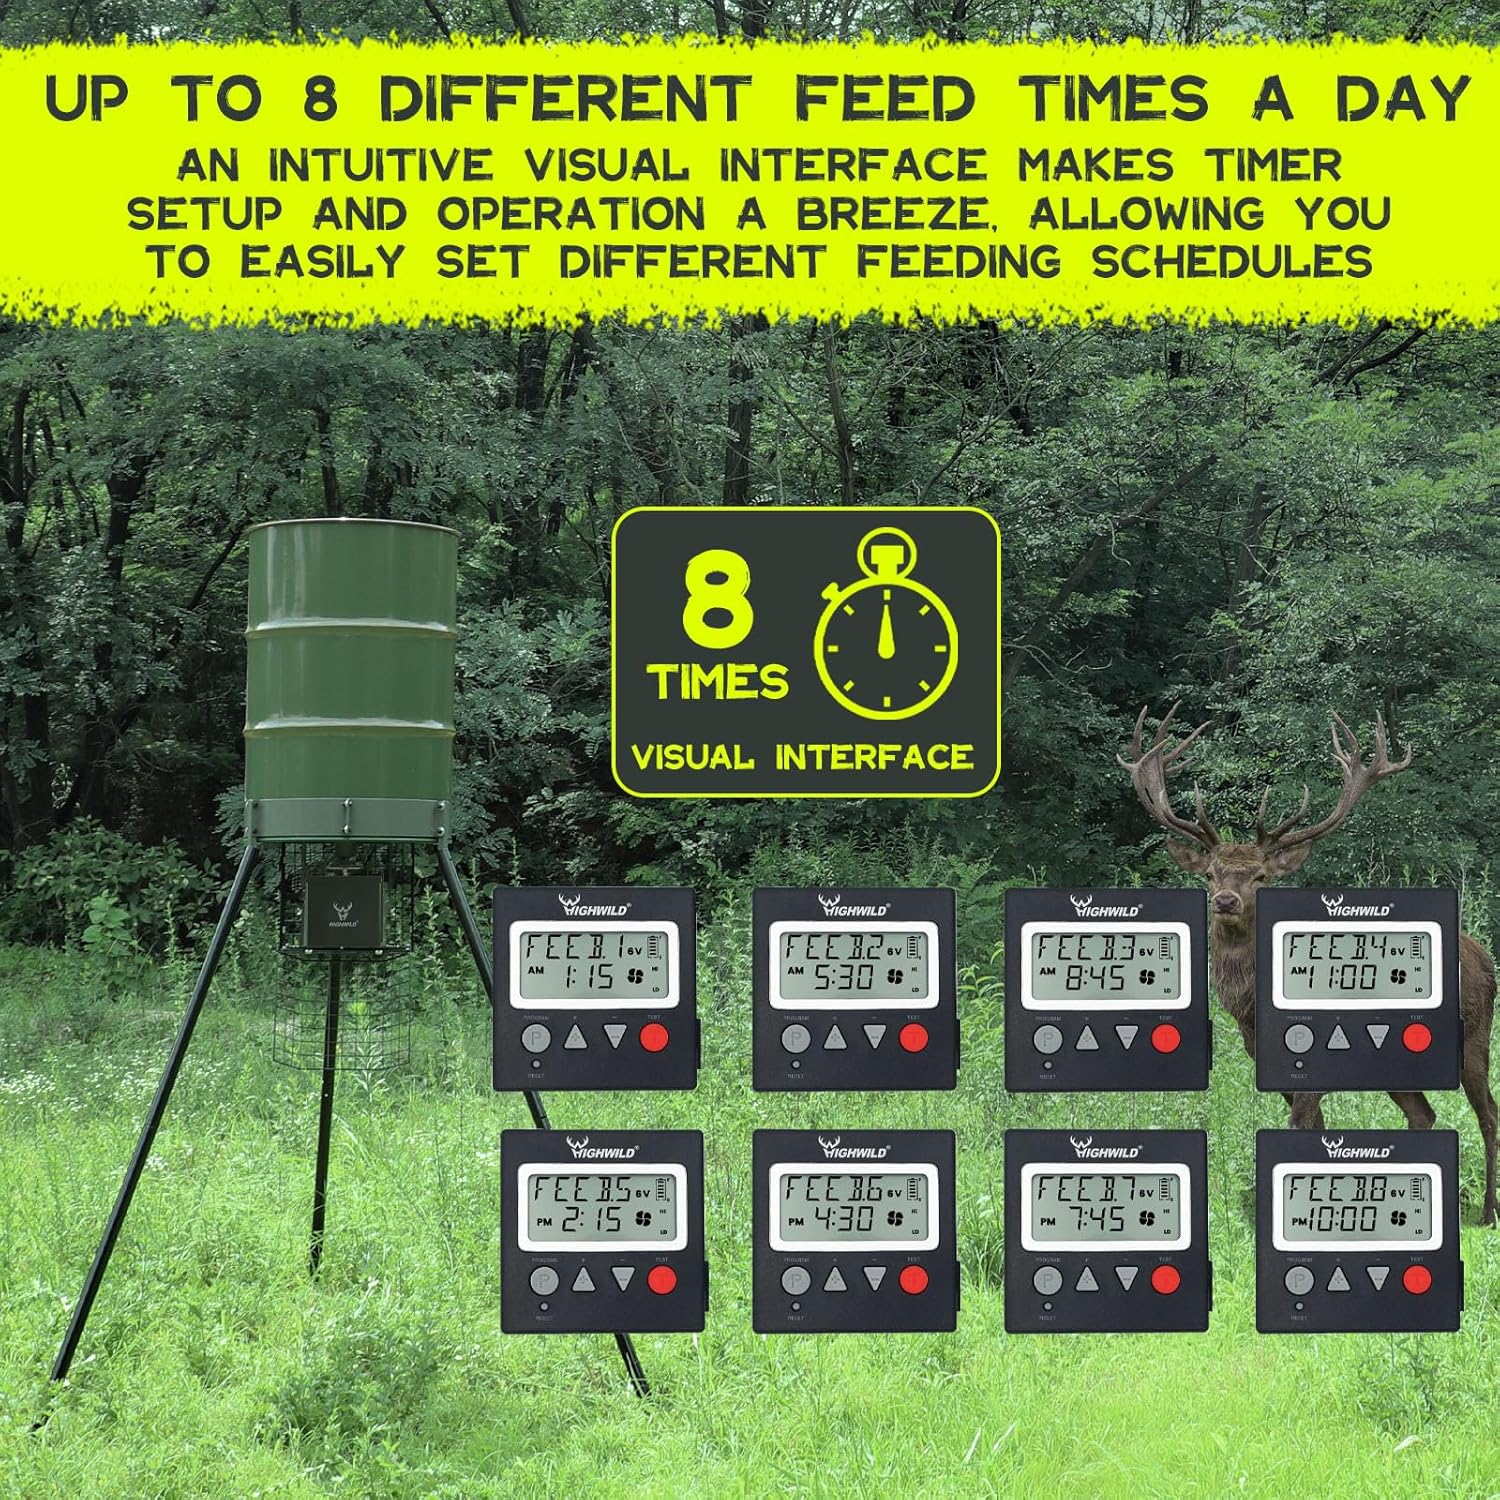
Figure 5: Example of multiple programmed feed times. This image visually demonstrates the timer's capability to store and display up to 8 distinct feeding schedules throughout the day.
3. Test Function
To manually test the feeder motor, press the TEST (T) button. The motor will run for a short duration (typically 3-5 seconds) to confirm functionality. Release the button to stop the test.
4. Reset Function
To reset the timer to factory default settings, locate the small RESET button (often recessed) and press it gently with a pointed object (e.g., a paperclip). This will clear all programmed settings and reset the clock.
Maintenance
Regular maintenance helps ensure the reliable operation and extends the lifespan of your Highwild Digital Timer.
- Battery Check: Periodically check the battery voltage to ensure it is adequately charged. A low battery can affect timer accuracy and motor performance.
- Environmental Protection: While durable, it is recommended to protect the timer from extreme weather conditions (heavy rain, direct prolonged sunlight, freezing temperatures) by placing it in a sheltered location or using a protective cover.
- Cleaning: Keep the display and buttons clean from dirt, dust, and debris. Use a soft, dry cloth for cleaning. Avoid abrasive cleaners or solvents.
- Fuse Inspection: The timer includes a fuse tube on the positive battery wire. If the timer or motor stops functioning unexpectedly, check this fuse and replace it if blown (ensure to use a fuse of the correct amperage).
- Connection Integrity: Periodically inspect all wire connections for corrosion or looseness. Clean and tighten as necessary.
Troubleshooting
If you encounter issues with your Highwild Digital Timer, refer to the following common problems and solutions.
| Problem | Possible Cause | Solution |
|---|---|---|
| Timer display is blank or dim. | Low or dead battery; incorrect battery connection. | Check battery charge. Ensure red wire is connected to positive (+) and black wire to negative (-). Recharge or replace battery. |
| Motor does not spin during programmed feed times or test. | Low battery; loose motor connection; blown fuse; faulty motor. | Verify battery charge. Check motor wire connection. Inspect and replace fuse if necessary. Test motor directly if possible. |
| Motor spins continuously or does not stop. | Timer malfunction; wiring short. | Press the RESET button. Check all wiring for shorts or damage. If problem persists, contact support. |
| Feed times are not accurate or inconsistent. | Incorrect time setting; programming error; low battery. | Re-set the current time. Re-program feed schedules carefully. Ensure battery is fully charged. |
Specifications
| Attribute | Detail |
|---|---|
| Brand | Highwild |
| Model | Universal Game Feeder Digital Timer |
| Compatibility | 6V or 12V control unit |
| Feed Times | Up to 8 per day |
| Feed Rate Adjustment | 1 to 30 seconds |
| Power Source | Battery Powered |
| Material | Plastic |
| Mounting Type | Pole Mount |
| Item Weight | 191 Grams (6.7 ounces) |
| Package Dimensions | 5.35 x 4.57 x 1.65 inches |
| UPC | 759981102301 |
Warranty and Support
For specific warranty information regarding your Highwild 6V/12V Universal Game Feeder Digital Timer, please refer to the documentation included with your purchase or visit the official Highwild website. Warranty terms typically cover manufacturing defects for a specified period from the date of purchase.
If you require technical assistance, have questions about product functionality, or need to report an issue, please contact Highwild customer support directly. Contact details can usually be found on the product packaging, the official Highwild website, or through your retailer.
For more information, you may visit the Highwild Store on Amazon.
Ask a question about this manual
Ask about setup, troubleshooting, compatibility, parts, safety, or missing instructions. Manuals+ will review the question and use this page’s manual context to help answer it.