
1. Introduction
Thank you for purchasing the Samson CR288 Wireless Receiver. This manual provides detailed instructions for the setup, operation, and maintenance of your CR288 receiver. To ensure optimal performance and safe operation, please read this manual thoroughly before use and retain it for future reference.
2. Safety Information
- Power Source: Only use the supplied 110V AC adapter. Ensure the voltage matches the requirements of your region.
- Ventilation: Do not block any ventilation openings. Install in accordance with the manufacturer's instructions.
- Water and Moisture: Do not expose this apparatus to rain or moisture. Do not place objects filled with liquids, such as vases, on the apparatus.
- Heat: Do not install near any heat sources such as radiators, heat registers, stoves, or other apparatus (including amplifiers) that produce heat.
- Servicing: Do not attempt to service this product yourself. Refer all servicing to qualified service personnel. Servicing is required when the apparatus has been damaged in any way, such as power-supply cord or plug is damaged, liquid has been spilled or objects have fallen into the apparatus, the apparatus has been exposed to rain or moisture, does not operate normally, or has been dropped.
3. Product Overview
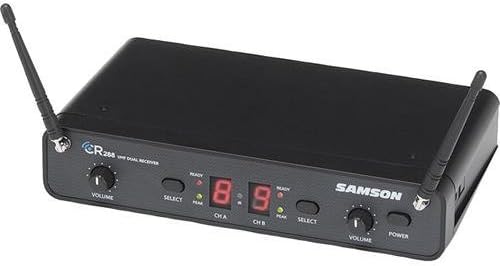
The Samson CR288 Wireless Receiver features dual antennas for reliable signal reception, two independent volume control knobs for Channel A and Channel B, and clear digital displays for channel indication. It also includes 'SELECT' buttons for frequency adjustment and 'READY' and 'PEAK' LED indicators to monitor signal status.
Front Panel Features:
- Antennas: For receiving wireless signals.
- Volume Knobs: Independent control for Channel A and Channel B audio output levels.
- SELECT Buttons: Used to change the operating frequency for each channel.
- Digital Displays: Show the current operating channel number.
- READY Indicators: Green LEDs illuminate when a strong RF signal is received.
- PEAK Indicators: Red LEDs illuminate when the audio signal is clipping or too high.
- POWER Button: Turns the receiver on or off.
4. Setup
4.1. Connections
- Antenna Connection: Screw the two included antennas onto the antenna connectors on the rear panel of the CR288 receiver. Position them vertically for optimal reception.
- Audio Output: Connect the audio output of the CR288 receiver to the input of your mixer, amplifier, or powered speakers using appropriate cables. The receiver features RCA and 3.5mm Jack connector types.
- Power Connection: Connect the supplied 110V AC adapter to the DC input jack on the rear of the CR288 receiver, then plug the adapter into a suitable AC power outlet.
4.2. Powering On
Press the POWER button located on the front panel of the receiver. The digital displays will illuminate, indicating the unit is powered on.
5. Operating
5.1. Channel Selection
To select the operating channel for Channel A or Channel B, press the corresponding SELECT button. Each press will cycle through the available frequencies within the Group I (518-566 MHz) band. Ensure your wireless microphone transmitters are set to the same frequency as the receiver channels.
5.2. Volume Control
Adjust the individual VOLUME knobs for Channel A and Channel B to set the desired audio output level. Start with the volume low and gradually increase it to prevent sudden loud sounds.
5.3. Indicators
- READY LED (Green): This LED will light up when the receiver is successfully receiving a signal from its paired transmitter. If this LED is off, check the transmitter's power and frequency.
- PEAK LED (Red): This LED indicates that the audio signal from the transmitter is too strong and may be causing distortion. If the PEAK LED illuminates frequently, reduce the input gain on your transmitter or the volume on the receiver.
6. Maintenance
To ensure the longevity and proper functioning of your CR288 receiver:
- Clean the unit with a soft, dry cloth. Do not use abrasive cleaners or solvents.
- Keep the unit away from excessive dust, dirt, and moisture.
- Store the receiver in a cool, dry place when not in use.
7. Troubleshooting
| Problem | Possible Cause | Solution |
|---|---|---|
| No sound from receiver. | Receiver not powered on; Transmitter off or out of range; Incorrect frequency; Volume too low. | Ensure receiver is powered on; Check transmitter power and proximity; Verify receiver and transmitter frequencies match; Increase receiver volume. |
| Poor reception or dropouts. | Interference; Antennas not positioned correctly; Transmitter too far or low battery. | Change operating frequency; Reposition antennas; Move transmitter closer to receiver; Replace transmitter batteries. |
| Distorted audio. | PEAK LED constantly on; Input signal too high. | Reduce the gain on the transmitter or lower the volume on the receiver. |
8. Specifications
| Feature | Detail |
|---|---|
| Brand | Samson |
| Model Number | CR288 Receiver |
| Item Weight | 3.55 pounds |
| ASIN | B07CTZQ6MV |
| Date First Available | May 1, 2018 |
| Manufacturer | Samson |
| Connectivity Technology | HDMI, USB, optical audio |
| Controller Type | Push Button |
| Special Feature | Multiroom |
| Compatible Devices | Smartphone, Speaker |
| Total HDMI Ports | 1 |
| Connector Type | RCA, 3.5mm Jack |
| Audio Output Mode | Stereo, Surround |
| Surround Sound Channel Configuration | 5.1 |
| Color | Black |
9. Warranty and Support
For warranty information and technical support, please refer to the warranty card included with your product or visit the official Samson website. You can also visit the Samson Store on Amazon for additional product information and customer service contacts.