1. Safety Information
Always observe basic safety precautions to reduce the risk of fire, electric shock, and personal injury when using this power tool.
1.1 General Power Tool Safety Warnings
- Work Area Safety: Keep the work area clean and well-lit. Cluttered or dark areas invite accidents. Do not operate power tools in explosive atmospheres, such as in the presence of flammable liquids, gases, or dust.
- Electrical Safety: Power tool plugs must match the outlet. Never modify the plug in any way. Do not use any adapter plugs with earthed (grounded) power tools. Avoid body contact with earthed or grounded surfaces such as pipes, radiators, ranges, and refrigerators.
- Personal Safety: Always wear eye protection. Use appropriate personal protective equipment such as dust masks, non-skid safety shoes, hard hats, or hearing protection when necessary. Stay alert, watch what you are doing, and use common sense when operating a power tool.
1.2 Specific Demolition Hammer Safety
- Secure Workpiece: Always ensure the material being worked on is stable and properly supported.
- Avoid Hidden Obstacles: Before starting work, check for hidden electrical wires, gas pipes, or water pipes in the work area.
- Proper Grip: Maintain a firm grip on the tool with both hands. The tool can generate significant torque.
- Vibration: Prolonged use can cause vibration-related injuries. Take regular breaks and use anti-vibration gloves if available.
2. Product Overview
The Ingco PDB17008 Demolition Hammer is a powerful tool designed for heavy-duty demolition tasks. It features a robust design and delivers significant impact energy for efficient material removal.
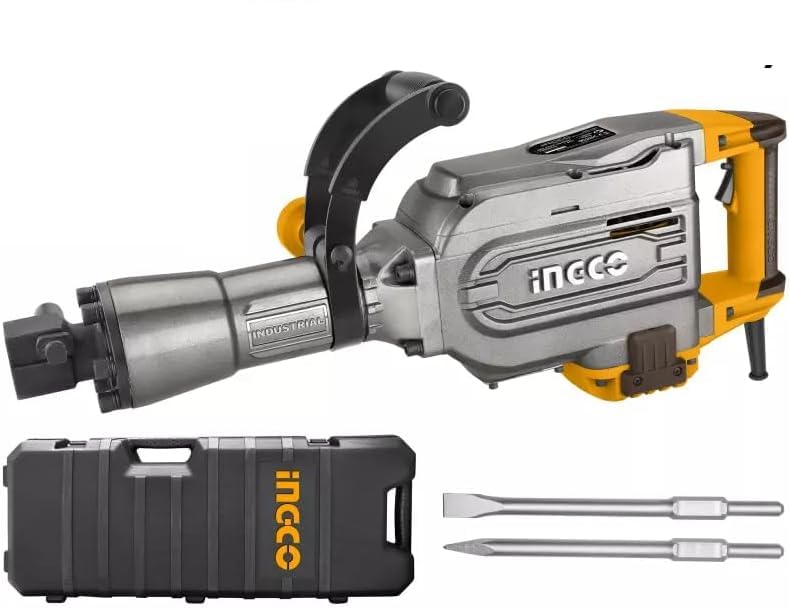
Image: The Ingco PDB17008 Demolition Hammer, shown in its black carrying case with red latches. The hammer itself is red and black, equipped with a pointed chisel.
Key Features:
- Impact Energy: 50 Joules
- Power Input: 1700 Watts
- Impact Rate: 1400 bpm (blows per minute)
- Robust design for durability
Included Components:
- 1 x Ingco PDB17008 Demolition Hammer
- 2 x Chisels
- 1 x Carrying Case
3. Setup
3.1 Unpacking
- Carefully remove the demolition hammer and all accessories from the carrying case.
- Inspect the tool and accessories for any damage that may have occurred during transit. Do not operate the tool if any damage is observed.
- Retain the packaging for future storage or transport.
3.2 Chisel Installation
- Ensure the tool is unplugged from the power source before installing or removing chisels.
- Clean the shank of the chisel and apply a small amount of grease to prevent wear.
- Insert the chisel into the tool holder (chuck) until it clicks into place. Pull on the chisel to ensure it is securely locked.
- To remove, pull back the locking sleeve on the tool holder and pull out the chisel.
3.3 Handle Adjustment
The auxiliary handle can be adjusted to various positions for optimal control and comfort. Loosen the handle clamp, rotate the handle to the desired position, and securely tighten the clamp.
4. Operating Instructions
4.1 Power Connection
Connect the power cord to a suitable electrical outlet. Ensure the voltage and frequency of the power supply match the specifications of the tool.
4.2 Starting and Stopping the Tool
- To start the tool, press the ON/OFF switch.
- For continuous operation, engage the self-locking button (if present) after pressing the ON/OFF switch.
- To stop the tool, release the ON/OFF switch. If the self-locking button is engaged, press the ON/OFF switch again to release it.
4.3 Demolition Techniques
- Initial Impact: Place the chisel tip firmly against the material to be demolished before starting the tool.
- Controlled Pressure: Apply steady, firm pressure. Do not force the tool; its weight and impact action are designed to do the work.
- Angle of Attack: Experiment with different angles to find the most effective way to break up the material.
- Dust Management: Demolition generates significant dust. Use appropriate dust extraction methods and wear a dust mask.
5. Maintenance
Regular maintenance ensures the longevity and optimal performance of your demolition hammer.
5.1 Cleaning
- After each use, clean the tool thoroughly. Remove dust and debris from ventilation openings using compressed air.
- Wipe down the exterior with a damp cloth. Do not use harsh chemicals or abrasive cleaners.
5.2 Lubrication
The internal mechanism requires periodic lubrication. Refer to the tool's specific lubrication points, typically indicated by a cap or plug on the gearbox housing. Use only the recommended grease for demolition hammers.
5.3 Storage
Store the tool in its original carrying case in a dry, secure location, out of reach of children. Protect it from direct sunlight and extreme temperatures.
6. Troubleshooting
If you encounter issues with your demolition hammer, consult the following common troubleshooting steps:
- Tool does not start: Check the power connection, ensure the switch is fully engaged, and verify the power outlet is functional.
- Reduced impact power: Ensure the chisel is correctly inserted and locked. Check for excessive wear on the chisel. The tool may require lubrication or servicing if the issue persists.
- Excessive vibration or noise: Stop the tool immediately. Check for loose components or damaged chisels. If the issue continues, professional servicing may be required.
For problems not covered here, contact Ingco customer support or a qualified service technician.
7. Specifications
| Attribute | Value |
|---|---|
| Manufacturer | INGCO |
| Model Number | PDB17008 (CRHLI201681) |
| Power Input | 1700 Watts |
| Max Power | 1700 Watt |
| Impact Energy | 50 Joule |
| Impact Rate | 1400 bpm |
| Power Type | Corded |
| Voltage | 20 Volt (Note: For a 1700W corded tool, typical operating voltage is 230V AC. Please verify local power supply requirements.) |
| Amperage | 16 Ampere |
| Max Chuck Size | 16 Millimeters |
| Material | Metal |
| Color | Black and Yellow |
| Product Dimensions | 25 x 15 x 20 cm |
| Item Weight | 2 Kilograms (Note: This weight is unusually low for a 50 Joule demolition hammer. Please refer to the product packaging for accurate weight information.) |
| Special Features | Accessories included, Robust design |
8. Warranty and Support
For warranty information, technical support, or service inquiries, please refer to the warranty card included with your product or contact Ingco customer service directly. Keep your purchase receipt as proof of purchase.


