Introduction
This manual provides detailed instructions for the setup, operation, and maintenance of your Youshiko YK YC8025-B Radio Controlled Wall Clock. This clock is designed for precise timekeeping, automatically adjusting for seasonal changes and receiving time signals specific to the UK and Ireland (MSF).
The clock features a large LCD display showing time in 12/24 hour format, date, month, day of the week, indoor temperature (Celsius or Fahrenheit), and moon phase. It also includes an alarm with a snooze function.

Figure 1: Front view of the Youshiko YK YC8025-B Radio Controlled Wall Clock. The large LCD screen displays the current time, date, day of the week, indoor temperature, and moon phase.
Setup
1. Battery Installation
- Locate the battery compartment cover on the back of the clock.
- Remove the cover.
- Insert the required batteries (not included) according to the polarity markings (+ and -) inside the compartment.
- Replace the battery compartment cover.

Figure 2: Rear view of the clock, showing the battery compartment and control buttons (SET, ALARM, UP, DOWN, SNOOZE, WAVE).
2. Initial Signal Reception
After battery installation, the clock will automatically begin searching for the radio time signal. This clock is designed for the UK and Ireland (MSF signal).
- Place the clock near a window or in an open area to optimize signal reception.
- The signal reception icon (often a tower with waves) on the display will flash during the search.
- Once the signal is successfully received, the clock will automatically set the correct time, date, and day, and the signal icon will become solid. This process may take several minutes.
Note: For optimal signal reception, avoid placing the clock near electronic devices that may cause interference.
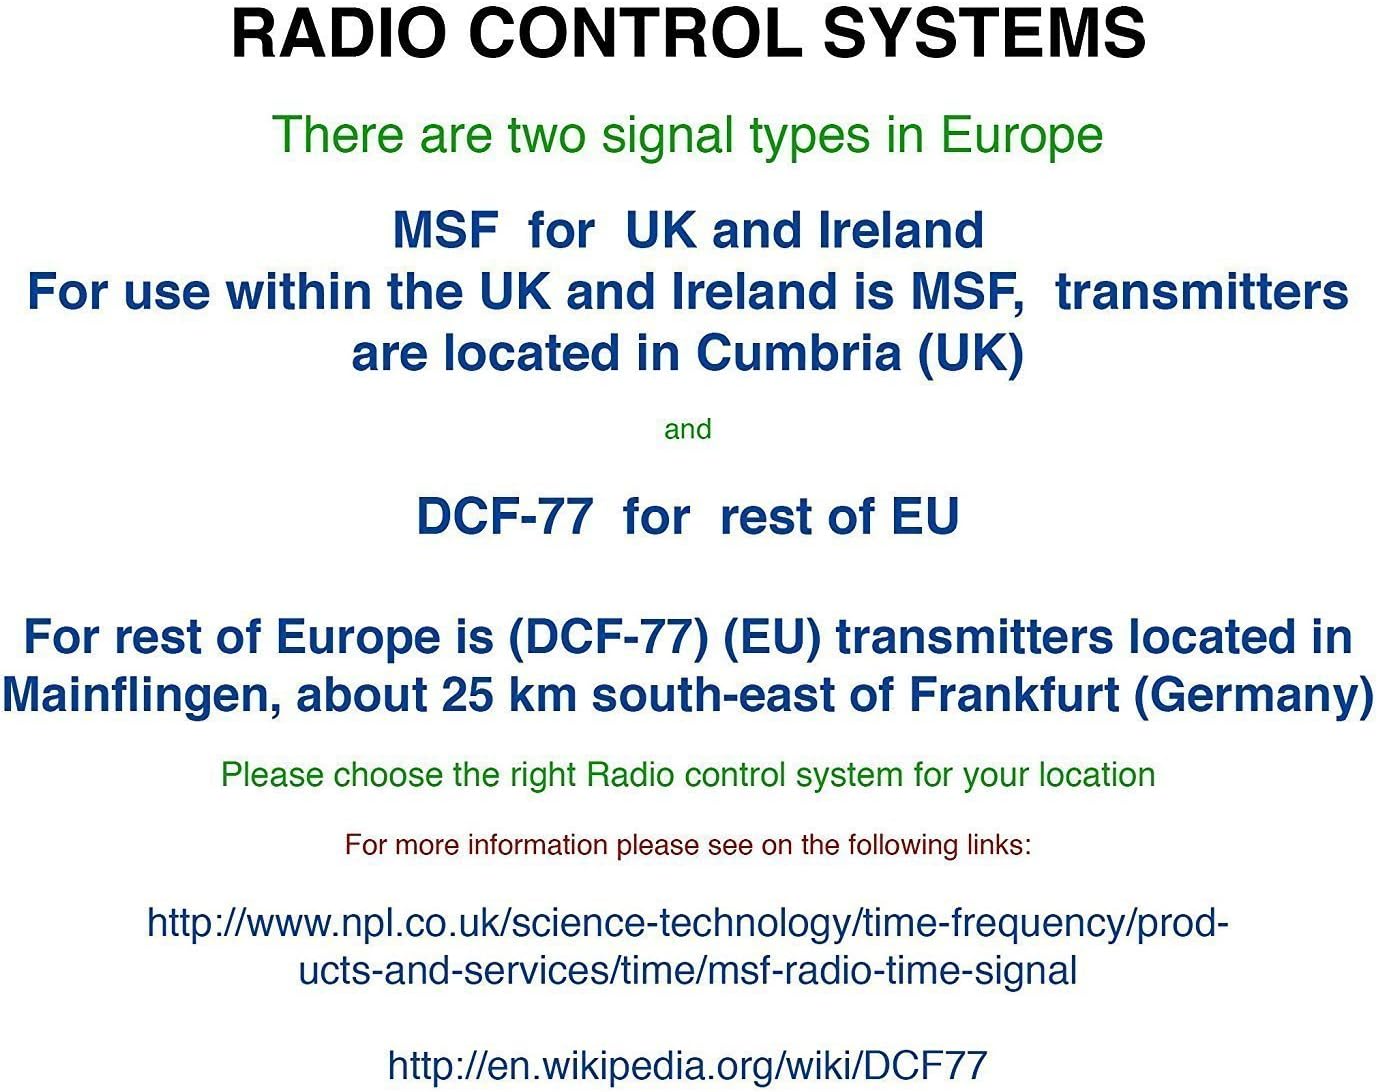
Figure 3: Explanation of radio control systems. The Youshiko YK YC8025-B uses the MSF signal for the UK and Ireland.
Operating Instructions
1. Display Information
The large LCD display provides the following information:
- Time: Current time in 12-hour (with AM/PM indicator) or 24-hour format.
- Date: Day and month.
- Day of the Week: Abbreviated day name.
- Indoor Temperature: Measured in Celsius (°C) or Fahrenheit (°F).
- Moon Phase: Graphical representation of the current moon phase.
- Signal Icon: Indicates radio signal reception status.
- Alarm Icon: Indicates if the alarm is active.
2. Setting Time and Date Manually (if needed)
While the clock is radio-controlled, manual adjustments may be necessary in certain situations (e.g., outside signal range).
- Press and hold the SET button until the display starts flashing.
- Use the UP or DOWN buttons to adjust the flashing value (e.g., hour, minute, year, month, day).
- Press SET again to confirm the setting and move to the next adjustable item.
- Repeat until all desired settings are configured. The clock will exit setup mode automatically after a period of inactivity or by pressing SET repeatedly until the normal display returns.
3. 12/24 Hour Format and Temperature Unit
- To switch between 12-hour and 24-hour time format, press the UP button during normal time display.
- To switch between Celsius (°C) and Fahrenheit (°F) for temperature display, press the DOWN button during normal time display.
4. Alarm Setting and Snooze
- Press the ALARM button once to display the current alarm time.
- Press and hold the ALARM button until the alarm time starts flashing.
- Use the UP or DOWN buttons to adjust the alarm hour and then the alarm minute.
- Press ALARM again to confirm and activate the alarm. The alarm icon will appear on the display.
- When the alarm sounds, press the SNOOZE button to temporarily silence it. The alarm will sound again after a few minutes.
- To turn off the alarm completely, press any other button (e.g., ALARM, SET) when it is sounding or when the snooze is active.
5. Manual Signal Search
If the clock fails to receive the radio signal automatically, you can initiate a manual search.
- Press the WAVE button.
- The signal icon will flash, indicating the clock is searching for the radio signal.
- Allow several minutes for the clock to attempt synchronization.
Maintenance
1. Battery Replacement
When the display becomes dim or the clock stops functioning, it is time to replace the batteries.
- Open the battery compartment on the back of the clock.
- Remove the old batteries.
- Insert new batteries, ensuring correct polarity.
- Close the battery compartment. The clock will then attempt to re-synchronize with the radio signal.
2. Cleaning
- Wipe the clock's surface with a soft, dry cloth.
- Do not use abrasive cleaners or chemical solvents, as these can damage the display or casing.
Troubleshooting
- No Time Display / Incorrect Time:
- Ensure batteries are correctly installed and not depleted. Replace if necessary.
- Check signal reception. Move the clock to a location with better reception, away from electronic interference.
- Initiate a manual signal search by pressing the WAVE button.
- Verify that you are within the MSF signal range (UK and Ireland).
- Dim Display:
- Replace the batteries with new ones.
- Alarm Not Sounding:
- Ensure the alarm is activated (alarm icon visible on display).
- Check that the alarm time is set correctly.
Specifications
| Brand | Youshiko |
| Model Number | YK YC8025-B |
| Color | Black |
| Dimensions (L x W x H) | 23 x 16 x 3 cm |
| Weight | 30 Grams |
| Material | Plastic, Glass |
| Display Type | Digital |
| Special Features | Temperature Display, Alarm, Moon Phase, Radio Controlled |
| Power Source | Battery Powered (Batteries not included) |

Figure 4: Dimensions of the Youshiko YK YC8025-B Radio Controlled Wall Clock.


