
Introduction
This user manual provides essential information for the safe and efficient operation of your Weller WE 1010 Digital Soldering Station. This 70W/230V unit is designed for precise soldering tasks, offering rapid heat-up and recovery times. Please read this manual thoroughly before initial use and keep it for future reference.
Safety Information
Always observe the following safety precautions to prevent injury or damage to the equipment:
- Ensure the soldering station is connected to a properly grounded power outlet.
- Do not touch the hot soldering iron tip or molten solder. Temperatures can reach up to 450°C.
- Use in a well-ventilated area to avoid inhaling solder fumes. Consider using a fume extractor.
- Always place the soldering iron in its safety stand when not in use.
- Wear appropriate personal protective equipment, including safety glasses.
- Keep flammable materials away from the soldering area.
- Disconnect the power supply before cleaning or performing maintenance.
- This unit is ESD safe. Take appropriate electrostatic discharge precautions when working with sensitive electronic components.
- Do not operate the station if the power cord or soldering iron cable is damaged.

Image: ESD Safe Symbol. This symbol indicates that the device is protected against electrostatic discharge, crucial for handling sensitive electronic components.
Product Overview
The Weller WE 1010 soldering station consists of the following main components:
- Power Unit (WE 1): The main control unit with digital display and temperature controls.
- Soldering Iron (WEP 70): A 70W high-performance soldering iron with an ergonomic handle and heat-resistant silicone cable.
- Safety Rest (PH 70): A stand for the soldering iron, including a cleaning sponge.
- Soldering Tip (ET Series): Interchangeable tips for various applications.

Image: Weller WE 1010 Digital Soldering Station. This image shows the complete soldering station setup, including the power unit, soldering iron, and safety stand with sponge.

Image: Front view of the Weller WE 1010 Power Unit. This shows the digital LCD screen, temperature control buttons, and power switch.

Image: Close-up of the Weller WEP 70 Soldering Iron. Highlights the ergonomic handle and the tip attachment area.

Image: The PH 70 Safety Rest for the soldering iron. Includes the spring holder and the sponge tray for tip cleaning.
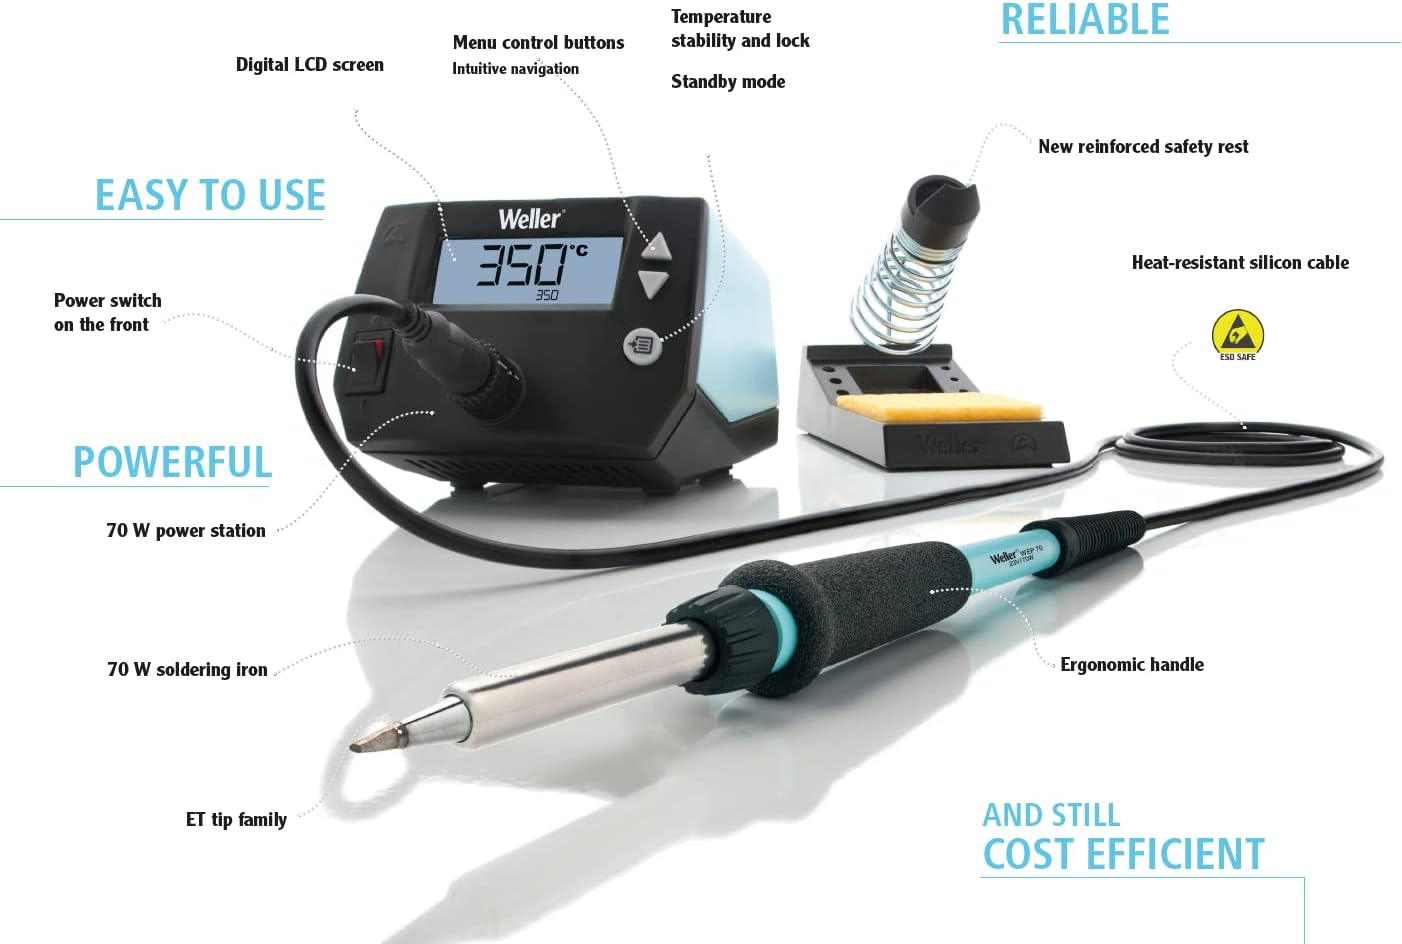
Image: Diagram illustrating key features of the Weller WE 1010. Points out the digital LCD screen, menu controls, standby mode, new reinforced safety rest, heat-resistant silicon cable, ESD safety, 70W power station, 70W soldering iron, ET tip family, and ergonomic handle.
Setup
- Unpacking: Carefully remove all components from the packaging. Verify that all parts listed in the product overview are present.
- Placement: Place the power unit (WE 1) and safety rest (PH 70) on a stable, heat-resistant, and ESD-safe workbench. Ensure adequate ventilation.
- Connect Soldering Iron: Plug the soldering iron (WEP 70) cable into the designated port on the front of the power unit. Ensure a secure connection.
- Power Connection: Connect the power cord to the back of the power unit and then to a grounded electrical outlet. The unit supports 230V.
- Prepare Sponge: Moisten the cleaning sponge in the safety rest with distilled water. The sponge should be damp, not soaking wet.
Operating Instructions
- Power On: Flip the power switch on the front panel of the power unit to the 'ON' position. The LCD display will illuminate.
- Set Temperature: Use the up and down arrow buttons on the control panel to set the desired soldering temperature. The digital display shows both the set temperature and the actual tip temperature. The temperature range is 100°C to 450°C.
- Heat-up Time: The soldering iron will heat up rapidly. Wait until the actual temperature displayed stabilizes at the set temperature.
- Tinning the Tip: Before first use and periodically during operation, tin the soldering iron tip by applying a small amount of solder to it. This helps prevent oxidation and ensures efficient heat transfer.
- Soldering:
- Clean the tip on the damp sponge before each use.
- Apply the hot tip to the joint to be soldered, ensuring both components are heated simultaneously.
- Feed solder onto the heated joint, not directly onto the iron tip. Allow the solder to flow and form a strong connection.
- Remove the solder and then the iron. Allow the joint to cool naturally.
- Sleep Mode: The station features an automatic sleep mode to save energy and prolong tip life. If inactive for a set period, the temperature will automatically reduce.
- Password Protection: Settings can be password-protected to maintain consistent parameters for quality control. Refer to the full manual for details on setting and managing passwords.
- Power Off: When finished, turn off the power switch and allow the iron to cool completely in its safety rest before storing.

Image: A soldering iron being used to solder components on a circuit board. This demonstrates the practical application of the soldering station.
Maintenance
- Tip Cleaning: Regularly clean the soldering tip using the damp sponge or a brass wool cleaner. This removes oxidation and old solder, ensuring optimal performance.
- Tip Replacement: Replace worn or damaged soldering tips. The WEP 70 iron allows for tool-free tip changes by turning the plastic knurled nut. Ensure the iron is cool before changing tips.
- Unit Cleaning: Wipe the power unit and soldering iron handle with a soft, damp cloth. Do not use abrasive cleaners or solvents. Ensure the unit is unplugged before cleaning.
- Sponge Maintenance: Keep the cleaning sponge moist during operation. Replace the sponge when it becomes heavily soiled or worn.
Troubleshooting
| Problem | Possible Cause | Solution |
|---|---|---|
| Iron not heating up. | Power switch off; loose connection; faulty iron or unit. | Check power switch and connections. If problem persists, contact support. |
| Tip not tinning properly. | Oxidized tip; insufficient temperature; old solder. | Clean tip thoroughly. Increase temperature if necessary. Replace tip if heavily oxidized. |
| Temperature display erratic. | Loose iron connection; sensor issue. | Ensure iron cable is securely plugged in. If problem continues, contact support. |
| Unit enters sleep mode too quickly. | Sleep mode settings. | Adjust sleep mode duration in the unit's settings menu. |
Specifications
- Model: T0053298399
- Power Unit: WE 1
- Soldering Iron: WEP 70
- Power: 70 Watts
- Voltage: 230 Volts
- Temperature Range: 100°C - 450°C (200°F - 850°F)
- Temperature Stability: +/- 2°C
- Display Type: LCD
- Number of Channels: 1
- ESD Safe: Yes
- Dimensions (L x W x H): 15 x 12 x 9.8 cm (approx. 5.9 x 4.7 x 3.9 inches)
- Weight: 1.4 Kilograms (approx. 3.1 lbs)
- Country of Origin: Mexico
Warranty
Weller products are manufactured to high quality standards. For specific warranty terms and conditions, please refer to the warranty card included with your product or visit the official Weller website. Keep your proof of purchase for any warranty claims.
Support
For technical assistance, spare parts, or further inquiries, please contact Weller customer support. Contact information can typically be found on the Weller official website or on the product packaging.
Online Resources: Visit the official Weller website for product documentation, FAQs, and support resources.


