
1. Product Overview
The Wellmate WM-4/WM0060 Classic Fiberglass Tank is designed for residential and commercial water systems, offering superior durability and performance. Its fiberglass construction prevents rust, and the epoxy-resin sealed exterior resists dents and scratches, making it virtually maintenance-free. Significantly lighter than steel tanks, Wellmate tanks are easier and quicker to install.
Key features include:
- Replaceable air cell for simplified field maintenance.
- Greater drawdown compared to similar steel tanks, leading to increased efficiency.
- Corrosion-resistant composite construction, ideal for corrosive environments, including coastal areas.
- Faster and more cost-effective installation, often requiring only one person.
- Wider pressure setting differential for enhanced system flexibility.

Figure 1: Internal components of the Wellmate Classic Fiberglass Tank. This diagram illustrates the durable interior air cell, the seamless inner shell made of high-density polyethylene, the outer shell of continuous fiberglass strands sealed with epoxy resin, the sturdy polymeric base, and the custom-molded PVC bottom inlet/outlet drain.
2. Installation and Setup
Proper installation is crucial for the optimal performance and longevity of your Wellmate tank. Always consult local plumbing codes and regulations before beginning installation. If you are unsure about any step, seek assistance from a qualified professional.
2.1 Unpacking and Inspection
- Carefully remove the tank from its packaging.
- Inspect the tank for any signs of shipping damage. Do not install a damaged tank.
- Verify that all components listed in the packing slip are present.
2.2 Location Selection
- Choose a location that is level, dry, and protected from freezing temperatures.
- Ensure adequate clearance around the tank for future maintenance and service.
- The tank should be installed as close as possible to the pressure pump.
2.3 Plumbing Connections
- Connect the tank to your water system using appropriate plumbing fittings. The WM-4/WM0060 model typically uses a 1" male NPT system connection.
- Use thread sealant on all threaded connections to prevent leaks.
- Avoid overtightening connections, as this can damage the tank or fittings.
- Install a shut-off valve on the inlet side of the tank for easy isolation during maintenance.
2.4 Pre-charge Pressure Setting
- The tank comes pre-charged from the factory. However, it is essential to verify and adjust the pre-charge pressure before connecting to the water system.
- The pre-charge pressure should be set 2 PSI below the pump's cut-in pressure.
- Use an accurate pressure gauge to check the air valve located at the top of the tank.
- Add or release air as necessary using a bicycle pump or air compressor.
3. Operating Instructions
Once installed and properly charged, the Wellmate tank operates automatically as part of your water pressure system. It stores water under pressure, reducing pump cycling and extending pump life.
3.1 Initial Start-up
- Ensure all plumbing connections are secure and leak-free.
- Open the shut-off valve to the tank slowly.
- Turn on your water pump. The tank will begin to fill with water, and the system pressure will rise.
- Check for any leaks in the system.
- Allow the pump to cycle several times to ensure proper operation and to purge any air from the system.
3.2 Normal Operation
- The tank will maintain system pressure within the pump's cut-in and cut-out settings.
- Water will be drawn from the tank when a faucet is opened, and the pump will activate when the pressure drops to the cut-in setting.
- The pump will turn off once the system reaches the cut-out pressure.
4. Maintenance
Regular maintenance ensures the continued efficiency and reliability of your Wellmate tank.
4.1 Annual Air Charge Check
- At least once a year, check the tank's pre-charge pressure.
- To do this, first turn off the power to the pump.
- Drain all water from the system by opening a faucet downstream from the tank.
- Use a pressure gauge to check the air valve at the top of the tank.
- Adjust the pressure to 2 PSI below the pump's cut-in pressure.
- Close the faucet, restore power to the pump, and allow the system to repressurize.
4.2 Inspect for Leaks
- Periodically inspect all plumbing connections for any signs of leaks.
- Address any leaks promptly to prevent water damage and maintain system efficiency.
4.3 Replaceable Air Cell
The Wellmate tank features a replaceable air cell, simplifying field maintenance. If the air cell ever fails, it can be replaced without replacing the entire tank. Refer to the manufacturer's specific instructions for air cell replacement.
5. Troubleshooting
This section provides solutions to common issues you might encounter with your Wellmate tank.
5.1 Pump Cycles Too Frequently (Short Cycling)
- Possible Cause: Low or no air pre-charge in the tank.
- Solution: Check and adjust the pre-charge pressure as described in the Maintenance section (4.1).
- Possible Cause: Waterlogged tank (air cell failure).
- Solution: If adjusting the air charge doesn't resolve the issue, the air cell may need replacement. Consult a professional or the manufacturer's guidelines.
5.2 No Water or Low Water Pressure
- Possible Cause: Pump not running or faulty.
- Solution: Check power to the pump and pump operation.
- Possible Cause: Closed shut-off valve.
- Solution: Ensure all valves in the system are open.
- Possible Cause: System leak.
- Solution: Inspect all plumbing for leaks and repair as necessary.
5.3 Water Leaking from Air Valve
- Possible Cause: Damaged air cell.
- Solution: This indicates the air cell has failed and needs to be replaced.
6. Specifications
The following table provides detailed performance data for the Wellmate WM Series Classic tanks, including the WM-4/WM0060 model.
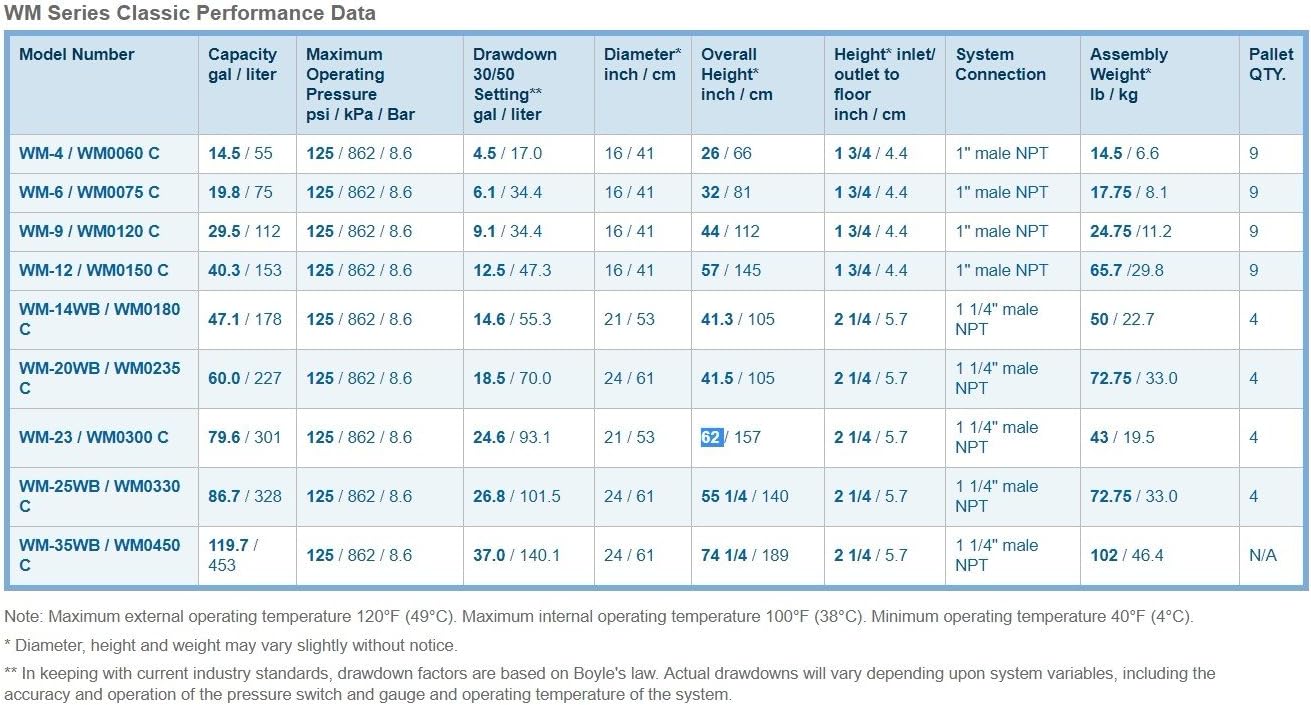
Figure 2: Wellmate WM Series Classic Performance Data. This table provides comprehensive specifications for various Wellmate WM Series models, including capacity in gallons/liters, maximum operating pressure, drawdown, physical dimensions (diameter, overall height, inlet/outlet to floor), system connection type, assembly weight, and pallet quantity.
General Specifications for WM-4/WM0060:
- Material: Fiberglass
- Diameter: 16 Inch (Composite Diameter)
- Weight: 14.5 Pounds
- Maximum Operating Temperature: 120°F (49°C)
- Maximum Internal Operating Temperature: 100°F (38°C)
- Minimum Operating Temperature: 40°F (4°C)
Note: External maximum operating temperature 120°F (49°C). Internal maximum operating temperature 100°F (38°C). Minimum operating temperature 40°F (4°C). Diameter, height and weight may vary slightly without notice. Drawdown factors are based on Boyle's law. Actual drawdowns will vary depending upon system variables, including the accuracy and operation of the pressure switch and gauge and operating temperature of the system.
7. Warranty and Support
Wellmate tanks are built for durability and come with a manufacturer's warranty. An extended labor warranty option may be available for homeowners.
7.1 Warranty Information
For detailed information regarding the specific warranty coverage for your Wellmate WM-4/WM0060 tank, please refer to the warranty card included with your product or visit the official Wellmate website. Keep your proof of purchase for warranty claims.
7.2 Customer Support
If you have questions, require technical assistance, or need to report an issue that cannot be resolved using the troubleshooting guide, please contact Wellmate customer support or your authorized Wellmate dealer. Contact information can typically be found on the manufacturer's website or in the product packaging.