
1. Introduction
This manual provides essential instructions for the safe and effective use of your IDEAL 36-311 TKO Carbide Tipped Hole Cutter 3 Piece Kit. Please read this manual thoroughly before operating the tools and retain it for future reference. Proper understanding and adherence to these instructions will ensure optimal performance and extend the lifespan of your hole cutters.
2. Safety Information
Always observe basic safety precautions to reduce the risk of personal injury and damage to the tools. This product is designed for use with appropriate power drills.
- Wear Personal Protective Equipment (PPE): Always wear safety glasses, hearing protection, and gloves when operating power tools and using hole cutters.
- Secure Workpiece: Ensure the material being cut is firmly clamped or secured to prevent movement during drilling.
- Use Correct Speed: Operate the drill at the recommended speed for the material and hole cutter size. Excessive speed can cause overheating and premature wear.
- Apply Steady Pressure: Maintain consistent, moderate pressure. Do not force the cutter, as this can lead to binding or breakage.
- Clear Debris: Regularly clear chips and debris from the cutting area to prevent clogging and overheating.
- Inspect Tools: Before each use, inspect the hole cutters for any signs of damage, dullness, or cracks. Do not use damaged tools.
- Disconnect Power: Always disconnect the power drill from its power source before changing accessories or performing maintenance.
- Keep Hands Clear: Never touch the rotating cutter or the workpiece near the cutting area while the drill is operating.
- Ventilation: Ensure adequate ventilation in the work area, especially when cutting materials that may produce dust or fumes.
3. Package Contents
Verify that all items are present in your kit:
- 3 x TKO Carbide Tipped Hole Cutters (various sizes)
- 1 x Hex Key (Allen Wrench)
- 1 x Storage Case
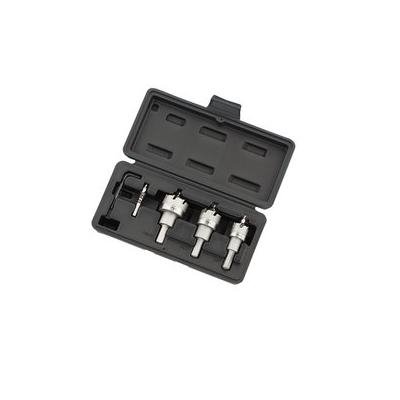
Figure 1: Contents of the IDEAL 36-311 TKO Carbide Tipped Hole Cutter Kit. The image displays the IDEAL 36-311 TKO Carbide Tipped Hole Cutter 3 Piece Kit. It includes three carbide-tipped hole cutters of varying sizes and an Allen wrench, all neatly organized within a black plastic storage case. The cutters feature a robust design suitable for demanding drilling applications.
4. Setup
Follow these steps to properly attach the hole cutter to your power drill:
- Select Cutter: Choose the appropriate size hole cutter for your application.
- Prepare Drill: Ensure your power drill is unplugged or its battery is removed. Open the drill chuck wide enough to accept the hole cutter's shank.
- Insert Cutter: Insert the shank of the hole cutter into the drill chuck. Ensure it is seated as deeply as possible.
- Tighten Chuck: Hand-tighten the drill chuck, then use the chuck key (if applicable) to firmly secure the cutter. Ensure the cutter is centered and does not wobble. A loose cutter can be dangerous and cause inaccurate cuts.
- Pilot Bit Adjustment (if applicable): Some hole cutters have an adjustable pilot bit. Use the provided hex key to ensure the pilot bit extends slightly beyond the cutting teeth for accurate centering.
5. Operating Instructions
These carbide-tipped hole cutters are designed for efficient cutting in various materials. Always prioritize safety as outlined in Section 2.
- Mark the Center: Clearly mark the center point of the desired hole on your workpiece.
- Secure Workpiece: Firmly clamp the workpiece to a stable surface to prevent movement during drilling.
- Set Drill Speed: Adjust your drill to a suitable speed for the material you are cutting. Generally, harder materials and larger diameter cutters require lower speeds.
- Start Drilling: Position the pilot bit on your marked center. Start the drill at a low speed, applying light, steady pressure.
- Increase Speed and Pressure: Once the pilot bit has engaged and the cutter teeth begin to score the surface, gradually increase the drill speed and apply moderate, consistent pressure.
- Maintain Control: Keep a firm grip on the drill and maintain control throughout the cutting process. Avoid excessive side pressure.
- Clear Chips: For deeper cuts, periodically withdraw the cutter slightly to clear chips and allow for cooling.
- Complete Cut: Continue drilling until the hole is fully cut. Reduce pressure as the cutter breaks through the material to prevent splintering or sudden jolts.
- Remove Core: After cutting, the material core will be inside the hole cutter. Use a screwdriver or punch to carefully push out the core from the side slots or the back of the cutter.
6. Maintenance
Proper maintenance ensures the longevity and performance of your hole cutters.
- Cleaning: After each use, clean the hole cutters to remove any accumulated debris, dust, or residue. Use a brush or compressed air. Avoid using harsh chemicals that could damage the carbide tips.
- Inspection: Regularly inspect the carbide tips for wear, chipping, or damage. Also check the shank for any signs of bending or cracking. Replace damaged cutters immediately.
- Lubrication (for specific materials): When cutting certain metals, a cutting lubricant or coolant may be beneficial to reduce heat and extend cutter life. Refer to material-specific guidelines.
- Storage: Store the hole cutters in their original case or a protective container to prevent damage to the carbide tips and keep them free from rust and corrosion. Store in a dry environment.
7. Troubleshooting
| Problem | Possible Cause | Solution |
|---|---|---|
| Poor cut quality / Slow cutting | Dull or damaged cutter; Incorrect drill speed; Insufficient pressure; Material too hard for cutter. | Inspect and replace cutter if damaged/dull; Adjust drill speed (lower for harder materials); Increase steady pressure; Ensure cutter is suitable for material. |
| Cutter overheating / Smoke | Excessive drill speed; Insufficient chip clearance; Lack of coolant (for metal); Dull cutter. | Reduce drill speed; Clear chips frequently; Use cutting fluid for metal; Replace dull cutter. |
| Cutter binding / Stalling | Excessive pressure; Workpiece not secured; Chips clogging cutter; Incorrect drill speed. | Reduce pressure; Secure workpiece firmly; Clear chips; Adjust drill speed. |
| Inaccurate hole placement | Pilot bit not properly set; Cutter wobbling in chuck; Workpiece shifting. | Ensure pilot bit extends correctly; Tighten drill chuck securely; Clamp workpiece firmly. |
8. Specifications
- Model: IDEAL 36-311
- Type: TKO Carbide Tipped Hole Cutter Kit
- Material: Carbide Tipped
- Shank Type: Straight
- Tool Flute Type: Spiral
- Product Dimensions: 1 x 1 x 1 inches (individual item, approximate)
- Item Weight: 5.28 ounces (approximate, for the kit)
- Manufacturer: Ideal
9. Warranty and Support
For information regarding warranty coverage, technical support, or replacement parts, please contact IDEAL customer service directly. Refer to the packaging or the official IDEAL website for current contact details.
Note: This product is subject to Proposition 65 Warning.