1. Introduction
This manual provides essential information for the safe and efficient use of your Sennheiser SK 500 G4-AW+ Bodypack Transmitter. This professional audio device is designed for reliable wireless transmission in the AW+ frequency range (470 - 558 MHz), featuring a robust build and intuitive controls for live sound applications.
2. Package Contents
The Sennheiser SK 500 G4-AW+ package includes the following components:
- SK 500 G4-AW+ Bodypack Transmitter
- EM 300-500 G4 Rackmount Receiver
- Power Supply Unit with various regional plugs (US, UK, EU, AU)
- Two Antennas for the receiver
- Rackmount Kit (brackets and screws)
- Lavalier Microphone (with EW connector)
- Instruction Manual
3. Safety Information
For safe use of this Sennheiser Pro Audio Bodypack Transmitter, please follow these guidelines: handle the device with care, avoid mixing battery types, keep it away from water or extreme temperatures, and be aware of potential interference with other wireless devices. Always refer to the user manual for specific safety instructions.
4. Device Overview

Figure 4.1: Front view of the Sennheiser SK 500 G4-AW+ Bodypack Transmitter, showing the display and control buttons.

Figure 4.2: Back view of the Sennheiser SK 500 G4-AW+ Bodypack Transmitter, highlighting the integrated belt clip and battery compartment.
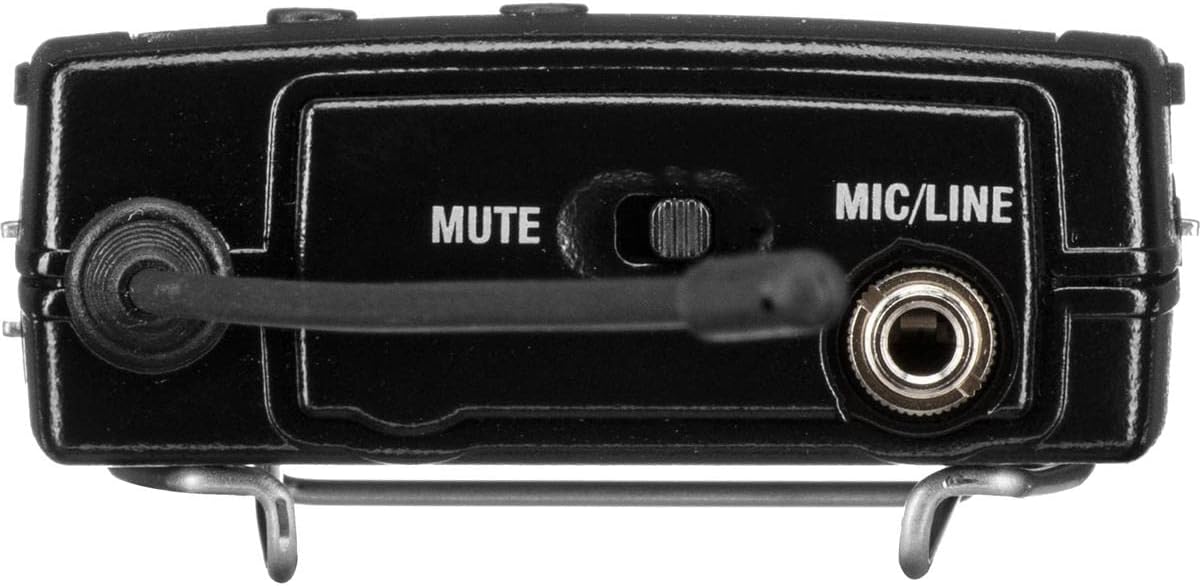
Figure 4.3: Top view of the Bodypack Transmitter, showing the 1/8" audio input socket (EW connector) and mute switch.

Figure 4.4: Front view of the EM 300-500 G4 Rackmount Receiver, featuring the display and control buttons.
5. Setup and Connections
5.1 Battery Installation (Bodypack Transmitter)
- Open the battery compartment on the bodypack transmitter.
- Insert two AA batteries, ensuring correct polarity as indicated inside the compartment.
- Close the battery compartment securely.
5.2 Microphone Connection (Bodypack Transmitter)
- Connect your lavalier microphone (with EW connector) to the 1/8" audio input socket on the top of the bodypack transmitter.
- Ensure the connector is securely screwed in to prevent accidental disconnection.
5.3 Antenna Installation (Receiver)
- Screw the two provided antennas onto the ANT 1 and ANT 2 connectors on the rear panel of the receiver.
- Position the antennas for optimal signal reception.
5.4 Power Connection (Receiver)
- Connect the power supply unit to the DC IN socket on the rear of the receiver.
- Plug the power supply into an appropriate electrical outlet using the correct regional adapter.
5.5 Audio Output Connections (Receiver)
The receiver offers both balanced (XLR) and unbalanced (1/4" jack) audio outputs:
- Balanced Output (AF OUT BAL/UNBAL XLR): For connecting to professional audio mixers or interfaces.
- Unbalanced Output (AF OUT BAL/UNBAL 1/4" Jack): For connecting to consumer-grade audio equipment.
5.6 Rack Mounting (Receiver)
If rack mounting is desired, use the provided rackmount kit. This includes brackets and screws to secure the receiver in a standard equipment rack.
6. Operation
6.1 Powering On/Off
- Bodypack Transmitter: Press and hold the power button for approximately 3 seconds to turn on or off. A red indicator light will illuminate when powered on.
- Receiver: Press the power button on the front panel to turn on or off. The display will illuminate upon activation.
6.2 Synchronization
To synchronize the bodypack transmitter with the receiver:
- Ensure both the transmitter and receiver are powered on.
- On the receiver, navigate to the 'Sync' function using the control buttons.
- Place the infrared interface of the bodypack transmitter close to the infrared interface of the receiver.
- Initiate synchronization on the receiver. The frequency and channel settings will be automatically transferred to the transmitter.
6.3 Monitoring Display
The receiver's display provides crucial operational information:
- Frequency: Displays the current operating frequency (e.g., 518.200 MHz).
- Battery Level: Shows the remaining battery life of the connected transmitter.
- Mute Status: Indicates if the transmitter's microphone is currently muted.
- RF/AF Levels: Visual representation of radio frequency and audio frequency signal strength.
6.4 Mute Function
The bodypack transmitter features a mute switch on its top panel. Sliding this switch will mute or unmute the microphone. The mute status is automatically displayed on the receiver.
7. Maintenance
To ensure the longevity and optimal performance of your Sennheiser SK 500 G4-AW+ system:
- Keep the devices clean and free from dust and debris. Use a soft, dry cloth for cleaning.
- Avoid exposing the units to extreme temperatures, humidity, or direct sunlight.
- Store the system in a protective case when not in use.
- Regularly check battery contacts for corrosion and replace batteries as needed.
8. Troubleshooting
If you encounter issues with your Sennheiser SK 500 G4-AW+ system, consider the following:
- No Audio: Check microphone connection, mute switch position, battery levels, and ensure correct frequency synchronization between transmitter and receiver. Verify audio output connections on the receiver.
- Poor Signal/Interference: Ensure antennas are properly installed and positioned. Check for other wireless devices operating on similar frequencies. Perform a new frequency scan and synchronization.
- Transmitter Not Powering On: Verify battery installation and ensure batteries are fresh or fully charged.
For more detailed troubleshooting or persistent issues, please refer to the comprehensive user manual provided with your product or contact Sennheiser customer support.
9. Specifications
| Feature | Specification |
|---|---|
| Item Weight | 12.2 ounces |
| Product Dimensions | 13.8 x 3.2 x 2.9 inches |
| ASIN | B07C869G9Y |
| Item model number | 509542 |
| Batteries | 2 AA batteries required. |
| Date First Available | April 17, 2018 |
| Color Name | Black |
| Compatible Devices | Sennheiser G4 series devices |
| Connector Type | Auxiliary |
| Hardware Interface | Radio Frequency |
| Material Type | Plastic |
| Size | Small |
| Battery type | Alkaline |
| Power Source | Battery Powered |
| Special Feature | Touch Control |
| Connectivity Technology | AUX |
10. Warranty and Support
For warranty information and technical support, please refer to the official Sennheiser website or contact their customer service directly. Keep your proof of purchase for any warranty claims.


