
Aux ASW-H12A3/FFR1
Aux ASW-H12A3/FFR1 Mini Split Air Conditioner User Manual
Model: ASW-H12A3/FFR1
Introduction
This user manual provides comprehensive instructions for the safe and efficient operation, installation, and maintenance of your Aux ASW-H12A3/FFR1 Mini Split Air Conditioner. Please read this manual thoroughly before using the appliance and retain it for future reference.
The Aux ASW-H12A3/FFR1 is a 1-ton (12,000 BTU) mini split system designed for both cooling and heating, operating on a 110V power supply. It utilizes R410A ecological refrigerant and is suitable for areas approximately 12 to 16 square meters. Key features include a smart remote control with an integrated sensor, personalized adjustment, auto-cleaning, anti-mold function, and automatic restart.
Important Safety Instructions
Always follow basic safety precautions when using electrical appliances to reduce the risk of fire, electric shock, and injury to persons.
- Ensure the power supply matches the unit's requirements (110V, 60Hz).
- Installation must be performed by qualified personnel in accordance with national wiring standards.
- Do not operate the unit with wet hands.
- Do not insert fingers or objects into the air inlet/outlet.
- Keep the unit away from flammable gases or combustible materials.
- Disconnect power before cleaning or maintenance.
- This appliance is not intended for use by persons (including children) with reduced physical, sensory or mental capabilities, or lack of experience and knowledge, unless they have been given supervision or instruction concerning use of the appliance by a person responsible for their safety.
Product Components
The Aux ASW-H12A3/FFR1 Mini Split Air Conditioner system consists of an indoor unit, an outdoor unit, and a remote control.
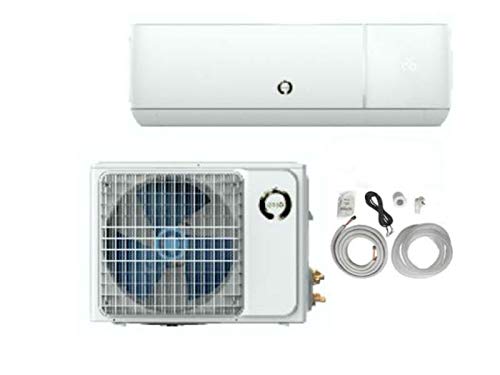
Figure 1: Indoor Unit. This image shows the white indoor unit of the Aux ASW-H12A3/FFR1 Mini Split Air Conditioner, typically mounted on a wall inside the room.

Figure 2: Outdoor Unit. This image displays the outdoor condenser unit of the Aux ASW-H12A3/FFR1 Mini Split Air Conditioner, featuring a protective grille over the fan and copper pipe connections on the side.
Setup and Installation
Installation of the Aux ASW-H12A3/FFR1 Mini Split Air Conditioner requires professional expertise. It is a split system, meaning it requires both an indoor and an outdoor unit connected by refrigerant lines and electrical wiring. An exterior unit is required.
Pre-Installation Checklist:
- Verify power supply (110V-1-60Hz).
- Ensure adequate space for both indoor and outdoor units, allowing for proper airflow and maintenance access.
- Confirm the wall can support the weight of the indoor unit.
- Prepare a stable, level surface for the outdoor unit.
General Installation Steps (Professional Installation Recommended):
- Mounting Plate Installation: Securely attach the indoor unit mounting plate to the wall.
- Drill Wall Hole: Create a hole for refrigerant piping, drain hose, and electrical cables.
- Refrigerant Piping Connection: Connect the refrigerant lines between the indoor and outdoor units. Ensure proper flaring and tightening to prevent leaks.
- Drain Hose Connection: Connect the drain hose from the indoor unit, ensuring proper slope for water drainage.
- Electrical Wiring: Connect the electrical wiring between the indoor unit, outdoor unit, and power supply according to the wiring diagram provided in the full installation manual.
- Vacuuming and Test Operation: Evacuate the refrigerant lines to remove air and moisture, then perform a test run to check for proper operation and leaks.

Figure 3: Installed Indoor Unit. This image shows the Aux ASW-H12A3/FFR1 indoor unit mounted on a wall in a modern living room setting, demonstrating its typical installed appearance.
Operating Instructions
Your Aux ASW-H12A3/FFR1 Mini Split Air Conditioner is controlled via a remote control. Ensure the remote has fresh batteries.
Remote Control Functions:
- Power Button: Turns the unit ON/OFF.
- Mode Button: Cycles through operating modes:
- Cool (Frio): For cooling the room.
- Heat (Calor): For heating the room.
- Fan: Circulates air without heating or cooling.
- Dry: Dehumidifies the room.
- Auto: Automatically selects mode based on room temperature.
- Temperature Adjustment Buttons (Up/Down Arrows): Adjusts the desired temperature setting.
- Fan Speed Button: Selects fan speed (Low, Medium, High, Auto).
- Swing Button: Controls the vertical louver movement for air direction.
- Timer Button: Sets the ON/OFF timer.
- Sleep Mode: Adjusts temperature and fan speed for comfortable sleep.
- iFeel/Sensor: Activates the sensor in the remote control for more accurate temperature sensing at the remote's location.
- Display ON/OFF: Toggles the display lights on the indoor unit for undisturbed rest.
Basic Operation:
- Press the Power button to turn on the unit.
- Press the Mode button to select your desired operating mode (Cool, Heat, Fan, Dry, Auto).
- Use the Temperature Adjustment buttons to set the desired room temperature.
- Adjust the Fan Speed and Swing settings as needed for comfort.
Maintenance
Regular maintenance ensures optimal performance and extends the lifespan of your air conditioner. Always disconnect power before performing any maintenance.
Air Filter Cleaning:
- Open the front panel of the indoor unit.
- Remove the air filters.
- Clean the filters with a vacuum cleaner or wash them with lukewarm water and mild detergent.
- Allow filters to dry completely before reinstalling.
- Frequency: Clean every two weeks or more often if used frequently or in dusty environments.
Outdoor Unit Cleaning:
- Keep the area around the outdoor unit clear of debris, leaves, and obstructions.
- Periodically clean the outdoor coil fins with a soft brush or water hose (low pressure) to remove dirt and dust.
- Frequency: Annually or as needed.
Professional Servicing:
It is recommended to have a qualified technician inspect and service your unit annually. This includes checking refrigerant levels, electrical connections, and overall system performance.
The unit features Auto-cleaning and Anti-mold functions to help maintain internal cleanliness. Consult the full manual for activation details of these features.
Troubleshooting
Before contacting service, refer to the following table for common issues and solutions.
| Problem | Possible Cause | Solution |
|---|---|---|
| Unit does not start. | No power; remote control batteries dead; timer set. | Check power supply; replace remote batteries; cancel timer setting. |
| Insufficient cooling/heating. | Dirty air filters; blocked outdoor unit; wrong mode selected; room too large. | Clean air filters; clear obstructions from outdoor unit; select correct mode; ensure unit capacity matches room size (12-16 m²). |
| Water leakage from indoor unit. | Clogged drain hose; improper installation. | Clear drain hose; contact qualified installer for inspection. |
| Unusual noise. | Loose parts; foreign object in fan; unit not level. | Check for loose parts; inspect fan; ensure unit is level. If noise persists, contact service. |
If the problem persists after attempting these solutions, disconnect the power supply and contact a qualified service technician.
Specifications
| Feature | Detail |
|---|---|
| Model Name | ASW-H12A3/FFR1 |
| Brand | Aux |
| Type | Mini Split Air Conditioner (Cooling & Heating) |
| Cooling Capacity | 12,000 BTU |
| Power Supply | 110V-1-60Hz |
| Refrigerant | R410A (Ecological) |
| Recommended Coverage Area | 12 to 16 m² |
| Control Method | Remote Control (with integrated sensor) |
| Special Features | Personalized adjustment, Auto-cleaning, Anti-mold, Automatic restart, Display ON/OFF |
| Installation Method | Split System (Requires exterior unit) |
| Product Weight | 4000 Grams (Indoor unit or component weight) |
Warranty and Support
Your Aux ASW-H12A3/FFR1 Mini Split Air Conditioner comes with a 1-year manufacturer's warranty. This warranty covers defects in materials and workmanship under normal use.
For warranty claims, technical support, or service inquiries, please contact your authorized Aux dealer or the manufacturer's customer service department. Keep your purchase receipt and model number (ASW-H12A3/FFR1) readily available.
Note: Unauthorized repairs or modifications may void your warranty.
Related documentsASW-H12A3/FFR1


Ask a question about this manual
Ask about setup, troubleshooting, compatibility, parts, safety, or missing instructions. Manuals+ will review the question and use this page’s manual context to help answer it.