
LiftMaster 877MAX
LiftMaster 877MAX Wireless Keypad Instruction Manual
Model: 877MAX
Introduction
This manual provides comprehensive instructions for the installation, programming, operation, and maintenance of your LiftMaster 877MAX Wireless Keypad. This keypad is designed to provide secure and convenient access to your garage without the need for a remote control or key. Featuring Security+2.0 and Security+ rolling code technology, it ensures a new code is sent every time, enhancing security. Its weatherproof flip-up protective cover and backlit keypad make it easy to use in various conditions. The 877MAX is compatible with all LiftMaster garage door openers manufactured since January 1993.
Product Overview
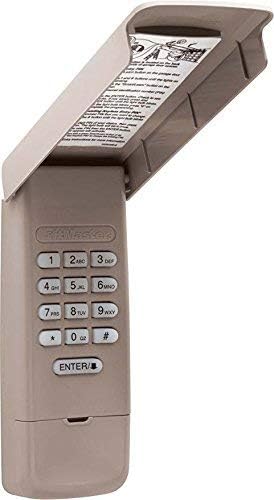
Image: LiftMaster 877MAX Wireless Keypad. The keypad features a beige housing with a flip-up cover. The cover is shown open, revealing the numeric keypad (0-9, *, #) and an 'ENTER' button. Instructions are visible on the inside of the cover.
The LiftMaster 877MAX Wireless Keypad is a durable, weather-resistant device designed for outdoor installation. It features a full numeric keypad, a backlit display for visibility in low light, and a protective cover to shield it from the elements. The keypad operates on a 9V battery (included or sold separately, depending on packaging) and communicates wirelessly with your garage door opener.
Setup and Installation
1. Battery Installation
The keypad typically comes with a 9V battery. To install or replace the battery:
- Open the keypad's flip-up cover.
- Locate the battery compartment, usually at the bottom of the keypad.
- Insert a new 9V battery, ensuring correct polarity.
- Close the battery compartment cover securely.
2. Programming the Keypad
Before mounting, program the keypad to your garage door opener. Ensure the garage door is closed before beginning the programming process.
Identify your garage door opener's "Learn" button color:
- Purple Learn Button: For Security+ 2.0 (manufactured 2011-present)
- Yellow Learn Button: For Security+ 2.0 (manufactured 2011-present)
- Red/Orange Learn Button: For Security+ (manufactured 1996-2005)
- Green Learn Button: For Billion Code (manufactured 1993-1995)
General Programming Steps:
- Choose a 4-digit Personal Identification Number (PIN) for your keypad.
- Press and hold the * and # buttons simultaneously on the keypad until the lights stop flashing (approximately 10 seconds). This clears any previous programming.
- Press the Learn button on your garage door opener's motor unit. The LED indicator on the opener will light up. You have 30 seconds to complete the next step.
- On the keypad, enter your chosen 4-digit PIN.
- Press the ENTER button.
- Press the ENTER button again. The garage door opener lights will flash or two clicks will be heard, indicating successful programming.
- Test the keypad by entering your PIN and pressing ENTER. The garage door should activate.
Note: For specific programming instructions related to your opener model, refer to your garage door opener's manual or the instructions printed inside the keypad's cover.
3. Mounting the Keypad
Mount the keypad outside your garage, at a height convenient for all users, but out of reach of small children. Avoid mounting it directly in sunlight or where it will be exposed to excessive moisture.
- Open the keypad cover and remove the battery cover to expose the mounting holes.
- Mark the desired mounting location on the wall.
- Drill pilot holes if necessary.
- Secure the keypad to the wall using the provided screws.
- Replace the battery cover and close the flip-up cover.
Operating Instructions
To operate your garage door using the LiftMaster 877MAX Wireless Keypad:
- Flip up the protective cover.
- Enter your 4-digit Personal Identification Number (PIN).
- Press the ENTER button.
The garage door will begin to move. If the door is open, it will close. If it is closed, it will open. If the door is in motion, entering the code and pressing ENTER will stop the door. Pressing ENTER again will reverse its direction.
Temporary PIN (Guest Access)
Some LiftMaster openers allow for a temporary PIN. Consult your garage door opener's manual for instructions on setting up a temporary PIN, if supported.
Maintenance
Battery Replacement
The keypad uses one 9V battery. When the battery is low, the keypad's backlight may dim or the keypad may become unresponsive. Replace the battery as described in the "Battery Installation" section under Setup.
Cleaning
Clean the keypad's exterior with a soft, damp cloth. Do not use abrasive cleaners or solvents, as these can damage the finish or internal components. Ensure the flip-up cover is kept clean and free of debris to ensure proper sealing.
Troubleshooting
| Problem | Possible Cause | Solution |
|---|---|---|
| Keypad does not light up or respond. | Dead or low battery. | Replace the 9V battery. |
| Keypad programmed but garage door does not open/close. | Incorrect programming; interference; keypad out of range. | Re-program the keypad following the "Programming the Keypad" steps. Ensure the keypad is within range of the garage door opener. Check for sources of interference. |
| Keypad lights flash but door does not move. | Safety sensors are obstructed or misaligned. | Check the garage door safety sensors for obstructions or misalignment. Clear any debris and ensure they are properly aligned. |
| Keypad requires multiple ENTER presses. | Possible programming issue or signal strength. | Re-program the keypad. Ensure the keypad is mounted securely and not obstructed. |
Specifications
- Model: LiftMaster 877MAX
- Part Number (ASIN): SG_B07C57H6LK_US
- Compatibility: All LiftMaster garage door openers manufactured since January 1993 (Security+ 2.0, Security+, Billion Code)
- Frequency: 315MHz, 390MHz (Auto-sensing)
- Power: 9V Battery (not always included)
- Color: White (or light beige, as pictured)
- Dimensions (L x W x H): Approximately 7.09 x 2.8 x 1.46 inches
- Weight: Approximately 0.2 Kilograms (0.44 lbs)
- Features: Weatherproof, Backlit Keypad, Flip-up Protective Cover, Security+2.0 Rolling Code Technology
Warranty and Support
For warranty information, please refer to the documentation included with your product or visit the official LiftMaster website. If you require technical assistance or have questions not covered in this manual, please contact LiftMaster customer support directly. Contact details can typically be found on the LiftMaster website or on the product packaging.
This manual is intended for informational purposes only. LiftMaster reserves the right to make changes to products or specifications at any time without notice.
Related documents877MAX


Ask a question about this manual
Ask about setup, troubleshooting, compatibility, parts, safety, or missing instructions. Manuals+ will review the question and use this page’s manual context to help answer it.