
1. Introduction
This manual provides comprehensive instructions for the installation, operation, and maintenance of the LOGiC V5 Camera Interface. This interface is designed to seamlessly integrate aftermarket reverse and front cameras with your existing Mercedes-Benz infotainment system.
Please read this manual thoroughly before installation and operation to ensure proper functionality and to avoid any damage to the product or your vehicle.
2. Product Overview
The LOGiC V5 Camera Interface is a Plug & Play solution for adding rear-view and front-view camera capabilities to compatible Mercedes-Benz vehicles equipped with Comand Online NTG5-205/NTG5.1 or Audio20 NTG5-205/NTG5.1 systems. It allows for automatic switching to the reverse camera when engaging reverse gear and supports manual switching to the front camera.
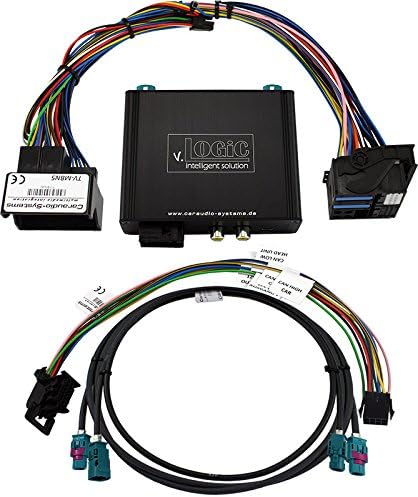
Figure 1: LOGiC V5 Camera Interface module with included wiring harnesses. The main black module features the "v. LOGiC intelligent solution" branding and RCA connectors. Various multi-pin connectors and a long cable with blue and purple FAKRA connectors are visible, indicating a comprehensive plug-and-play wiring solution for vehicle integration.
3. Features
- Plug & Play Camera Interface: Designed for easy installation without complex wiring modifications.
- Dynamic Parking Guidelines: Provides active parking lines on the screen for enhanced assistance.
- On-Screen Display (OSD): Allows for parameter changes directly on the vehicle's display.
- FBAS Rear-View Camera Input: Dedicated input for a reverse camera.
- FBAS Front-View Camera Input: Dedicated input for a front camera.
- Automatic Reverse Camera Switching: Automatically switches to the reverse camera input when reverse gear is engaged from any operating mode.
- Manual Camera Switching: Option to manually switch to the reverse camera.
- Two Switching Outputs (+12V max. 1A): Separately adjustable switching criteria (CAN, ignition, camera, reverse).
- Compatibility with Original Video Applications: Works alongside existing original video applications (e.g., factory reverse camera, TV tuner).
- USB Update Port: Allows for end-user software updates.
4. Compatibility
This interface is compatible with Mercedes-Benz vehicles equipped with the following infotainment systems:
- Comand Online NTG5/NTG5.1
- Audio20 CD NTG5/NTG5.1
- Audio20 USB NTG5/NTG5.1
Important Restriction: This interface is NOT supported for vehicles with a factory-installed TV tuner.
Compatible Mercedes-Benz vehicle models (from specified production dates):
- A-Class (W176) from 09/2015
- B-Class (W246) from 11/2014
- C-Class (W205) up to approx. 06/2018
- C-Class Coupe (C202) from 2015
- CLA Coupe (C117) from 10/2014
- CLA Shooting Brake (X117) from 03/2015
- CLS Coupe (W218) from 08/2014
- CLS Shooting Brake (X218) from approx. 08/2014
- E-Class (S/W212) from 11/2014
- E-Class Coupe (A/C207) from 06/2015 up to 08/2017
- G-Model (G463) from 10/2016
- GL-Class (X166) from 09/2016
- GLA-Class (X156) from 09/2015
- GLC-Class (X253)
- GLE-Class (C292)
- GLS-Class (X166) from 11/2015
- GT AMG (C190)
- ML-Class (W166) from 08/2015
- SL-Class (R231) from approx. 10/2015
- SLC-Class (R172) from 2016
- V-Class (W447) from 2014
5. Setup and Installation
The LOGiC V5 Camera Interface is designed for Plug & Play installation. While specific vehicle disassembly steps are beyond the scope of this general manual, the following outlines the typical installation process:
- Preparation: Ensure the vehicle's ignition is off and the battery is disconnected before beginning installation.
- Access Head Unit: Carefully remove the vehicle's infotainment head unit to access its rear connections. Refer to your vehicle's specific service manual for detailed instructions on head unit removal.
- Connect Interface: The interface harness connects inline with the existing wiring of your Mercedes head unit. Disconnect the original wiring harness from the head unit and connect it to the corresponding input on the LOGiC V5 interface harness. Then, connect the output of the LOGiC V5 interface harness to the head unit.
- Camera Connection: Connect your aftermarket reverse camera to the dedicated FBAS reverse camera input (RCA connector) on the LOGiC V5 module. If installing a front camera, connect it to the FBAS front camera input.
- Power and Ground: Ensure the interface receives proper power and ground connections as per the wiring diagram (typically integrated into the Plug & Play harness).
- Routing Cables: Route all cables neatly and securely, ensuring they do not interfere with moving parts or get pinched.
- Test Functionality: Before reassembling the dashboard, reconnect the vehicle battery and test the camera functionality.
- Reassemble: Once confirmed working, carefully reassemble the head unit and dashboard components.
Note: Professional installation is recommended if you are not familiar with automotive electrical systems or dashboard disassembly.
6. Operating Instructions
Once installed, the LOGiC V5 Camera Interface operates largely automatically:
- Reverse Camera Activation: When you shift your vehicle into reverse gear, the interface will automatically switch the display to the connected reverse camera feed. After disengaging reverse, the display will return to the previous operating mode.
- Front Camera Activation: The front camera can typically be activated manually. Consult the interface's OSD (On-Screen Display) menu for specific activation methods, which may involve a button press or a sequence on the vehicle's controls.
- Dynamic Parking Guidelines: These guidelines will appear on the screen with the reverse camera feed and will dynamically adjust with steering wheel movement (if supported by your vehicle and camera).
- OSD Menu: Access the On-Screen Display menu to adjust various parameters of the interface, such as camera settings, switching criteria for the 12V outputs, or other configuration options. Refer to the interface's specific OSD instructions for navigation.
7. Maintenance
The LOGiC V5 Camera Interface is designed for long-term, maintenance-free operation. To ensure its longevity and optimal performance, consider the following general guidelines:
- Keep Dry: Ensure the interface module and its connections remain dry and free from moisture.
- Temperature: Avoid exposing the unit to extreme temperatures, both hot and cold, beyond typical automotive operating conditions.
- Cleanliness: Keep the module free from dust and debris. If cleaning is necessary, use a soft, dry cloth. Do not use liquid cleaners.
- Connections: Periodically check that all connections remain secure, especially if the vehicle experiences significant vibrations.
- Software Updates: Utilize the USB update port for software updates provided by the manufacturer to ensure compatibility and access to new features.
8. Troubleshooting
If you encounter issues with your LOGiC V5 Camera Interface, please refer to the following troubleshooting steps:
| Problem | Possible Cause | Solution |
|---|---|---|
| No camera image on display. |
|
|
| Image flickering or distorted. |
|
|
| Automatic switching not working. |
|
|
| Dynamic guidelines not appearing. |
|
|
If the problem persists after attempting these solutions, please contact Caraudio-Systems customer support for further assistance.
9. Specifications
| Feature | Specification |
|---|---|
| Model Number | V5-NTG5-PNP |
| Brand | Caraudio-Systems |
| Connectivity Technology | USB (for updates) |
| Number of Channels | 2 (Camera Inputs) |
| Audio Input | AUX (Implied for video integration, not direct audio input for interface) |
| Item Weight | 614 Grams |
| Material Type | Metal |
| UPC | 784089002239 |
10. Warranty and Support
Warranty information for the LOGiC V5 Camera Interface is typically provided at the point of purchase or within the product packaging. Please retain your proof of purchase for warranty claims.
For technical support, troubleshooting assistance beyond this manual, or warranty inquiries, please contact the manufacturer:
Manufacturer: Caraudio-Systems Vertriebs GmbH
Please refer to the official Caraudio-Systems website or your retailer for contact details and the most up-to-date support information.


