Introduction
The NZXT H700 Series is an ATX mid-tower PC gaming case designed for modern PC building. It features a tempered glass panel, an enhanced cable management system, and is ready for water-cooling installations. This manual provides essential information for setting up, operating, maintaining, and troubleshooting your H700 case.

Figure 1: Front angled view of the NZXT H700 case, showcasing the tempered glass side panel and clean design.
Setup
1. Unpacking and Initial Access
Carefully remove the case from its packaging. The H700 features a quick-release side panel for easy access to the interior. To open the rear panel, locate the push button on the rear of the case, above where the connections panel goes. Pressing this button will release the panel. The accessory box and manual are typically located within a 3.5" HDD enclosure in the lower chamber of the case.

Figure 2: Rear view of the NZXT H700 case, highlighting the panel release mechanism and expansion slots.
2. Motherboard Installation
The H700 supports Mini-ITX, MicroATX, ATX, and EATX motherboards (up to 272mm or 10.7 inches). Install your motherboard according to its manufacturer's instructions, securing it to the pre-installed standoffs.
3. Cable Management
The H700 is designed with an enhanced cable management system to simplify the building process. It includes a dual-position cable management bar and a cable routing kit located behind the motherboard tray. Velcro straps are pre-installed to help organize cables efficiently.

Figure 3: Interior view of the H700, illustrating the cable management channels and Velcro straps for organized wiring.
4. Water Cooling Installation
The case is water-cooling ready, featuring drop-in brackets and integrated reservoir mounting for both All-In-One (AIO) and custom loop configurations. The top panel can accommodate radiators up to 2x140mm or 3x120mm.
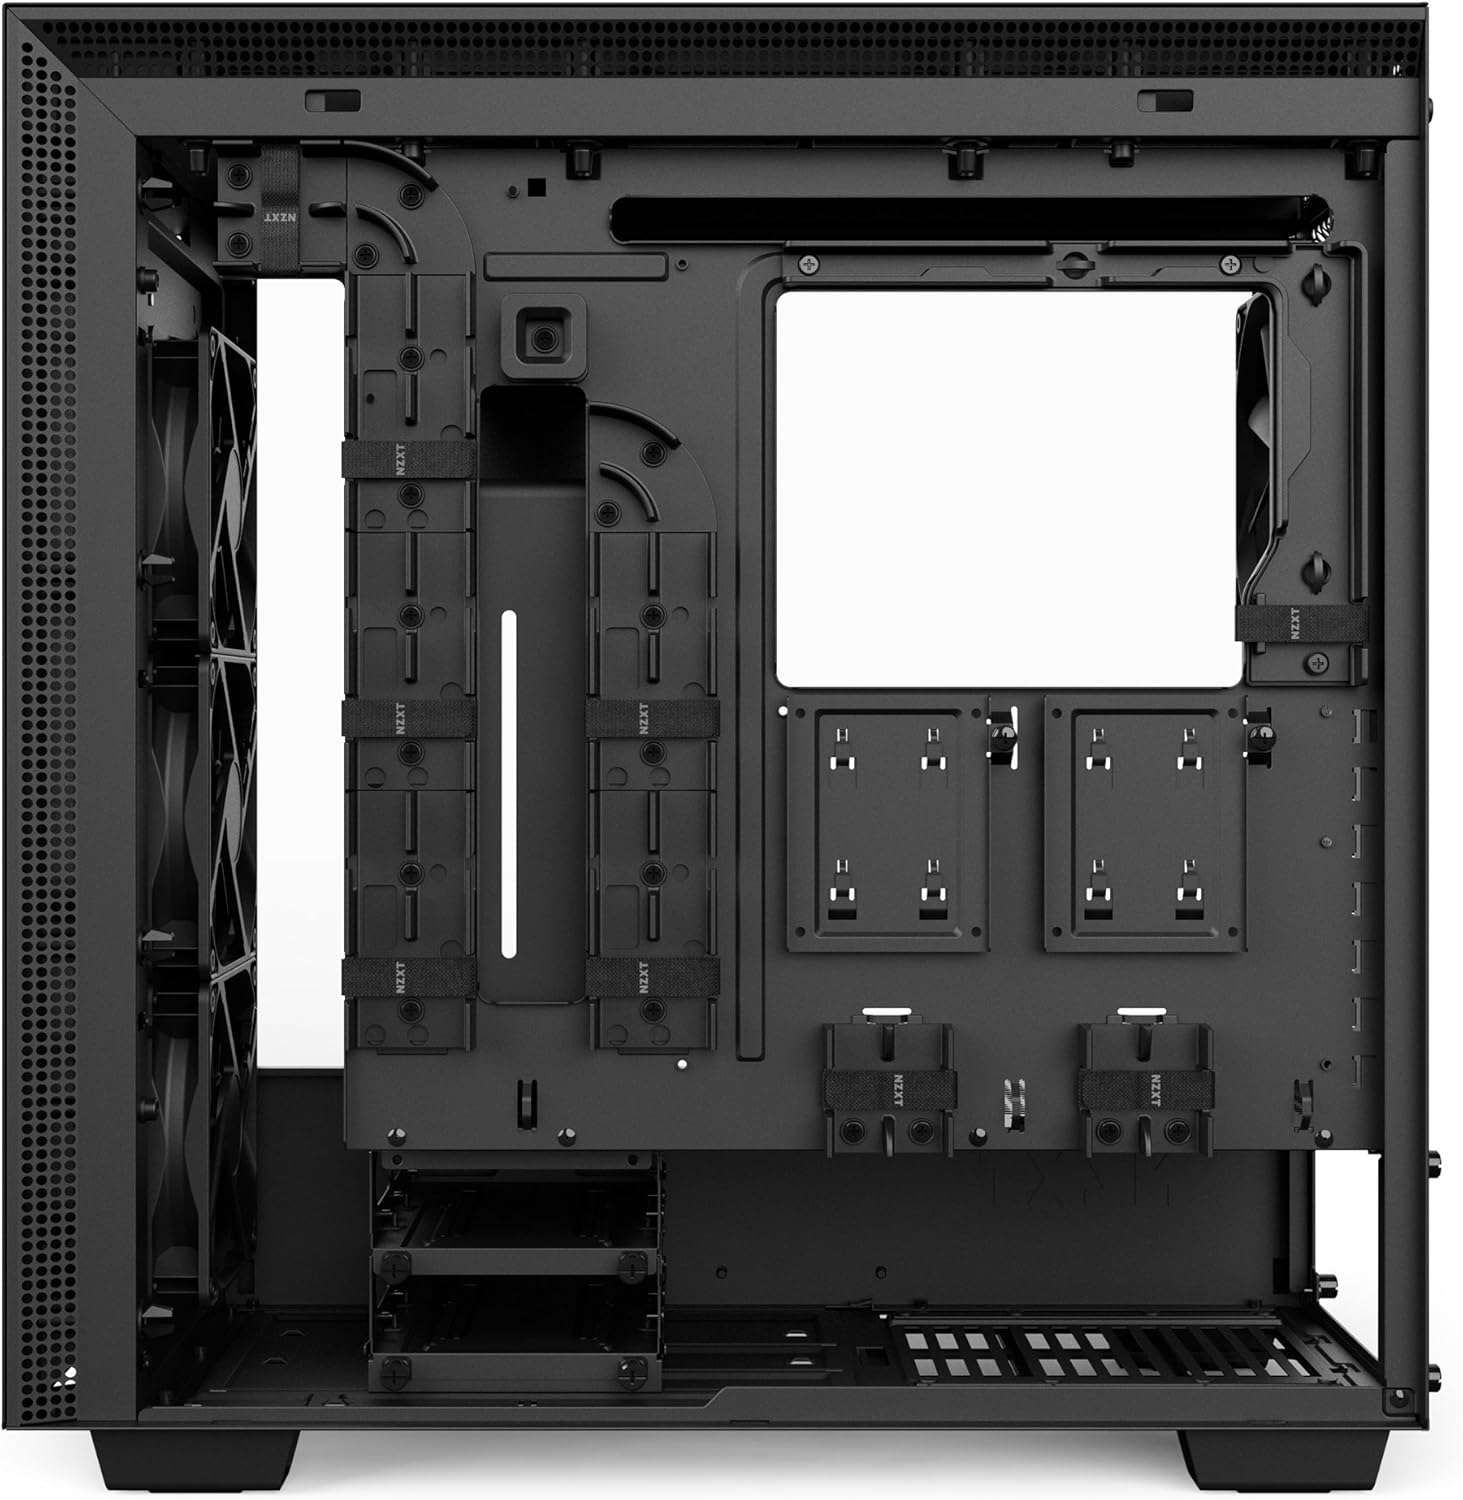
Figure 4: Top angled view of the H700 interior, demonstrating the fan and radiator mounting options.
5. Storage Installation
The H700 offers versatile storage options:
- 2.5" SSDs: Quick-release 2.5" SSD trays are located on the PSU shroud and behind the motherboard tray.
- 3.5" HDDs: Mounting points for traditional 3.5" drives are available.

Figure 5: Interior view of the H700, highlighting the PSU shroud and various drive mounting locations.
Operating Features
1. Front I/O Ports
The top panel of the H700 includes convenient front I/O ports for easy access to peripherals.

Figure 6: Top view of the H700, indicating the USB 2.0, USB 3.1 Gen 1, and Audio ports.
2. Cooling and Airflow
The H700 comes with two Aer F120mm fans for optimal airflow. To maintain a clean interior, the front and PSU intakes are fully filtered, preventing dust accumulation.
3. RGB Lighting and Fan Control (i-Series only)
While this is a Non i-Series H700, the i-Series models feature a CAM-powered Smart Device for digitally driving RGB lighting and fan performance. This allows for effortless control of RGB lighting and fans via the CAM dashboard. Adaptive Noise Reduction optimizes the build's acoustics through machine learning, finding ideal fan settings.
Video 1: An official NZXT product walkthrough demonstrating features like RGB lighting, fan control, and cable management in the H-Series cases. Note that the Smart Device and advanced RGB/fan control features are specific to the i-Series models.
Maintenance
1. Cleaning Dust Filters
Regularly check and clean the dust filters located at the front and under the PSU intake. These filters are designed to be easily removable for cleaning, helping to maintain optimal airflow and prevent dust buildup inside your system.
2. General Cleaning
Use a soft, dry cloth to clean the exterior surfaces of the case, including the tempered glass panel. For stubborn smudges on the glass, a mild glass cleaner can be used, applied to the cloth first, not directly to the glass.
Troubleshooting
1. Difficulty Opening Rear Panel / Finding Manual
If you are having trouble opening the rear panel or locating the accessory box and manual, remember that the rear panel is released by a push button located on the back of the case, above the I/O shield area. The accessory box is typically found within a 3.5" HDD enclosure in the lower chamber once the panel is open.
2. RGB Lighting Issues (i-Series specific)
For i-Series models, if RGB LED strips are not functioning correctly, ensure all connections to the Smart Device are secure. If using CAM software, check for software updates or reinstallation. Some users have reported issues with pre-installed LED strips; if a strip is faulty, contact NZXT support.
3. Fan Noise / Performance (i-Series specific)
For i-Series models, if fan noise is excessive or performance is not optimal, verify fan connections to the Smart Device. Utilize the Adaptive Noise Reduction feature in CAM software to allow the system to learn and optimize fan curves for your specific build's acoustics.
Specifications
| Feature | Specification |
|---|---|
| Motherboard Compatibility | Mini-ITX, MicroATX, ATX, EATX (Up to 272mm or 10.7-inches) |
| Case Type | Mid Tower |
| Material | Alloy Steel, Tempered Glass |
| Color | Black |
| Dimensions (LxWxH) | 19.45 x 9.05 x 20.3 inches |
| Item Weight | 27 pounds |
| Number of USB 3.0 Ports | 2 |
| Power Supply Mounting Type | Rear Mount |
| Cooling Method | Air, Water |
Warranty and Support
For detailed warranty information and technical support, please visit the official NZXT website at www.nzxt.com. You can find FAQs, support articles, and contact information for customer service there.