
1. Introduction
Thank you for choosing the Tepro Abington Tabletop Gas Barbecue. This compact and versatile gas grill is designed for convenient outdoor cooking on balconies, small terraces, or during camping trips. Its efficient single burner and precise heat control ensure optimal grilling results. Please read this manual carefully before assembly, operation, or maintenance to ensure safe and efficient use of your barbecue.
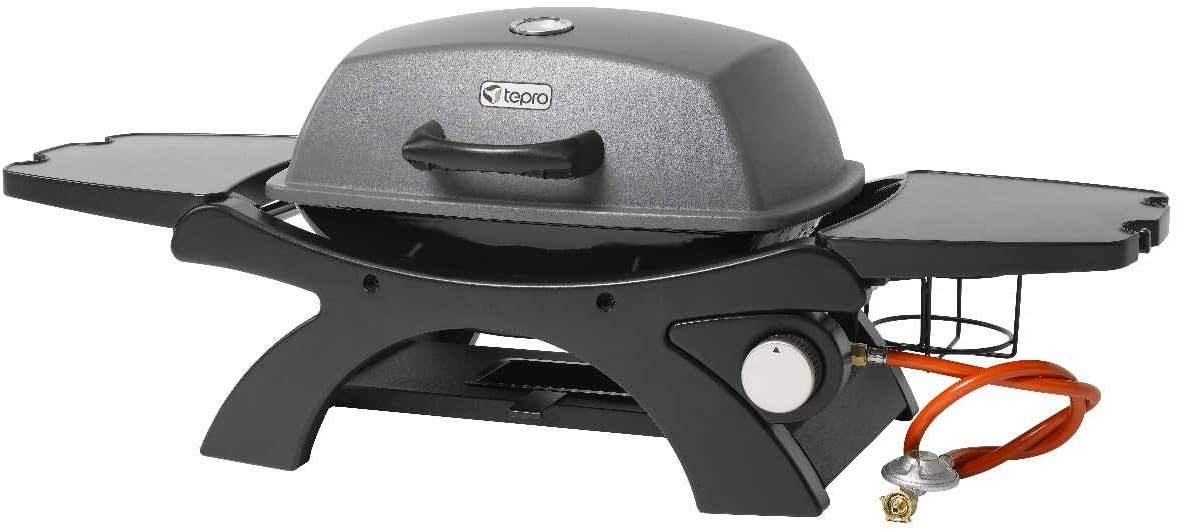
Figure 1: Tepro Abington Tabletop Gas Barbecue (Lid Closed)
2. Safety Information
WARNING: Failure to follow these instructions could result in fire, explosion, or burn hazard which could cause property damage, personal injury, or death.
- For outdoor use only. Do not operate indoors or in enclosed spaces.
- Keep children and pets away from the barbecue at all times.
- Ensure the barbecue is placed on a stable, level, non-combustible surface.
- Do not store or use gasoline or other flammable liquids and vapors in the vicinity of this or any other appliance.
- Always check for gas leaks before each use. Use a soapy water solution; never use an open flame.
- Do not obstruct the flow of combustion and ventilation air.
- Always disconnect the gas supply when the barbecue is not in use.
- Allow the barbecue to cool completely before moving or cleaning.
- Only use the pressure regulator and hose assembly supplied with the appliance.
- If using a gas cartridge, ensure it is securely inserted into the existing holder. A special pressure regulator (Tepro 8567) may be required for gas cartridge use.
3. Package Contents
Carefully unpack all components and check against the list below. If any parts are missing or damaged, do not attempt to assemble or operate the barbecue. Contact customer service immediately.
- 1x Burner with side shelves
- 2x Enameled cast iron cooking grates (approx. 23.5 x 35 cm each)
- 1x Stainless steel flame plate
- 1x Powder-coated lid with thermometer
- 1x Plastic lid handle
- 2x Removable side shelves
- 1x Enameled fire bowl
- 1x Removable grease drip tray
- 1x Piezo ignition integrated into the control knob
- 1x Gas cartridge holder
- 1x Hose and regulator for standard 5/11 kg gas bottles

Figure 2: Barbecue with one side shelf detached, showing portability.
4. Assembly and Setup
Assembly is required. Follow these steps carefully. It is recommended to have two people for assembly.
- Unpack Components: Remove all parts from the packaging and lay them out on a clean, flat surface. Verify all parts are present as per the "Package Contents" section.
- Attach Side Shelves: Secure the removable side shelves to the main barbecue body. Ensure they click firmly into place.
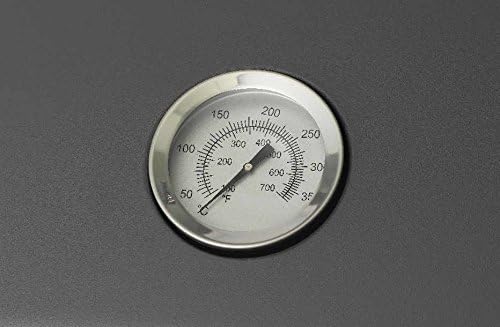
Figure 3: Attaching/Detaching the side shelves.
- Install Flame Plate and Grates: Place the stainless steel flame plate over the burner. Then, position the two enameled cast iron cooking grates onto the supports above the flame plate.
- Connect Gas Supply:
- For 5/11 kg Gas Bottles: Connect the supplied hose and regulator to the barbecue's gas inlet and then to your gas bottle. Ensure all connections are tight.
- For Gas Cartridges: Insert the gas cartridge into the designated holder. If a special regulator (Tepro 8567) is required for your cartridge type, ensure it is properly installed.
IMPORTANT: Perform a leak test on all gas connections using a soapy water solution before first use and after every gas bottle/cartridge change. Bubbles indicate a leak. Do not use the barbecue if a leak is detected.
5. Operation
5.1 Lighting the Barbecue
- Ensure the lid is open.
- Open the gas supply valve on your gas bottle/cartridge.
- Push in the control knob and turn it counter-clockwise to the HIGH position.

Figure 4: Control knob for gas flow and ignition.
- The integrated piezo ignition will spark, lighting the burner. If the burner does not light within 5 seconds, turn the control knob to OFF, close the gas supply, wait 5 minutes, and repeat the lighting procedure.
- Once lit, adjust the flame intensity by turning the control knob between HIGH and LOW.
5.2 Grilling
Preheat the barbecue for 10-15 minutes with the lid closed to reach desired cooking temperature. The integrated thermometer on the lid allows you to monitor the internal temperature.

Figure 5: Integrated lid thermometer for temperature monitoring.
Place food on the cooking grates. For even cooking, turn food regularly. The compact design and efficient burner ensure quick and consistent heat distribution.

Figure 6: Barbecue with lid open, revealing the cooking grates and flame plate.
5.3 Shutting Down
- Turn the control knob to the OFF position.
- Close the gas supply valve on your gas bottle/cartridge.
- Allow the barbecue to cool completely before covering or storing.
6. Maintenance and Cleaning
Regular cleaning and maintenance will extend the life of your barbecue and ensure safe operation. Always ensure the barbecue is cool and the gas supply is disconnected before cleaning.
- Cooking Grates: After each use, once cooled, brush off any food residue. For thorough cleaning, wash with warm soapy water and a non-abrasive sponge.
- Grease Drip Tray: The removable grease drip tray should be emptied and cleaned regularly to prevent grease fires.
- Exterior Surfaces: Wipe down the powder-coated lid and other exterior metal surfaces with a damp cloth and mild detergent. Avoid abrasive cleaners.
- Burner and Flame Plate: Periodically inspect the burner ports for blockages. Clean with a soft brush if necessary. Ensure the flame plate is free of debris.
- Storage: When not in use, especially during off-season, store the barbecue in a dry, protected area. The removable side shelves allow for more compact storage.
7. Troubleshooting
| Problem | Possible Cause | Solution |
|---|---|---|
| Burner does not light. | No gas supply, clogged burner, faulty igniter. | Check gas bottle/cartridge connection and level. Clean burner ports. Check igniter spark. |
| Low flame or uneven heat. | Low gas, partially clogged burner, regulator issue. | Replace gas bottle/cartridge. Clean burner. Ensure regulator is properly connected. |
| Gas smell. | Gas leak. | IMMEDIATELY turn off gas supply. Perform leak test with soapy water. Do not use until leak is fixed. |
| Lid handle loose. | Mounting screws loose. | Tighten screws on the lid handle. |
8. Specifications
| Feature | Detail |
|---|---|
| Model Number | 3142N |
| Dimensions (L x W x H) | 102 x 46.2 x 38 cm (40.16 x 18.19 x 14.96 inches) |
| Weight | 12.3 kg (27.12 lbs) |
| Cooking Surface | Approx. 47 x 35 cm (18.5 x 13.8 inches) |
| Burner Power | 3200 Watts |
| Fuel Type | Gas (Propane/Butane) |
| Gas Supply | Standard 5/11 kg gas bottles or gas cartridges (with optional Tepro 8567 regulator) |
| Material | Metal (Powder-coated), Enameled Cast Iron (grates), Stainless Steel (flame plate) |
| Color | Anthracite/Black |
| Ignition Type | Integrated Piezo Ignition |
9. Warranty and Support
Tepro products are manufactured with high-quality materials and undergo strict quality control. For information regarding warranty coverage, spare parts availability, or technical support, please refer to the warranty card included with your purchase or visit the official Tepro website.
Manufacturer: Tepro
Website: www.tepro-gmbh.de (Please check for local country-specific websites for support.)


