1. Introduction and Overview
The ROOFULL ECD829-Y is a versatile external CD/DVD drive designed for modern computers lacking built-in optical drives. This device functions as both a reader and a writer, allowing you to play movies, music, install software, burn data to discs, and rip audio/video content. Its compact and portable design, coupled with dual USB-A and USB-C connectivity, ensures broad compatibility and ease of use across various operating systems.

Image 1.1: The ROOFULL ECD829-Y External CD/DVD Drive, showcasing its sleek design and a disc being inserted into the tray.
2. Product Features
- Multi-functional Capability: Reads and writes CD-ROM, CD-R/RW, CD+R/RW, DVD-ROM, DVD±R/RW, DVD-RAM, and dual-layer DVD±R DL. (Note: Blu-ray and 4K discs are not supported.)
- High-Speed Data Transfer: Features upgraded USB 3.0 technology for data transfers up to 5 Gbps, significantly faster than USB 2.0. Max read/write speeds of DVD 8X and CD 24X.
- Dual Connectivity: Equipped with both USB-A and USB-C connectors for broad compatibility with various devices without needing additional adapters.
- Plug and Play: No manual driver installation required for most operating systems.
- Portable Design: Lightweight and ultra-slim with a built-in data cable that tucks neatly into the bottom of the drive for easy transport and storage.
- Reliable Performance: Engineered for stable operation, enhanced error correction, and minimal noise.

Image 2.1: Close-up of the ROOFULL drive's dual USB 3.0 and USB-C connector, emphasizing its plug-and-play convenience.
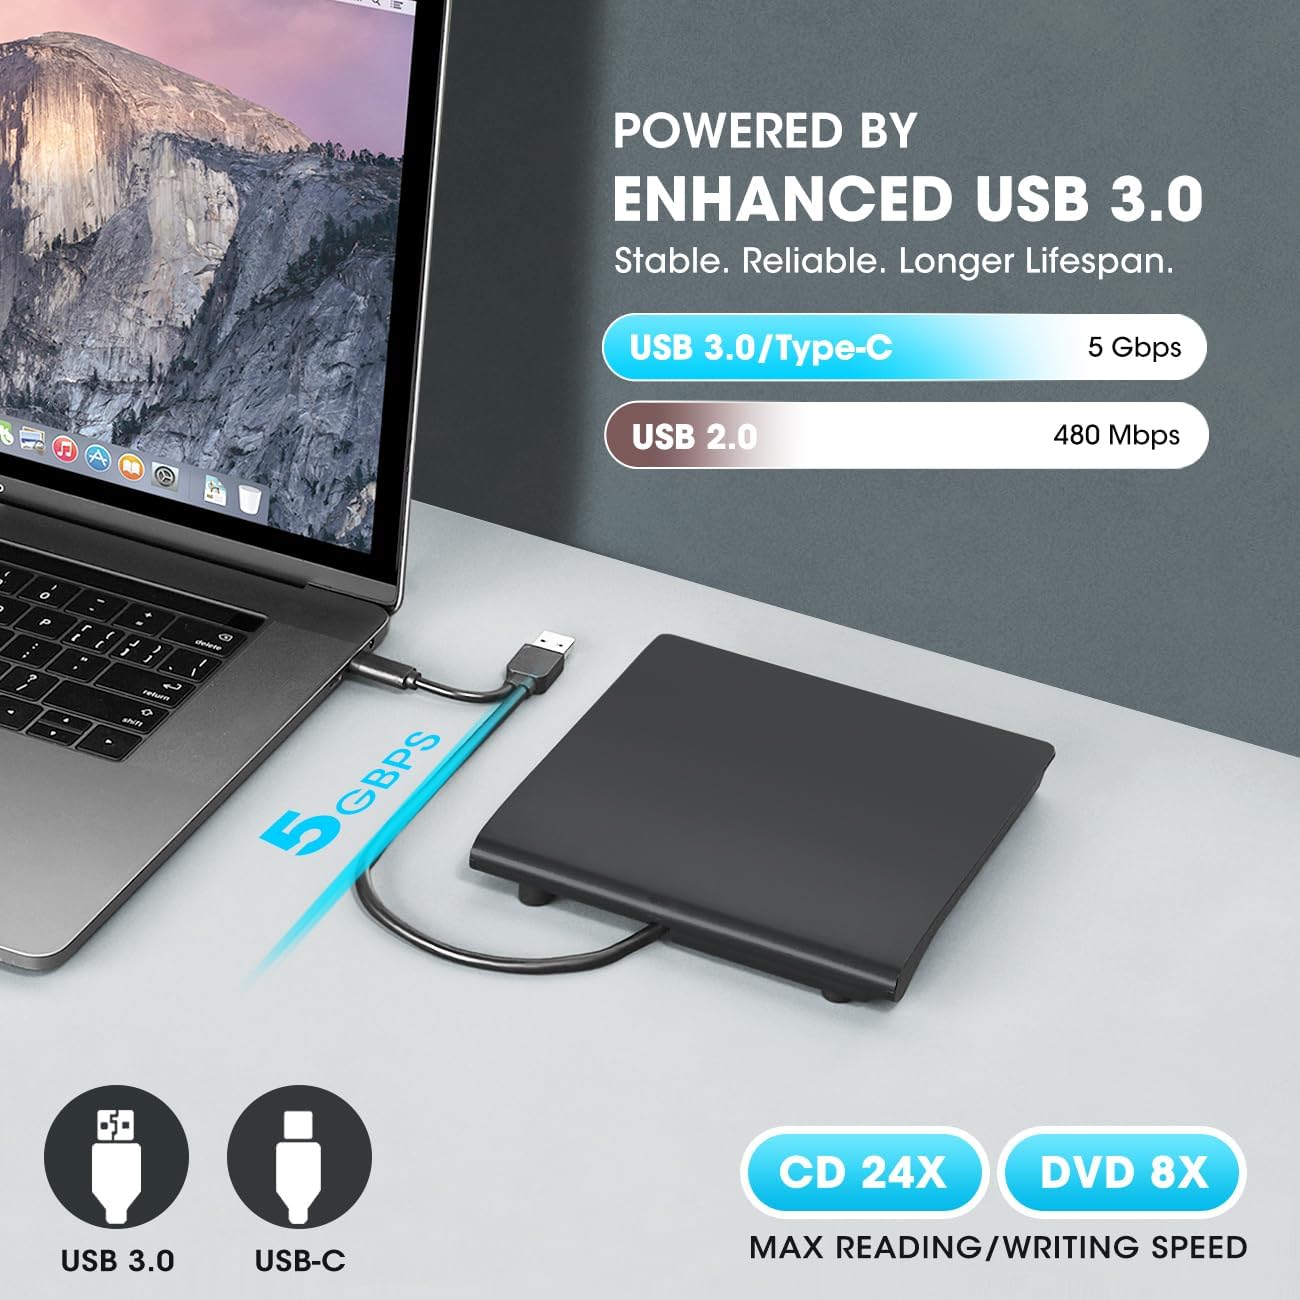
Image 2.2: The drive connected to a laptop, visually representing the 5 Gbps data transfer speed of USB 3.0 compared to USB 2.0.
3. Package Contents
- ROOFULL External CD/DVD Drive (Model ECD829-Y)
- Integrated USB 3.0 & USB-C Data Cable
- User Manual (this document)
4. Setup
- Connect the Drive: Locate the integrated USB cable tucked into the bottom of the drive. Connect the appropriate end (USB-A or USB-C) to an available USB port on your computer.
- Power Supply: The drive is typically powered directly via the USB connection. For desktop PCs, it is recommended to use a rear USB port on the motherboard to ensure sufficient power supply.
- Automatic Recognition: The drive should be automatically recognized by your operating system (Windows, Mac, Linux) without the need for manual driver installation.
- Mac Specific Note: On Mac, the disc drive icon will appear on the desktop after a disc is inserted and successfully read.

Image 4.1: The underside of the drive showing the integrated USB 3.0 and USB-C cable neatly stored in its compartment.
5. Operating Instructions
5.1 Playing/Reading Discs
- Open the Disc Tray: Press the eject button on the front of the drive to open the disc tray.
- Insert Disc: Carefully place your CD or DVD onto the tray, ensuring it is centered on the spindle.
- Close the Tray: Gently push the tray back into the drive until it clicks shut.
- Access Content: Your computer should recognize the disc. Use your preferred media player software (e.g., VLC Media Player, Windows Media Player, iTunes) to play movies, music, or access data files.
5.2 Burning/Writing Discs
- Insert Blank Disc: Follow steps 1-3 from "5.1 Playing/Reading Discs" using a blank CD-R/RW or DVD±R/RW.
- Use Burning Software: Utilize compatible burning software (e.g., Nero, Roxio, Windows built-in burning utility) to select the files you wish to burn and initiate the writing process.
- Monitor Progress: The drive's indicator light will typically show activity during the burning process. Avoid interrupting the process to prevent disc corruption.
5.3 Ejecting Discs (Mac Specific)
Due to macOS limitations, the tray cannot be opened via the physical button after playing or burning a disc. To eject a disc on a Mac:
- Right-click the desktop icon for the drive and select "Eject."
- Alternatively, go to "File" > "Eject" from the menu bar in Finder or your media player.
5.4 DVD Region Codes
DVDs are often region-coded, meaning they will only play on DVD drives that use the same region country codes. For example, if you are in the U.S. or Canada (Region 1), you need to set the DVD drive Region Code to #1 to play Region 1 DVDs. CD's are not region coded. Note that external optical drives typically allow changing the region code only a limited number of times (e.g., 4-5 times).

Image 5.1: Visual representation of DVD region codes and their corresponding geographical areas.
6. Compatibility
6.1 Compatible Operating Systems:
- Windows 11 / 10 / 8.1 / 7 / Vista / XP / 98 / SE / ME / 2000
- Linux
- macOS 10.16 or later (including Apple MacBook, MacBook Pro, MacBook Air, Mac Studio/Pro with M1/2/3 chip)
6.2 Incompatible Devices/Formats:
- Chromebooks
- Smartphones, TVs, iPads, iPhones, Projectors
- Trucks, Cars
- Some Surface models
- Blu-ray / 4K discs
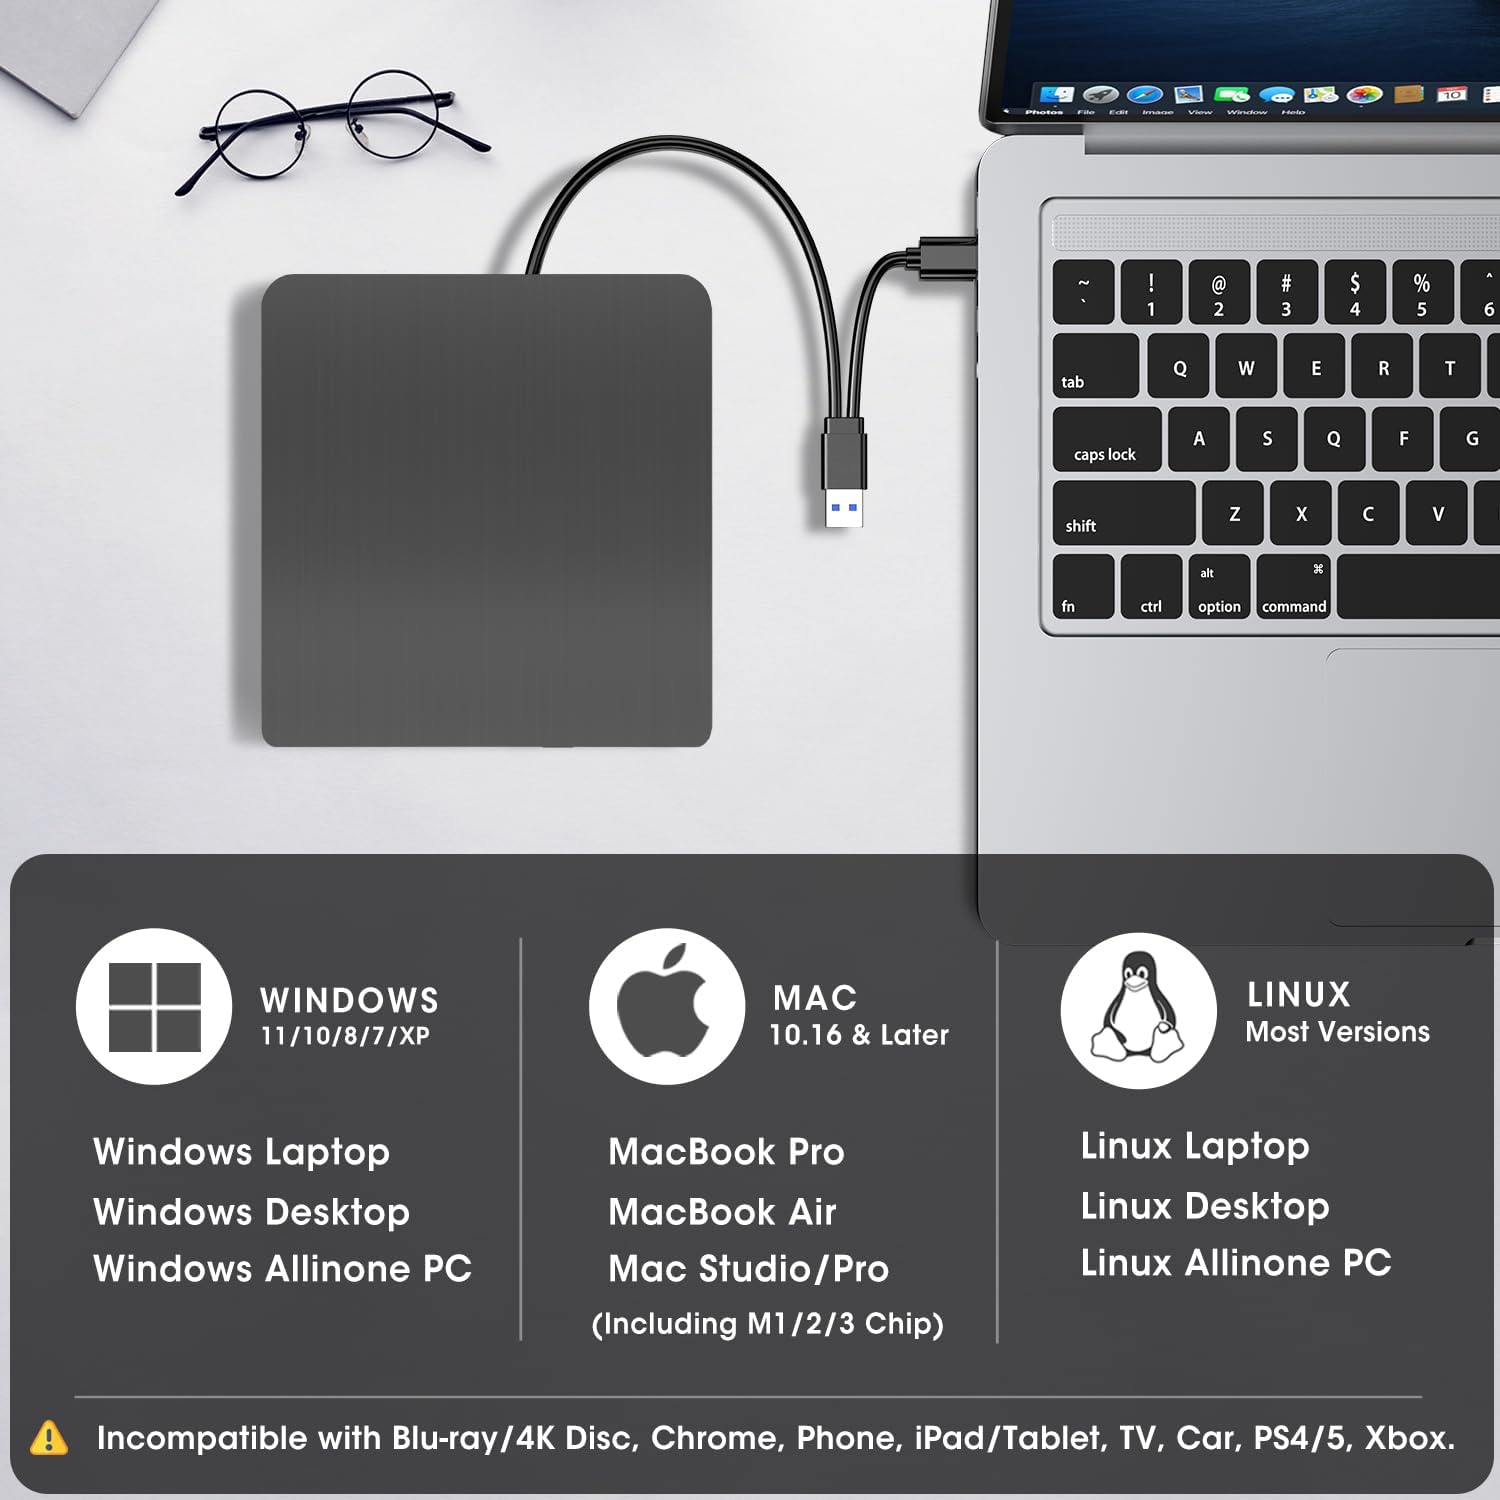
Image 6.1: A visual guide to the drive's compatibility with various operating systems and devices, clearly listing unsupported platforms.
7. Maintenance
- Cleaning: Use a soft, dry cloth to clean the exterior of the drive. Do not use liquid cleaners or abrasive materials.
- Disc Care: Always handle discs by their edges to avoid fingerprints and scratches. Store discs in protective cases when not in use.
- Storage: When not in use, store the drive in a cool, dry place, away from direct sunlight and extreme temperatures. Utilize the built-in cable storage to prevent damage to the cable.
- Avoid Magnetic Objects: Do not keep the machine near strong magnetic objects, as this can interfere with its operation.
- Stability: Place the machine on a stable, flat surface during operation to ensure proper disc reading and writing.
8. Troubleshooting
- Drive Not Recognized:
- Ensure the USB cable is securely connected to both the drive and your computer.
- Try connecting to a different USB port. For desktop PCs, use a rear USB port directly on the motherboard.
- Restart your computer.
- Disc Not Reading/Writing:
- Check if the disc is clean and free from scratches or damage.
- Ensure the disc type is supported by the drive (e.g., not Blu-ray/4K).
- Verify that you have appropriate media player or burning software installed and updated.
- For DVDs, check the region code settings on your computer.
- Disc Not Ejecting (Windows/Linux): Press the eject button on the drive. If it doesn't work, try ejecting through your operating system's file explorer (right-click the drive icon and select "Eject").
- Disc Not Ejecting (Mac): Right-click the drive icon on your desktop and select "Eject," or go to "File" > "Eject" from the menu bar. The physical button may not function after media playback/burning on macOS.
- Insufficient Power: If the drive is not functioning correctly or intermittently, it may not be receiving enough power. Try connecting it to a different USB port, especially a powered USB hub if available, or a rear USB port on a desktop PC.
9. Specifications
| Brand | ROOFULL |
| Model Number | ECD829-Y |
| Optical Drive Type | CD-ROM, CD-R, CD±RW, DVD-ROM, DVD±R, DVD±RW |
| Optical Storage Read Speed | Max 24xCD / 8xDVD |
| Optical Storage Write Speed | Max 24xCD / 8xDVD |
| Hardware Interface | USB 3.0 Type A, USB 3.0 Type C |
| Item Weight | 10.6 ounces |
| Product Dimensions (LxWxH) | 5.79 x 5.59 x 0.69 inches |
| Color | Black |
10. Warranty and Support
ROOFULL is committed to providing quality products and customer satisfaction. Every drive undergoes strict testing processes before shipment. We offer up to 2 years of after-sales service for this product.
If you encounter any issues or require technical assistance, please do not hesitate to reach out to ROOFULL customer support. We are here to help with troubleshooting or device replacement to ensure your satisfaction.
For support, please visit the official ROOFULL store on Amazon or contact us directly through the platform where you purchased the product.


