
1. Introduction
This manual provides essential information for the safe and efficient use of your Speroni CAM 100 self-priming jet pump. Please read these instructions carefully before installation, operation, or maintenance. Keep this manual for future reference.
The Speroni CAM 100 is a single-phase self-priming jet pump designed for domestic water systems. It offers excellent hydraulic performance and high-pressure capability, capable of drawing water from depths up to 8 meters. This pump is suitable for lifting and distributing water in small to medium-sized domestic tanks and can operate effectively even with water containing dissolved gases.
2. Safety Instructions
General Safety:
- Always disconnect the pump from the power supply before performing any installation, maintenance, or repair work.
- Ensure the electrical installation complies with local regulations and standards.
- The pump must be properly grounded to prevent electric shock.
- Do not operate the pump with damaged cables or plugs.
- Keep children and unauthorized personnel away from the pump during operation.
- Do not use the pump to handle flammable, corrosive, or explosive liquids.
- Protect the pump from frost.
Electrical Safety:
- The pump is designed for 230V, 50Hz power supply. Verify your power source matches these requirements.
- Install a residual current device (RCD) with a tripping current not exceeding 30mA for additional protection.
- Avoid operating the pump in wet conditions or with wet hands.
3. Product Overview
The Speroni CAM 100 is a robust self-priming jet pump constructed with a cast iron pump body and a stainless steel impeller, ensuring durability and efficient performance.

Figure 3.1: Side view of the Speroni CAM 100 self-priming jet pump, showing the motor and pump body assembly.

Figure 3.2: Front view of the Speroni CAM 100 pump, highlighting the motor cooling fan cover.

Figure 3.3: Close-up of the stainless steel impeller, a key component for efficient water transfer.
4. Technical Specifications
| Specification | Value |
|---|---|
| Model | CAM 100 |
| Manufacturer | SPERONI |
| Power Consumption | 1100 W |
| Voltage | 230 V |
| Frequency | 50 Hz |
| Max Flow Rate | 60 Liters per minute |
| Max Head | 46 m |
| Max Suction Height | 8 m |
| Max Liquid Temperature | 35°C |
| Pump Body Material | Cast Iron |
| Impeller Material | Stainless Steel |
| Dimensions (L x W x H) | 42.1 x 17.6 x 19.4 cm |
| Weight | 16.5 kg |
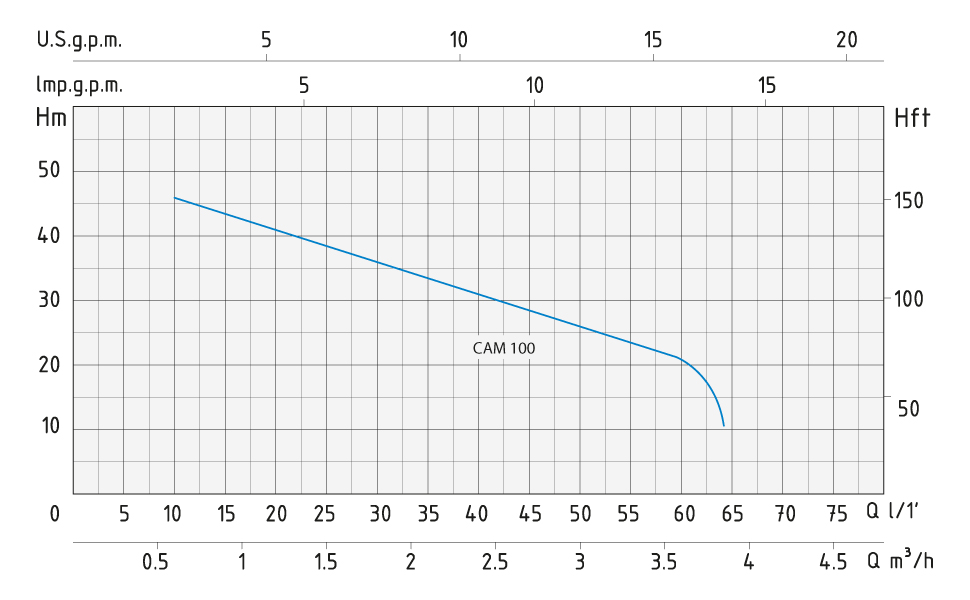
Figure 4.1: Performance curve for the CAM 100 pump, illustrating flow rate (Q) versus head (Hm).
5. Installation and Setup
Location:
- Install the pump in a dry, well-ventilated area, protected from direct sunlight, rain, and frost.
- Mount the pump on a stable, level surface to minimize vibration.
- Ensure adequate space around the pump for ventilation and maintenance access.
Piping Connections:
- Use pipes of appropriate diameter to avoid flow restrictions.
- Ensure all connections are airtight to prevent air leaks, which can affect self-priming capability.
- Install a foot valve with a strainer at the end of the suction pipe to prevent debris from entering the pump and to maintain prime.
- For the discharge line, install a check valve if necessary to prevent backflow.
Electrical Connection:
- Connect the pump to a dedicated electrical circuit with appropriate overcurrent protection.
- Ensure the power supply voltage and frequency match the pump's specifications (230V, 50Hz).
- The pump must be correctly grounded.
Priming the Pump:
- Remove the priming plug located on the top of the pump body.
- Fill the pump casing completely with clean water until it overflows from the priming hole.
- Replace the priming plug securely.
- Open any valves on the suction and discharge lines.
- The pump is now ready for initial operation.

Figure 5.1: Close-up view of the pump's inlet and outlet ports, where piping connections are made.

Figure 5.2: Detail of the priming plug (top) and drain plug (bottom) on the pump casing.
6. Operating Instructions
- Ensure the pump is properly primed as described in Section 5.
- Verify all valves in the suction and discharge lines are open.
- Connect the pump to the power supply. The pump will start automatically if connected to a pressure switch system, or manually if controlled by a switch.
- Monitor the pump during the first few minutes of operation to ensure it is drawing water and operating smoothly.
- If the pump fails to draw water after a few minutes, switch it off, disconnect power, and re-prime it. Check for air leaks in the suction line.
- The pump is designed for continuous service within its specified operating limits.
7. Maintenance
Regular maintenance ensures the longevity and optimal performance of your pump.
- Regular Checks: Periodically inspect the pump for any signs of leaks, unusual noises, or vibrations.
- Cleaning: Keep the pump exterior clean and free from dust and debris to ensure proper motor cooling.
- Foot Valve/Strainer: Regularly check and clean the foot valve strainer to prevent blockages and maintain efficient suction.
- Frost Protection: In cold climates, drain the pump completely during periods of inactivity to prevent damage from freezing. Remove the drain plug (Figure 5.2) to empty the casing.
- Long-Term Storage: If storing the pump for an extended period, drain all water, clean it thoroughly, and store it in a dry, protected environment.
8. Troubleshooting
| Problem | Possible Cause | Solution |
|---|---|---|
| Pump does not start | No power supply; Motor overload; Seized impeller | Check power connection and circuit breaker; Allow motor to cool and reset thermal protector; Inspect impeller for obstructions. |
| Pump runs but does not deliver water | Pump not primed; Air leak in suction line; Suction lift too high; Clogged foot valve/strainer; Low water level in source | Re-prime the pump; Check all suction connections for leaks; Verify suction height is within 8m limit; Clean foot valve/strainer; Ensure adequate water supply. |
| Low flow or pressure | Partial blockage in suction/discharge; Air in system; Worn impeller; Motor running slow | Inspect and clear pipes; Re-prime the pump; Contact qualified service personnel for impeller inspection; Check power supply voltage. |
| Excessive noise or vibration | Cavitation (air in water); Loose mounting; Bearing wear; Debris in pump | Ensure pump is fully primed and suction line is airtight; Securely fasten pump to mounting surface; Contact service for bearing replacement; Inspect pump casing for foreign objects. |
9. Warranty and Support
Speroni products are manufactured to high-quality standards. This product comes with a standard manufacturer's warranty against defects in materials and workmanship. Please refer to your purchase documentation for specific warranty terms and duration.
Spare parts for this model are generally available for up to 7 years from the date of manufacture.
For technical assistance, spare parts, or warranty claims, please contact your authorized Speroni dealer or customer support. When contacting support, please have your pump's model number (CAM 100) and serial number (if applicable) ready.
Contact Information:
Speroni Customer Support
support@speroni.it
www.speroni.it