1. Introduction
This manual provides essential information for the safe and efficient installation, operation, and maintenance of your Sentiotec K1 Sauna Control Unit. Please read these instructions carefully before installation and use, and retain them for future reference. The Sentiotec K1 features innovative K1-Next Technology, offering a monobloc housing with integrated controls for a seamless sauna experience.
2. Safety Instructions
WARNING: Risk of Electric Shock and Fire!
- Installation and electrical connections must be performed by a qualified electrician in accordance with all local and national electrical codes.
- Ensure the main power supply to the sauna heater and control unit is disconnected before any installation, maintenance, or troubleshooting.
- Do not operate the control unit if it is damaged or malfunctioning.
- Keep the control unit dry and away from direct water spray.
- This appliance is not intended for use by persons (including children) with reduced physical, sensory or mental capabilities, or lack of experience and knowledge, unless they have been given supervision or instruction concerning use of the appliance by a person responsible for their safety.
- Children should be supervised to ensure that they do not play with the appliance.
3. Product Overview
The Sentiotec K1 Sauna Control Unit is designed for intuitive control of your sauna heater and lighting. It features a compact, monobloc design with clearly marked controls.
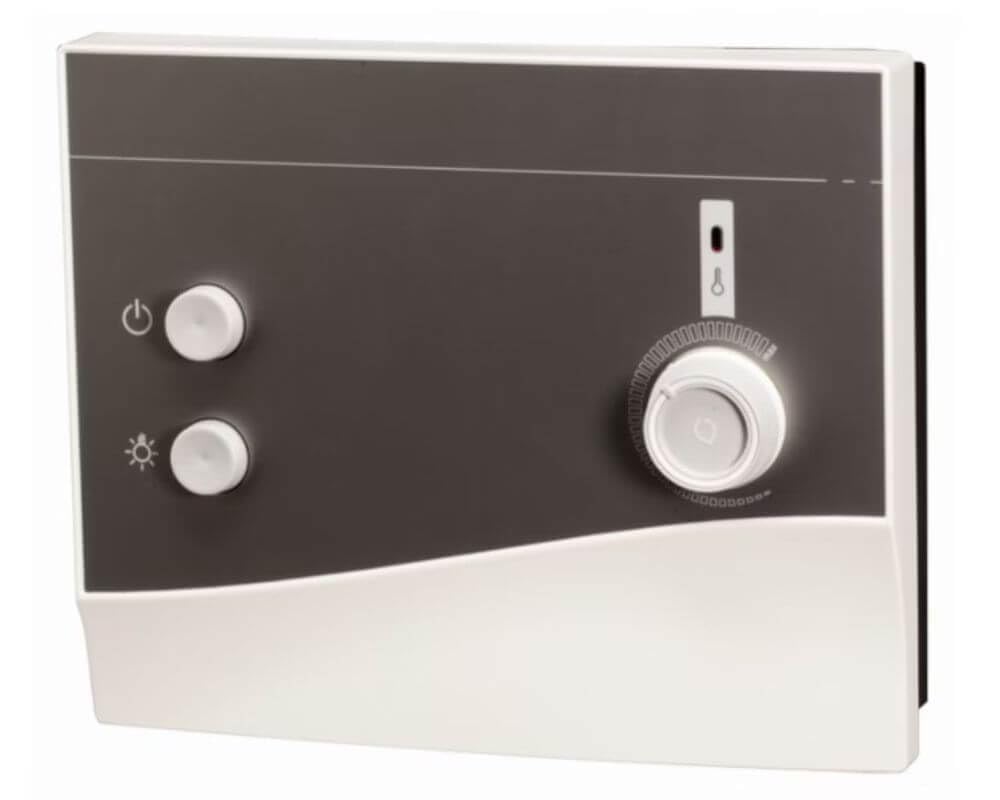
This image displays the Sentiotec K1 Sauna Control Unit. The unit features a two-tone design, with a dark gray upper panel and a white lower panel. On the left side of the dark gray panel, there are two white push-buttons. The top button is marked with a power symbol (circle with a vertical line), and the bottom button is marked with a light bulb symbol. On the right side, there is a large white rotary knob for temperature adjustment, with a temperature scale indicated around its circumference and a thermometer icon above it. The overall design is clean and functional.
Control Elements:
- Power Button (⏻): Activates and deactivates the sauna heater.
- Light Button (☼): Controls the sauna cabin lighting.
- Temperature Control Knob: Adjusts the desired sauna temperature.
4. Installation
Professional installation by a qualified electrician is mandatory.
4.1. Mounting Location
- Mount the control unit outside the sauna cabin, in a dry, easily accessible location.
- Ensure adequate ventilation around the unit.
- Avoid locations exposed to direct sunlight or extreme temperatures.
4.2. Electrical Connection
- The unit requires a supply voltage of 400 V 3 N ~.
- Connect the sauna heater, temperature sensor, and light according to the wiring diagram provided with the product packaging.
- Ensure all connections are secure and properly insulated.
- The control unit includes temperature and safety sensors for the oven. These must be correctly installed within the sauna heater.
- Maximum load capacity for the heater is 9.0 kW.
5. Operation
The Sentiotec K1 allows for simple and precise control of your sauna environment.
5.1. Powering On/Off
- To turn on the sauna heater, press the Power Button (⏻).
- To turn off the sauna heater, press the Power Button (⏻) again.
5.2. Adjusting Temperature
- Rotate the Temperature Control Knob to set the desired sauna temperature.
- The temperature can be continuously adjusted from 40 °C to 125 °C.
- The maximum temperature displayed is 125 °C.
5.3. Controlling Sauna Light
- Press the Light Button (☼) to turn the sauna cabin light on or off.
5.4. Heating Time Limit
- The control unit has a fixed heating time limit of 6 hours. After this period, the heater will automatically shut off for safety.
6. Maintenance
Regular maintenance ensures the longevity and proper functioning of your control unit.
- Ensure the power supply is disconnected before cleaning.
- Wipe the surface of the control unit with a soft, damp cloth. Do not use abrasive cleaners or solvents.
- Do not allow water to enter the unit.
- Periodically check all electrical connections for tightness and signs of wear.
7. Troubleshooting
The Sentiotec K1 is equipped with an optical error indicator to assist in diagnosing issues.
- No Power / Unit Unresponsive: Check the main power supply to the sauna and the control unit. Verify all electrical connections.
- Heater Not Activating: Ensure the temperature setting is above the current sauna temperature. Check for any error indicators.
- Optical Error Indicator Active: The unit features an optical error indicator. This may signal a sensor break or a short circuit. In such cases, the unit will automatically shut down.
- Unit Shuts Down Unexpectedly: This could be due to the 6-hour heating time limit or a safety shutdown triggered by a sensor issue (break or short circuit).
If problems persist after checking these points, contact a qualified electrician or Sentiotec customer support.
8. Specifications
| Feature | Specification |
|---|---|
| Brand | Sentiotec |
| Model | K1 |
| Supply Voltage / Phase | 400 V 3 N ~ |
| Dimensions (Unit) | 236 x 90 x 195 mm |
| Temperature Adjustment Range | 40 – 125 °C |
| Maximum Load | 9.0 kW |
| Heating Time Limit | 6 hours |
| Light Control | Yes |
| Ventilation Control | No |
| Smartphone Control | No |
| Item Weight | 5 Kilograms |
| Discontinued by Manufacturer | No |
9. Warranty and Support
For warranty information, please refer to the documentation included with your purchase or contact your retailer. For technical support or inquiries, please visit the official Sentiotec website or contact their customer service department.
Keep your proof of purchase for any warranty claims.