1. Introduction
The PROZOR Bi-directional Digital Audio Converter is designed to convert digital audio signals between coaxial and optical (Toslink) formats. It allows for flexible audio routing, supporting conversion from coaxial to optical, or optical to coaxial, with simultaneous output to both formats. This device is ideal for integrating various audio components in your home theater system, ensuring high-quality, noise-free audio transmission.
2. Package Contents
Please verify that all items are included in your package:
- PROZOR Bi-directional Digital Audio Converter Unit
- 2m SPDIF Optical Toslink Cable
- USB Power Cable
- User Manual

Figure 2.1: Package Contents
The image above displays the items typically included in the product package: the main converter unit, a 2-meter optical Toslink cable, a USB power cable for device operation, and the user manual.
3. Product Overview
The PROZOR Bi-directional Digital Audio Converter features clearly labeled input and output ports for ease of use. It includes a selector switch to choose between Coaxial and Toslink input sources.

Figure 3.1: Converter Ports and Indicators
This image illustrates the various ports and indicators on the converter. On one side, you will find the Coaxial Input, Optical Toslink Input, and an Input Selector Switch. The other side features the Optical Toslink Output, Coaxial Output, DC 5V/1A Power input, and a Power Indicator LED.
3.1 Conversion Modes
The converter supports four distinct conversion modes:
- Mode 1: Digital Coaxial Input to Digital Coaxial Output
- Mode 2: Digital Coaxial Input to Optical Toslink Output
- Mode 3: Optical Toslink Input to Digital Coaxial Output
- Mode 4: Optical Toslink Input to Optical Toslink Output

Figure 3.2: Conversion Mode Diagram
The diagram above visually represents the four possible audio signal conversion paths, highlighting the flexibility of the bi-directional functionality.
4. Setup Instructions
Follow these steps to connect your PROZOR Bi-directional Digital Audio Converter:
- Connect Input Source: Connect your audio source (e.g., TV, PS4, Blu-ray player) to the converter's input port (either Coaxial or Optical Toslink) using the appropriate cable.
- Select Input: Use the 'Select' switch on the converter to match your input source (Coaxial or Toslink).
- Connect Output Device: Connect your audio receiving device (e.g., soundbar, amplifier, 5.1 surround system) to the converter's output port (either Coaxial or Optical Toslink). You can connect to both outputs simultaneously.
- Power On: Connect the USB power cable to the converter's DC 5V/1A port and plug the other end into a USB power source (e.g., TV USB port, USB wall adapter). The power indicator LED will illuminate.
- Configure TV Audio Output (Important): Access your TV's audio settings and ensure the digital audio output format is set to PCM/LPCM. This converter does not support Dolby AC3/DTS 5.1CH or other compressed audio formats. If your TV is set to a compressed format, you will not get sound.

Figure 4.1: Typical Connection Diagram
This diagram illustrates a common setup where various digital audio sources are connected to the converter, which then outputs the audio to different sound systems.
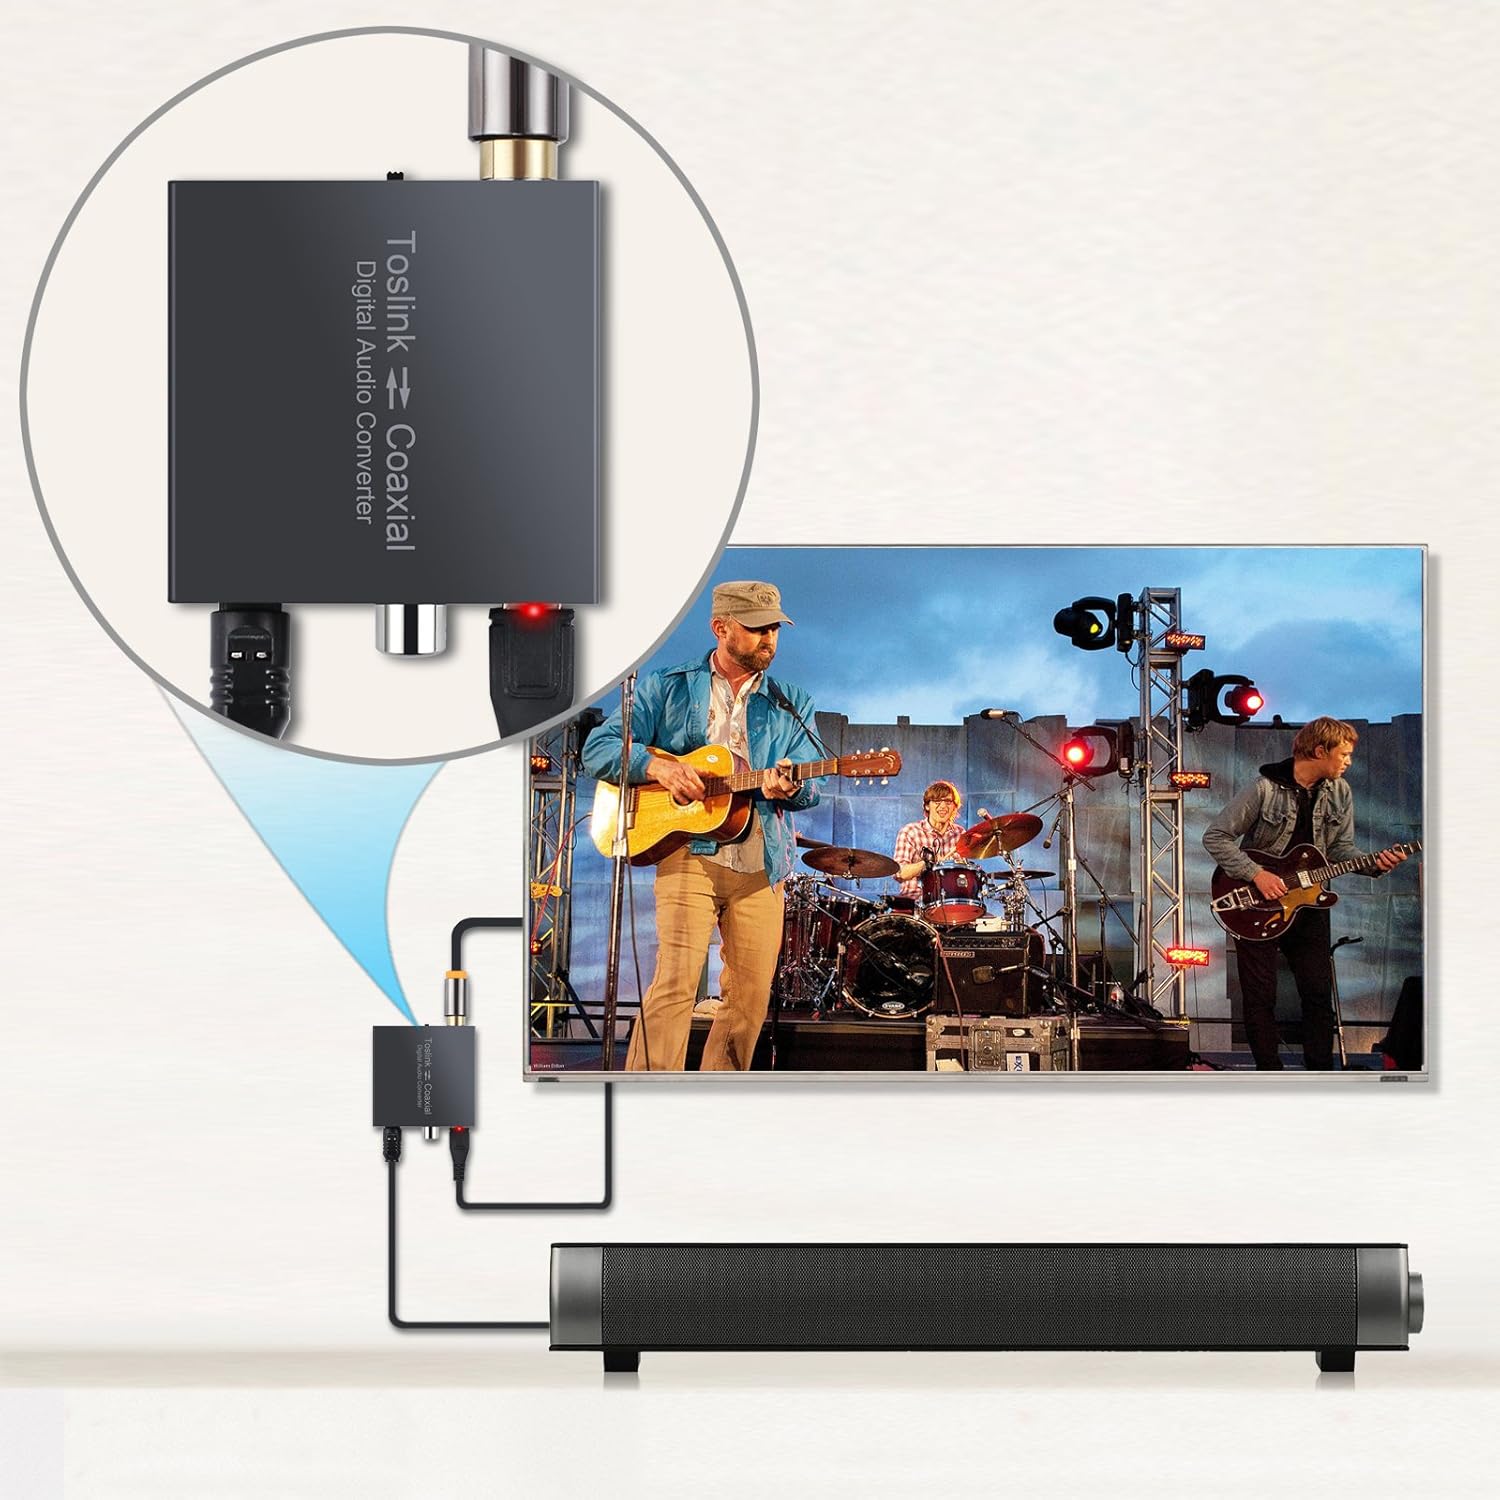
Figure 4.2: Example Connection with TV and Soundbar
This image provides a visual example of the converter in a practical setup, connecting a TV to a soundbar for enhanced audio.
4.1 Setup Demonstration Video
Video 4.1: PROZOR 192K Bi-directional Coaxial Optical Converter Setup Guide. This video demonstrates the physical connections and basic setup of the bi-directional converter.
Video 4.2: Optical to Coaxial or Coaxial to Optical Audio Converter Demonstration. This video provides a detailed look at the conversion process and how to switch between input types.
Video 4.3: LiNKFOR 192KHz DAC Digital to Analog Audio Converter Setup. This video demonstrates general setup steps for a digital audio converter, including important TV audio output settings (PCM/LPCM).
5. Operating Instructions
Once connected, the converter operates automatically based on the selected input. Ensure the 'Select' switch is set to the correct input type (Coaxial or Toslink) corresponding to your audio source. The red power indicator LED confirms the device is receiving power and functioning.
The device supports LPCM2.0/DTS/Dolby AC3/5.1CH audio formats, providing lossless digital audio conversion. It supports sampling rates up to 192 KHz 24bit for excellent audio output, as well as 32KHz, 44.1KHz, 48KHz, and 96KHz.
6. Troubleshooting
- No Sound Output:
- Ensure the converter is powered on (red LED indicator).
- Verify that the 'Select' switch is set to the correct input source (Coaxial or Toslink).
- Check all cable connections for secure fit.
- Crucially, confirm your TV's digital audio output is set to PCM/LPCM. This converter does not support Dolby AC3/DTS 5.1CH or other compressed audio formats.
- Test with different audio sources and output devices if possible.
- Distorted or Poor Quality Sound:
- Ensure all cables are high quality and not damaged.
- Check for any loose connections.
- Verify that the audio source is providing a clean signal.
- Intermittent Audio:
- Check the power supply for stability.
- Ensure cables are not bent or damaged.
7. Specifications
| Feature | Description |
|---|---|
| Model Number | 8541740581 |
| Dimensions | 16 x 10.21 x 2.49 cm (6.3 x 4.02 x 0.98 inches) |
| Item Weight | 160 g |
| Material | Metal |
| Input Interface | Coaxial, Optical (Toslink) |
| Output Interface | Coaxial, Optical (Toslink) |
| Sampling Rate Support | Up to 192 KHz 24bit (also 32KHz, 44.1KHz, 48KHz, 96KHz) |
| Audio Format Support | LPCM2.0/DTS/Dolby AC3/5.1CH |
| Power Supply | DC 5V/1A (via USB cable) |
| Mounting Type | Cable Mount |
| Upper Temperature Rating | 40 Degrees Celsius |

Figure 7.1: Product Dimensions
The image above provides a visual representation of the compact dimensions of the converter, making it easy to integrate into any setup.
8. Warranty and Support
PROZOR products are designed for reliability and performance. For warranty information or technical support, please refer to the contact details provided with your purchase or visit the official PROZOR website. Keep your purchase receipt for warranty claims.


