
1. Introduction and Product Overview
This manual provides essential information for the safe and effective use of your Mitutoyo Test Indicator, model 513-415-10H TI-123HX. This precision instrument is designed for accurate measurements in narrow or deep areas where conventional dial gauges may not be suitable.
Key features include a unique structure that minimizes stylus play, ensuring consistent sensitivity and follow-up accuracy. The instrument features a weakly magnetic pointer and carbide stylus, reducing susceptibility to magnetic environments. For specific applications, models with non-magnetic ruby styli are also available, offering superior wear resistance and suitability for electrical discharge machining (EDM) processes.
The dial plate has been redesigned with a universal font and optimized color scheme for enhanced visibility. An integrated outer frame and cover plate design helps prevent ingress of cutting fluids or oils, though the unit is not waterproof.
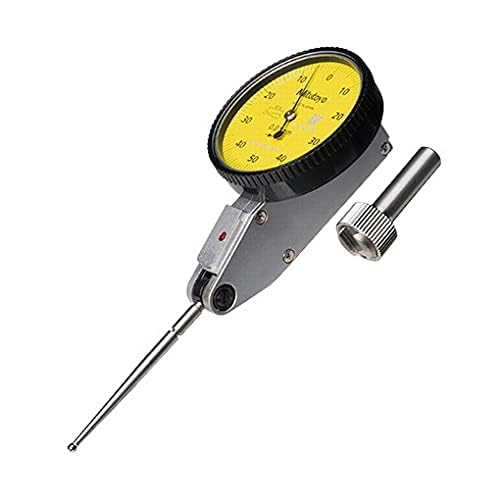
Figure 1: Mitutoyo Test Indicator 513-415-10H TI-123HX. This image displays the compact and precise design of the test indicator, highlighting its dial face and stylus.
2. Setup
- Unpacking: Carefully remove the test indicator from its packaging. Inspect for any signs of damage during transit.
- Mounting: The main body features three dovetail grooves. Attach the supplied φ6 dovetail stem (standard accessory) to one of these grooves. The mounting position can be adjusted to suit your specific measurement setup and application, enhancing convenience.
- Secure Attachment: Ensure the test indicator is securely fastened to a stable stand or fixture to prevent movement during measurement.
- Stylus Inspection: Verify that the stylus is clean and free from any obstructions or damage.
3. Operating Instructions
- Zero Setting: Before measurement, bring the stylus into contact with a known reference surface or master gauge. Rotate the outer bezel to align the dial pointer with the zero mark.
- Measurement: Gently bring the stylus into contact with the workpiece surface to be measured. The pointer will indicate the deviation from the zero reference.
- Reading the Dial: Read the measurement directly from the dial. The dial plate's improved visibility features, including the universal font and optimized color scheme, aid in accurate readings. The stylus length is also illustrated on the dial plate for reference.
- Measuring Narrow/Deep Areas: The compact design and sensitive stylus allow for precise measurements in confined spaces or at significant depths that are inaccessible to standard dial gauges.
- Magnetic Environments: The weakly magnetic pointer and carbide stylus are designed to be less affected by magnetic fields. For highly sensitive applications in strong magnetic environments, consider using models equipped with non-magnetic ruby styli.
4. Maintenance
- Cleaning: After each use, wipe the instrument clean with a soft, lint-free cloth. For stubborn dirt, use a cloth lightly dampened with isopropyl alcohol. Avoid harsh solvents.
- Stylus Care: Keep the stylus tip clean. If using a carbide stylus, handle with care to prevent chipping. Ruby styli offer higher wear resistance.
- Storage: Store the test indicator in its protective case when not in use. Keep it in a dry, dust-free environment away from direct sunlight and extreme temperatures.
- Lubrication: This instrument typically does not require user lubrication. Refer to manufacturer guidelines for any specific lubrication requirements during professional servicing.
- Inspection: Periodically inspect the instrument for any signs of wear, damage, or loose components.
5. Troubleshooting
| Problem | Possible Cause | Solution |
|---|---|---|
| Inaccurate readings | Improper zero setting Stylus dirty or damaged Loose mounting Temperature fluctuations | Re-zero the instrument Clean or replace stylus Ensure secure mounting Allow instrument to acclimate to ambient temperature |
| Pointer movement is sticky or erratic | Dust or debris inside mechanism Stylus bent or damaged Excessive measuring force | Clean the instrument thoroughly; if problem persists, seek professional service Replace stylus Apply appropriate measuring force |
| Stylus play/chatter | Mounting stem not tightened Internal wear | Ensure dovetail stem is securely tightened If internal wear is suspected, professional service is required |
6. Specifications
| Specification | Value |
|---|---|
| Model Number | 513-415-10H |
| Type | Standard, Vertical, No-clutch |
| Graduation | 0.01 mm |
| Measuring Range | 1.0 mm |
| Dial Reading | 0-50-0 |
| Overall Measuring Range Indication Error | 10 µm |
| 10 Scale Indication Error | 5 µm |
| Repeatability | 5 µm |
| Repeatability Precision | 3 µm |
| Measuring Force | 0.2 N or less |
| Mass | 45 g |
| Product Dimensions (LxWxH) | 13.49 x 8.99 x 3.71 cm |
| Thickness | 34.5 mm |
| Batteries Required | No |
| Inspection Standard | JIS B7533:2015 |
Note: This product is intended for business use.
7. Warranty and Support
For information regarding product warranty, service, or technical support, please refer to the official Mitutoyo website or contact your authorized Mitutoyo dealer. Keep your purchase receipt as proof of purchase for warranty claims.


