1. Introduction
This manual provides essential information for the safe and efficient installation, operation, and maintenance of your Garland 3072901 Thermostat Kit. Please read these instructions thoroughly before attempting any installation or operation. Retain this manual for future reference.
2. Product Overview
The Garland 3072901 Thermostat Kit is designed for precise temperature control in compatible commercial cooking equipment. This kit includes the main BJ thermostat unit, a flange nipple (#26-3808), a stem adaptor (#56-1197), a 1/4" x 7-1/2" pilot tube, and necessary mounting screws.
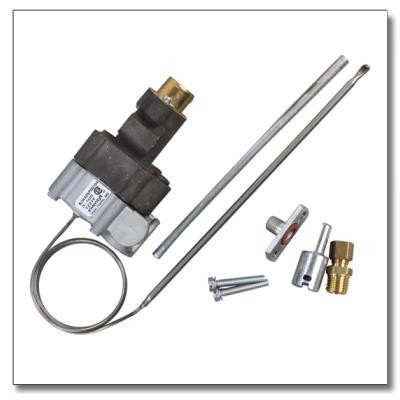
An image displaying the complete Garland 3072901 Thermostat Kit. It includes the main thermostat unit with a coiled capillary tube, a flange nipple, a stem adaptor, a pilot tube, and mounting screws.
3. Setup and Installation
Installation of the Garland 3072901 Thermostat Kit should only be performed by a qualified service technician. Improper installation can lead to equipment malfunction, property damage, or personal injury. Always ensure the equipment is disconnected from its power source and gas supply before beginning installation.
3.1 Component Identification
- BJ Thermostat: The primary control unit for temperature regulation.
- Flange Nipple (#26-3808): Used for secure connection.
- Stem Adaptor (#56-1197): Facilitates proper sensor placement.
- Pilot Tube (1/4" x 7-1/2"): Connects to the pilot light assembly.
- Screws: For mounting the thermostat unit.
3.2 Installation Steps (General Guidelines)
- Disconnect all power and gas supplies to the appliance.
- Carefully remove the existing thermostat, noting all connections.
- Mount the new BJ thermostat unit using the provided screws. Ensure it is securely fastened.
- Connect the flange nipple and stem adaptor as required by your appliance's configuration.
- Install the 1/4" x 7-1/2" pilot tube, ensuring a tight, leak-free connection.
- Reconnect all gas and electrical connections according to the appliance manufacturer's specifications.
- Perform a leak test on all gas connections before restoring power.
- Verify proper operation and calibration after installation.
4. Operating Instructions
Once installed and verified by a qualified technician, the thermostat controls the temperature of your appliance. The BJ thermostat features a bypass adjustment at the top and the gas inlet positioned downwards when viewed from the rear. Refer to the appliance's specific manual for detailed instructions on setting and adjusting the temperature.
4.1 Temperature Adjustment
Rotate the thermostat knob to the desired temperature setting. Allow sufficient time for the appliance to reach the set temperature. The thermostat will automatically regulate the heat to maintain this setting.
4.2 Pilot Light Operation
Ensure the pilot light is lit before attempting to operate the main burner. If the pilot light extinguishes, follow the appliance manufacturer's instructions for relighting. The pilot tube included in this kit is integral to the pilot light system.
5. Maintenance
Regular maintenance ensures the longevity and optimal performance of your thermostat kit and the appliance it controls. Always disconnect power and gas before performing any maintenance.
- Cleaning: Keep the thermostat and surrounding area clean and free from grease and debris. Use a soft, dry cloth for cleaning. Do not use abrasive cleaners or solvents.
- Inspection: Periodically inspect the capillary tube for kinks, damage, or signs of wear. Check all connections for tightness and signs of gas leaks.
- Professional Service: It is recommended to have the thermostat and appliance inspected and serviced annually by a qualified technician.
6. Troubleshooting
This section addresses common issues you might encounter. For complex problems, contact a qualified service technician.
6.1 Appliance Not Heating
- Check Pilot Light: Ensure the pilot light is lit. If not, relight according to appliance instructions.
- Thermostat Setting: Verify the thermostat is set to the desired temperature.
- Gas Supply: Confirm the gas supply to the appliance is open.
- Power Supply: Check if the appliance has power.
6.2 Inconsistent Temperature
- Sensor Placement: Ensure the thermostat's sensing bulb (capillary tube end) is correctly positioned and not obstructed.
- Calibration: The thermostat may require recalibration by a qualified technician.
- Airflow: Check for proper airflow around the sensing bulb if applicable to your appliance.
6.3 Gas Odor
If you detect a gas odor, immediately shut off the gas supply to the appliance and ventilate the area. Do not operate any electrical switches or open flames. Contact a qualified service technician or your gas provider immediately.
7. Specifications
| Feature | Detail |
|---|---|
| Brand | Garland |
| Model Number | 3072901 |
| ASIN | B07BK54BVP |
| Special Feature | Unlit |
| Wattage (if applicable to appliance) | 1000 watts |
| Style | Modern |
| Date First Available | December 15, 2018 |
8. Warranty and Support
For warranty information and technical support, please refer to the documentation provided with your specific Garland appliance or contact Garland customer service directly. Keep your purchase receipt as proof of purchase.


