
1. Introduction
This manual provides detailed instructions for the installation, operation, and maintenance of the Zerodis DC 12V-24V Wall Touch Panel Controller. This device is designed to adjust the brightness of single-color LED light strips, offering a convenient and modern control solution.
The controller features a high-end glass touch panel for easy operation and cleaning. Its design allows for seamless integration into various residential and commercial environments.
2. Safety Information
- Ensure power is disconnected before installation or maintenance to prevent electric shock.
- This device is designed for DC 12V-24V LED lighting systems only. Do not connect to AC power or other voltage systems.
- Installation should be performed by a qualified electrician or in accordance with local electrical codes.
- Do not expose the device to excessive moisture or extreme temperatures.
- Verify correct wiring polarity (positive and negative) to avoid damage to the controller and LED lights.
3. Package Contents
Please check the package for the following items:
- 1 x Zerodis Wall Touch Panel Dimmer
- 1 x English User Manual
4. Specifications
| Input Voltage | DC 12V-24V |
| Output Voltage | DC 12V-24V |
| Max. Output Current | 4A per channel |
| Output Channels | Single channel |
| Max. Output Power | 96W (at 12V), 192W (at 24V) |
| Static Power Consumption | Less than 1W |
| Dimensions (L x W x H) | Approx. 86 x 86 x 35 mm |
| Adjustment Mode | Touch Panel |
| Material | Glass Panel |
| Mounting Type | Wall Mount |
| Control Type | Touch Controller |
| Compatible Devices | 12V-24V Single Color LED Lighting Fixtures |
This image provides a visual representation of the Zerodis dimmer's dimensions (86x86mm) and emphasizes its 1.9mm retardant acrylic panel.
5. Installation
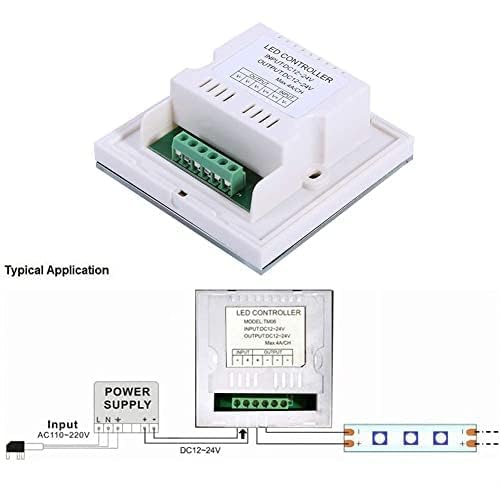
5.1 Wiring Diagram
Refer to the diagram below for proper wiring connections. Ensure all connections are secure and correctly polarized before applying power.

This diagram illustrates the typical application and wiring connections for the Zerodis LED controller, showing input from AC 110-220V power supply to DC 12V-24V output for LED strips.
5.2 Installation Steps
- Prepare the Installation Area: Ensure the power supply to the installation area is turned off at the circuit breaker.
- Mount the Back Box: Install a standard wall-mount back box (not included) in your desired location.
- Connect Wiring:
- Connect the DC 12V-24V power supply to the 'INPUT' terminals (positive to '+', negative to '-').
- Connect your single-color LED light strip to the 'OUTPUT' terminals (positive to '+', negative to '-').
This image displays the back of the Zerodis dimmer, highlighting the input and output wiring terminals for DC 12V-24V connections.
- Secure the Dimmer: Carefully place the dimmer into the wall box and secure it with screws.
- Attach the Glass Panel: Snap the glass touch panel onto the dimmer unit.
- Restore Power: Turn on the power supply from the circuit breaker.
6. Operating Instructions
The Zerodis Wall Touch Panel Controller offers intuitive touch-based operation for your LED lights.
6.1 Power On/Off
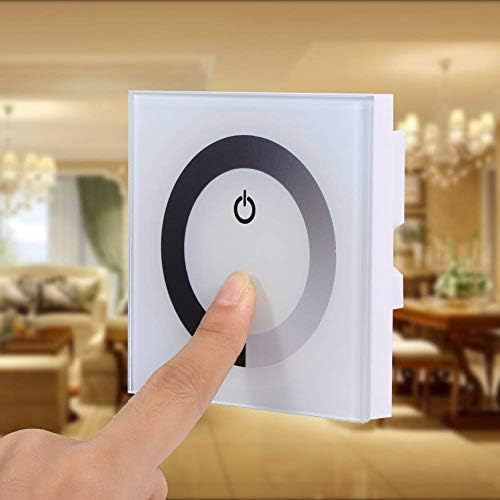
- To Turn On/Off: Lightly touch the power symbol (⏻) in the center of the panel.
6.2 Brightness Adjustment
- To Adjust Brightness: Slide your finger along the circular dimming ring on the panel. Moving clockwise will increase brightness, and counter-clockwise will decrease it.
- Instant Brightness Selection: Touch any point on the dimming ring to set the brightness to that specific level instantly.

This image shows a hand touching the circular control area of the Zerodis wall touch panel dimmer to adjust the brightness of connected LED lights.
6.3 Quiet Operation
The dimmer is designed for quiet operation, ensuring no distracting indicator lights or keypad tones when in 'Completely Shut Down' mode.

This image illustrates the 'Completely Shut Down' features of the Zerodis dimmer, showing a child sleeping without dazzling indicator lights and another child covering ears, indicating silent operation without keypad tones.
7. Maintenance
The Zerodis Wall Touch Panel Controller requires minimal maintenance.
- Cleaning: The glass panel is easy to clean. Use a soft, damp cloth to wipe the surface. Avoid abrasive cleaners or harsh chemicals that could damage the glass or touch sensors.
- Durability: The panel is designed to be wear-resistant, waterproof, and fire-retardant, ensuring long-term performance.

This image highlights the robust construction of the Zerodis dimmer, showcasing its fire-retardant, wear-resistant, waterproof, and easy-to-clean glass panel.
8. Troubleshooting
If you encounter issues with your Zerodis Wall Touch Panel Controller, please refer to the following common problems and solutions:
| Problem | Possible Cause | Solution |
|---|---|---|
| LED lights do not turn on. | No power supply; incorrect wiring; faulty LED strip. | Check if the power supply is connected and active. Verify wiring connections (input/output, polarity). Test the LED strip with another power source if possible. |
| Brightness cannot be adjusted. | Incorrect operation; incompatible LED strip. | Ensure you are sliding your finger along the circular dimming ring. Confirm your LED strip is a single-color, constant voltage type compatible with DC 12V-24V dimmers. |
| Dimmer is unresponsive. | Power issue; internal fault. | Turn off power at the circuit breaker for 1 minute, then restore power. If the issue persists, contact customer support. |
9. Warranty and Support
Zerodis products are manufactured to high-quality standards. While specific warranty details are not provided in this manual, we are committed to customer satisfaction.
If you require assistance, have questions, or encounter any issues with your Zerodis DC 12V-24V Wall Touch Panel Controller, please do not hesitate to contact your retailer or Zerodis customer support. We will be happy to help you.