
1. Introduction
Thank you for purchasing the GODOX Studio Flash Gemini GS300II. This professional studio flash is designed for high-quality photography, offering stable output, precise power adjustment, and fast recycling times. Please read this manual carefully before use to ensure safe operation and optimal performance. Keep this manual for future reference.
2. Safety Precautions
- Always ensure the power supply matches the voltage requirements of the flash unit.
- Do not operate the flash in wet or damp conditions to prevent electric shock.
- Avoid direct eye exposure to the flash light, as it can cause temporary vision impairment.
- Allow the flash to cool down after extended use to prevent overheating.
- Do not attempt to disassemble or repair the unit yourself. Refer to qualified service personnel.
- Keep out of reach of children.
3. Package Contents
Verify that all items are included in your package:
- GODOX Studio Flash Gemini GS300II Unit
- Power Cable
- Standard Reflector
- Modeling Lamp
- Flash Tube
- Instruction Manual (this document)
4. Product Overview and Components
Familiarize yourself with the various parts of your GODOX Studio Flash.

Figure 4.1: Front view of the GODOX Studio Flash Gemini GS300II with the standard reflector mounted.

Figure 4.2: Side view illustrating the main body and control panel of the flash unit.
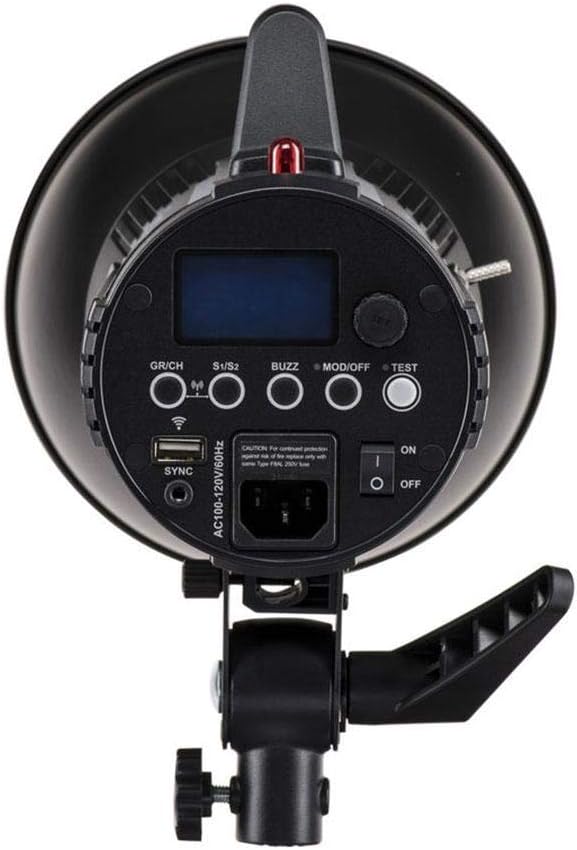
Figure 4.3: Detailed view of the rear control panel, including power switch, sync port, and function buttons.

Figure 4.4: Close-up view of the flash tube and modeling lamp within the reflector mount.
Key Components:
- Flash Tube: The main light source.
- Modeling Lamp: Provides continuous light for previewing lighting effects.
- Reflector Mount: Standard Bowens mount for attaching various light modifiers.
- Control Panel: Features an LCD display, power adjustment dial, and function buttons (GR/CH, S1/S2, BUZZ, MOD/OFF, TEST).
- Power Switch: On/Off toggle.
- Sync Port: For connecting external sync cables.
- Power Input: AC power connection.
- Mounting Bracket: For attaching the flash to a light stand.
5. Setup
5.1 Attaching the Reflector and Flash Tube
- Ensure the flash unit is powered off and unplugged.
- Carefully insert the flash tube into its socket, aligning the pins.
- Insert the modeling lamp into its socket.
- Align the standard reflector (or other light modifier) with the Bowens mount on the front of the flash. Twist clockwise until it locks securely.
5.2 Mounting the Flash Unit
- Loosen the locking knob on the mounting bracket.
- Place the flash unit onto a sturdy light stand.
- Tighten the locking knob to secure the flash in place.
- Adjust the tilt angle of the flash as needed and tighten the tilt locking knob.
5.3 Power Connection
- Connect the power cable to the power input port on the rear of the flash unit.
- Plug the other end of the power cable into a suitable AC power outlet.
6. Operating Instructions
6.1 Powering On/Off
Toggle the ON/OFF switch on the rear panel to power the unit on or off. The LCD display will illuminate upon power-on.
6.2 Adjusting Flash Power
Rotate the power adjustment dial (usually a large knob on the control panel) to increase or decrease the flash output. The power level will be displayed on the LCD screen. The GS300II offers precise power adjustment from 1/1 to 1/32.
6.3 Modeling Lamp Control
Press the MOD/OFF button to cycle through modeling lamp modes: ON, OFF, or Proportional (modeling lamp power adjusts with flash power).
6.4 Sync Modes (S1/S2)
Press the S1/S2 button to select the optical slave mode:
- S1 Mode: The flash will fire in response to the first flash from a master flash. Suitable for manual flash or TTL flash without pre-flash.
- S2 Mode: The flash will ignore the first pre-flash from a master TTL flash and fire on the second flash. Useful for cameras with pre-flash function.
6.5 Group and Channel Settings (GR/CH)
Press the GR/CH button to adjust the group and channel settings for wireless control. Refer to your wireless trigger's manual for specific pairing instructions.
6.6 Test Button
Press the TEST button to manually fire the flash and check its output.
6.7 Buzzer Function (BUZZ)
Press the BUZZ button to toggle the audible beep that indicates when the flash is fully recycled and ready to fire again.
7. Maintenance
- Cleaning: Use a soft, dry cloth to clean the exterior of the flash unit. Do not use abrasive cleaners or solvents.
- Flash Tube/Modeling Lamp Replacement: Ensure the unit is unplugged and cooled down before attempting to replace the flash tube or modeling lamp. Handle new bulbs with a clean cloth to avoid leaving fingerprints.
- Storage: Store the flash unit in a cool, dry place, away from direct sunlight and excessive humidity.
- Transportation: When transporting, use appropriate padding and a protective case to prevent damage.
8. Troubleshooting
| Problem | Possible Cause | Solution |
|---|---|---|
| Flash does not power on. | No power supply; Power cable loose; Unit malfunction. | Check power outlet and cable connection; Try a different outlet; Contact support. |
| Flash does not fire. | Not fully recycled; Sync cable not connected; Optical slave not triggered; Wireless trigger issue. | Wait for recycle beep; Ensure sync cable is secure; Check master flash/trigger settings; Test with TEST button. |
| Modeling lamp not working. | Lamp burned out; MOD/OFF setting. | Replace modeling lamp; Press MOD/OFF button to cycle modes. |
| Inconsistent flash output. | Overheating; Power fluctuation. | Allow unit to cool down; Ensure stable power supply. |
9. Specifications
| Feature | Detail |
|---|---|
| Model | GS300II (Item Model Number: 14570505) |
| Brand | GODOX |
| Max Power | 300Ws |
| Power Output Control | 1/1 to 1/32 |
| Flash Sync Speed | 1/200s |
| Camera Flash Type | Studio |
| Color | Black |
| Product Dimensions | 9.45 x 27.17 x 0.98 inches |
| Item Weight | 4.4 pounds |
| Included Components | Studio flash Godox GEMINI GS300II |
| Date First Available | January 10, 2025 |
Note: Specifications are subject to change without notice.
10. Warranty and Support
GODOX products are covered by a limited warranty. For detailed warranty information, please refer to the warranty card included with your product or visit the official GODOX website.
For technical support, troubleshooting assistance, or service inquiries, please contact GODOX customer service or your authorized dealer.
- GODOX Official Website: www.godox.com
- Customer Service: Refer to your regional GODOX distributor for contact information.