1. Introduction
This manual provides comprehensive instructions for the safe and effective operation, maintenance, and troubleshooting of your Walfront Air Siphon Sandblaster. This tool is designed for efficient abrasive blasting, utilizing compressed air to propel abrasive materials at high speeds to remove surface layers. It is ideal for tasks such as cleaning metal rims, removing rust, and reconditioning various surfaces.
Please read this manual thoroughly before using the sandblaster to ensure proper handling and to maximize the lifespan of your equipment.
2. Safety Information
Always prioritize safety when operating the sandblaster. Failure to follow these safety guidelines may result in injury or damage to the equipment.
- Personal Protective Equipment (PPE): Always wear appropriate PPE, including safety glasses or a face shield, gloves, and a respirator to protect against airborne particles.
- Ventilation: Use the sandblaster in a well-ventilated area to prevent inhalation of dust and abrasive particles.
- Air Pressure: Do not exceed the recommended operating air pressure of 120 psi. Excessive pressure can cause equipment damage or injury.
- Abrasive Material: Use only dry, clean, and appropriate abrasive materials for sandblasting. Ensure the abrasive is compatible with the nozzle size.
- Secure Workpiece: Ensure the item being sandblasted is securely fastened to prevent movement during operation.
- Disconnect Air Supply: Always disconnect the air supply before performing any maintenance, cleaning, or changing nozzles.
- Children and Bystanders: Keep children and bystanders away from the operating area.
- Inspect Before Use: Before each use, inspect the sandblaster gun, hose, and nozzles for any signs of wear, damage, or blockages.
3. Product Overview and Components
The Walfront Air Siphon Sandblaster is a robust tool designed for various abrasive blasting applications. It features a durable aluminum construction and comes with multiple ceramic nozzles for different tasks.

Figure 3.1: The Walfront Air Siphon Sandblaster gun shown with the four included ceramic nozzles.
Components:
- Sandblaster Gun: The main body of the tool, featuring a trigger and connections for air and abrasive.
- Ceramic Nozzles (4 Pcs): Interchangeable nozzles with varying inner diameters (4.5mm, 5mm, 6mm, 7mm) for different abrasive flow rates and applications.
- Air Inlet: 1/4" connection point for compressed air supply.
- Abrasive Feed Tube Connection: Point where the abrasive suction tube connects.

Figure 3.2: Detailed view of the sandblaster gun's nozzle connection point, showing the robust design for secure attachment.

Figure 3.3: Close-up of the air inlet (top) and the abrasive feed tube connection (bottom) on the sandblaster gun.
4. Setup
Follow these steps to set up your Walfront Air Siphon Sandblaster for operation.
- Select Nozzle: Choose the appropriate ceramic nozzle based on the abrasive material and the desired blasting intensity. The smaller the inner diameter, the finer the blast.
- Install Nozzle: Securely screw the selected ceramic nozzle onto the front of the sandblaster gun. Ensure it is hand-tightened to prevent air leaks.
- Connect Air Supply: Attach your compressed air hose to the 1/4" air inlet on the sandblaster gun. Ensure the connection is secure and leak-free.
- Connect Abrasive Feed Tube: Connect the abrasive suction tube (not included) to the designated feed tube connection point on the gun. Ensure the other end of the tube is placed into your container of abrasive material.
- Prepare Abrasive: Ensure your abrasive material is dry and free of clumps or foreign objects that could clog the nozzle.
- Air Compressor Settings: Set your air compressor to an operating pressure between 60-120 psi. Start with a lower pressure and increase as needed.
5. Operating Instructions
Once setup is complete, you can begin using your sandblaster. Always wear appropriate PPE during operation.
- Power On Air Compressor: Turn on your air compressor and allow it to reach the desired operating pressure.
- Test Blast: Before blasting your workpiece, perform a test blast on a scrap piece of material to verify proper operation and adjust air pressure as necessary.
- Begin Blasting: Hold the sandblaster gun firmly with a comfortable grip. Point the nozzle at the surface to be treated, maintaining a consistent distance and angle for even results.
- Engage Trigger: Press the trigger to initiate the flow of air and abrasive. The siphon action will draw abrasive material from your container.
- Consistent Movement: Move the gun steadily across the surface, overlapping passes slightly to ensure uniform coverage.
- Monitor Abrasive: Ensure the abrasive feed tube remains submerged in the abrasive material throughout the process.
- Release Trigger: Release the trigger to stop the blasting action.
- Clean Up: After blasting, clean the workpiece and the surrounding area of any residual abrasive.

Figure 5.1: Proper hand placement and grip for operating the sandblaster gun.

Figure 5.2: Illustrative examples of the sandblaster's versatility in various applications, such as etching glass, cleaning metal, and surface preparation.
6. Maintenance
Regular maintenance will ensure the longevity and optimal performance of your sandblaster. Always disconnect the air supply before performing any maintenance.
- Nozzle Inspection: Regularly inspect ceramic nozzles for wear. Worn nozzles will result in reduced efficiency and an inconsistent blast pattern. Replace them as needed.
- Clean Gun: After each use, clear any remaining abrasive from the gun and feed tube. You can do this by running air through the gun without abrasive.
- Check Air Connections: Periodically check all air connections for leaks. Tighten or replace fittings as necessary.
- Store Properly: Store the sandblaster in a clean, dry place away from moisture and extreme temperatures.
7. Troubleshooting
Refer to the following table for common issues and their potential solutions.
| Problem | Possible Cause | Solution |
|---|---|---|
| No abrasive flow or weak flow |
|
|
| Inconsistent blast pattern |
|
|
| Air leaks from connections |
|
|
8. Specifications
Detailed technical specifications for the Walfront Air Siphon Sandblaster.
| Feature | Specification |
|---|---|
| Model Number | Walfrontwkz5td6qnc |
| Material | Aluminum (Gun Body), Ceramic (Nozzles) |
| Color | Silver |
| Operating Air Pressure | 60 - 120 psi |
| Air Inlet Size | 1/4" |
| Nozzle Sizes (Inner Diameter) | 4.5mm, 5mm, 6mm, 7mm |
| Nozzle Length | Approx. 35 mm |
| Nozzle Outer Diameter | Approx. 15 mm |
| Gun Size (L x H) | Approx. 135 mm x 150 mm |
| Weight | Approx. 310 g (10.9 ounces) |
| Included Components | 1 Sandblaster Gun, 4 Ceramic Nozzles |
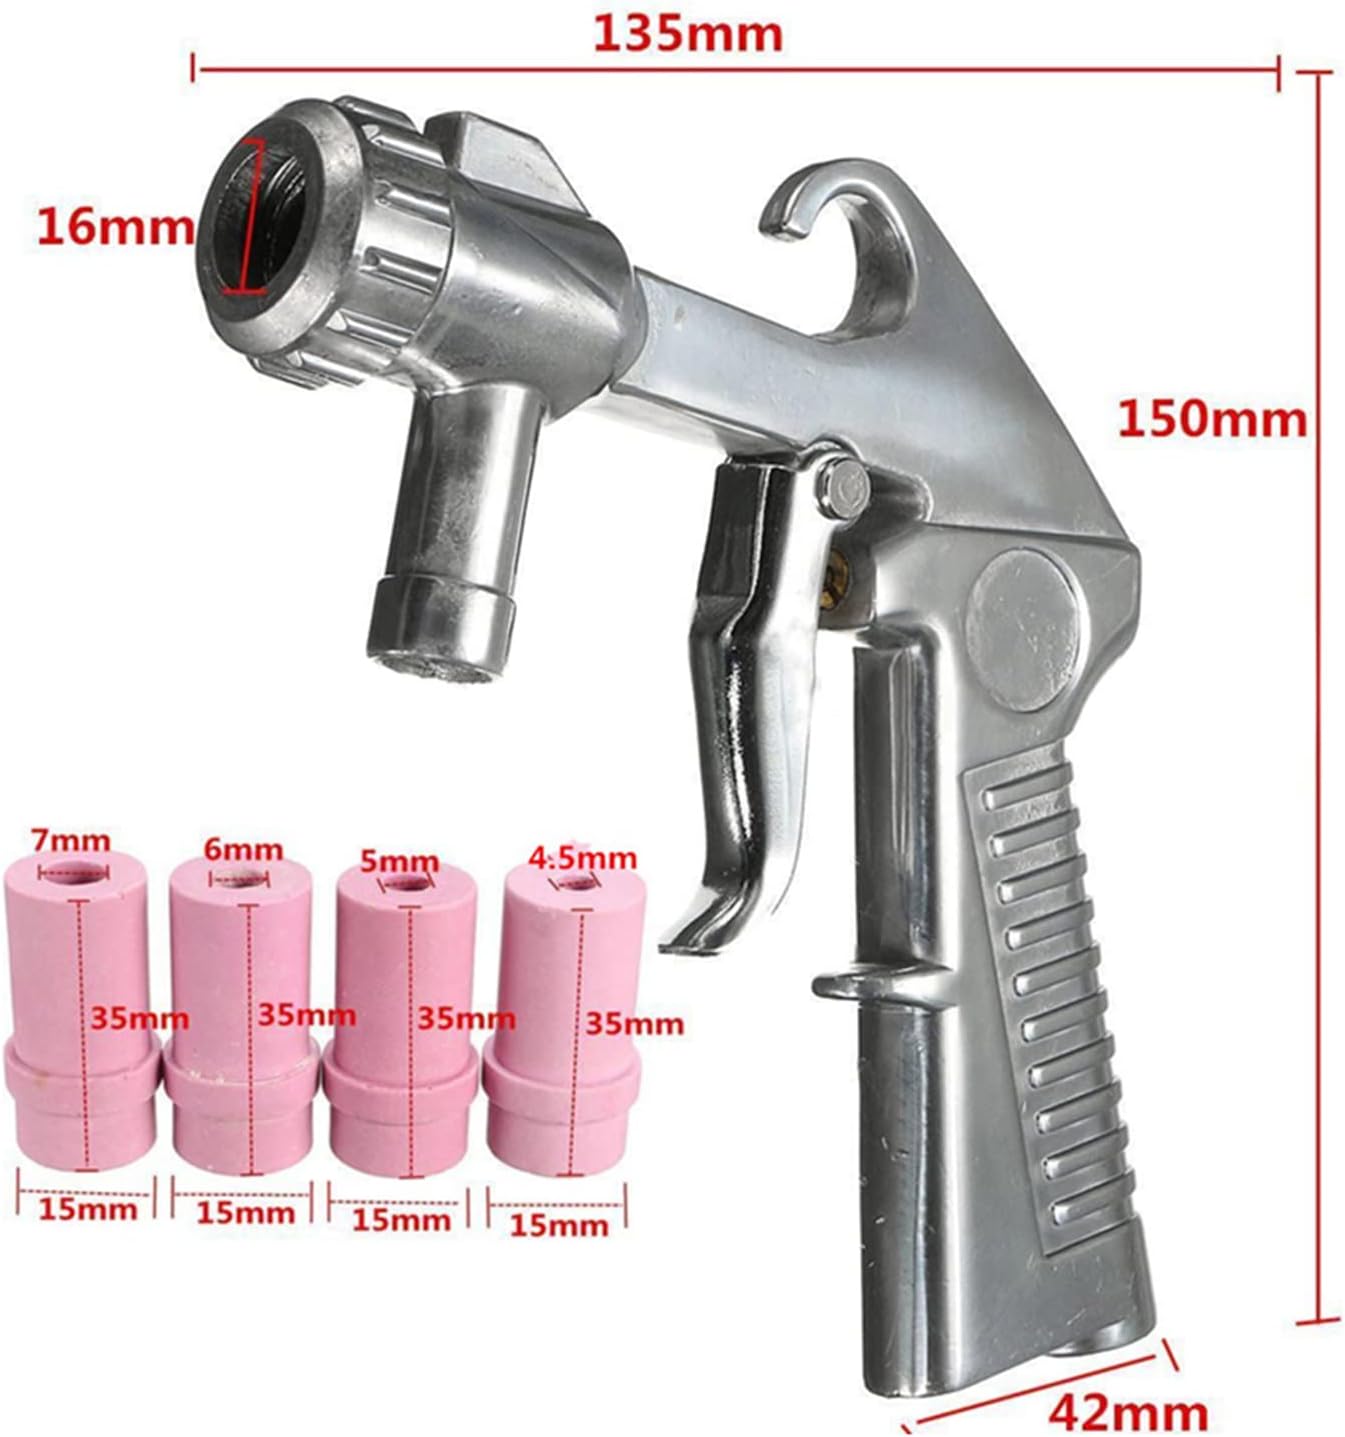
Figure 8.1: Dimensional drawing of the Walfront Air Siphon Sandblaster gun and its ceramic nozzles, indicating key measurements.
9. Warranty and Support
For warranty information or technical support, please refer to the retailer or manufacturer's official website. Keep your purchase receipt as proof of purchase.
Manufacturer: Walfront
Model Number: Walfrontwkz5td6qnc
