1. Introduction
This manual provides comprehensive instructions for the installation, operation, and maintenance of your WOBANE Under Cabinet LED Strip Light Kit. This kit is designed to provide efficient and warm white illumination (2700K) for various indoor applications such as cabinets, cupboards, desks, shelves, and more. Please read this manual thoroughly before installation and use to ensure proper function and safety.
2. Package Contents
Verify that all components are present in your package:
- 4 x LED Light Bars (20 inches each)
- 1 x Power Adapter (ETL Listed, 12V DC)
- 1 x In-line On/Off Switch
- Connectors (various types for straight and angled connections)
- Cable Holders
3. Product Specifications
| Feature | Specification |
|---|---|
| Brand | WOBANE |
| Model Number | LED cabinet light CS2 |
| Light Color | Warm White |
| Color Temperature | 2700 Kelvin |
| Brightness | 1200 Lumens (total) |
| Number of LEDs | 120 |
| Wattage | 12 Watts |
| Voltage | 12 Volts (DC) |
| Material | Copper, Plastic |
| Product Dimensions | 4"L x 2"W x 3"H (overall kit packaging) |
| Light Bar Length | 4 x 20 inches |
| Indoor/Outdoor Usage | Indoor Only |
| Water Resistance Level | Not Water Resistant |
4. Important Safety Instructions
- Read all instructions before using the product.
- This product is designed for indoor use only. Do not expose to water or high humidity.
- Ensure the power supply is disconnected before installation or maintenance.
- Use only the provided power adapter. Using an incompatible adapter may damage the product or pose a fire hazard.
- Do not cut the LED strips unless specifically instructed and at designated cut marks. Improper cutting can damage the strip and void the warranty.
- Avoid bending the LED strips sharply, especially at connection points, to prevent damage to the circuit.
- Keep out of reach of children.
- If any part of the product is damaged, discontinue use immediately and contact customer support.
5. Installation Guide
Follow these steps for a simple and secure installation:
5.1. Surface Preparation
Before attaching the LED strips, ensure the installation surface is clean, dry, and smooth. Wipe the area with a clean cloth to remove dust, grease, or moisture. This will ensure optimal adhesion of the tape.

Figure 5.1: Clean the installation surface thoroughly before applying the LED strips.
5.2. Attaching LED Strips
- Carefully peel off the protective backing from the adhesive tape on the back of each LED light bar.
- Press the LED strip firmly onto the desired surface. Apply even pressure along the entire length to ensure good contact.
5.3. Connecting Components
Connect the LED light bars to each other and to the power adapter using the provided connectors and the in-line switch. Ensure all connections are secure.

Figure 5.2: Use the provided connectors to link multiple LED light bars.
Use the included cable holders to manage and secure any loose wiring, keeping the installation neat and tidy. Connect the in-line switch and power adapter to the assembled LED strips, then plug the adapter into a standard electrical outlet.

Figure 5.3: Secure cables with cable holders for a clean installation.
5.4. Customizing Layout with Connectors
The kit includes flexible connectors that allow for versatile installation around corners or across gaps between surfaces. These connectors ensure a continuous lighting effect even in complex layouts.
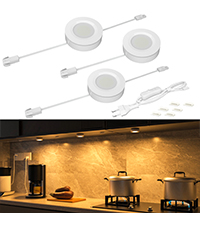
Figure 5.4: Flexible connectors enable seamless corner installations.
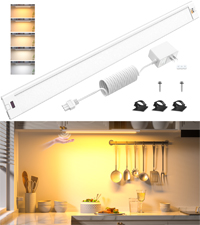
Figure 5.5: Achieve various angles with the flexible connectors.
6. Operation
Once installed and connected to power, operate the WOBANE LED Strip Light Kit using the in-line switch. Simply toggle the switch to turn the lights ON or OFF.
7. Maintenance
To maintain the performance and appearance of your LED strip lights:
- Ensure the power is disconnected before cleaning.
- Wipe the LED strips and other components with a soft, dry cloth. Do not use abrasive cleaners or solvents.
- Avoid direct contact with water.
8. Troubleshooting
| Problem | Possible Cause | Solution |
|---|---|---|
| Lights do not turn on. | No power, loose connection, faulty switch/adapter. | Check if the power adapter is securely plugged into the outlet. Verify all connectors are firmly attached. Test the switch. Ensure the outlet is functional. |
| Lights are dim or flickering. | Insufficient power, loose connection, damaged strip. | Ensure the power adapter is providing adequate power. Check all connections for looseness. Inspect the LED strip for visible damage. |
| LED strip does not stick. | Improper surface preparation, old adhesive. | Clean the surface thoroughly before re-applying. For persistent issues, consider using additional adhesive clips or double-sided tape. |
9. Warranty and Support
For warranty information or technical support, please refer to the product packaging or contact WOBANE customer service directly. Keep your purchase receipt as proof of purchase.


