
1. Product Overview
The ViewSonic PS501X is a short throw projector designed for versatile use in educational and small business environments. It features 3,400 lumens brightness and native XGA (1024 x 768) resolution, ensuring clear image projection even in smaller rooms. The projector incorporates SuperColor technology for accurate color reproduction and offers flexible connectivity options.
Key Features:
- Versatile Projection: Advanced visual features suitable for education and small business settings.
- Large Screen Capability: Projects a 120-inch image from a distance of 4 feet 10 inches with 3400 lumens.
- Simple Setup: Designed for easy plug-and-play operation for presentations, videos, and images.
- Extended Lamp Life: SuperEco mode extends lamp life up to 15,000 hours.
- Flexible Connectivity: Supports various media players, PCs, Macs, and mobile devices via HDMI, USB, and VGA inputs.
2. Setup Guide
2.1 Unboxing
Carefully unpack the contents of the box. Ensure all items are present:
- ViewSonic PS501X Projector
- Power Cable
- VGA Cable
- Remote Control
- User Manual (this document)
2.2 Physical Placement
Place the projector on a stable, flat surface. For optimal short-throw projection, position the projector approximately 4 feet 10 inches from the screen to achieve a 120-inch image. Ensure adequate ventilation around the projector.
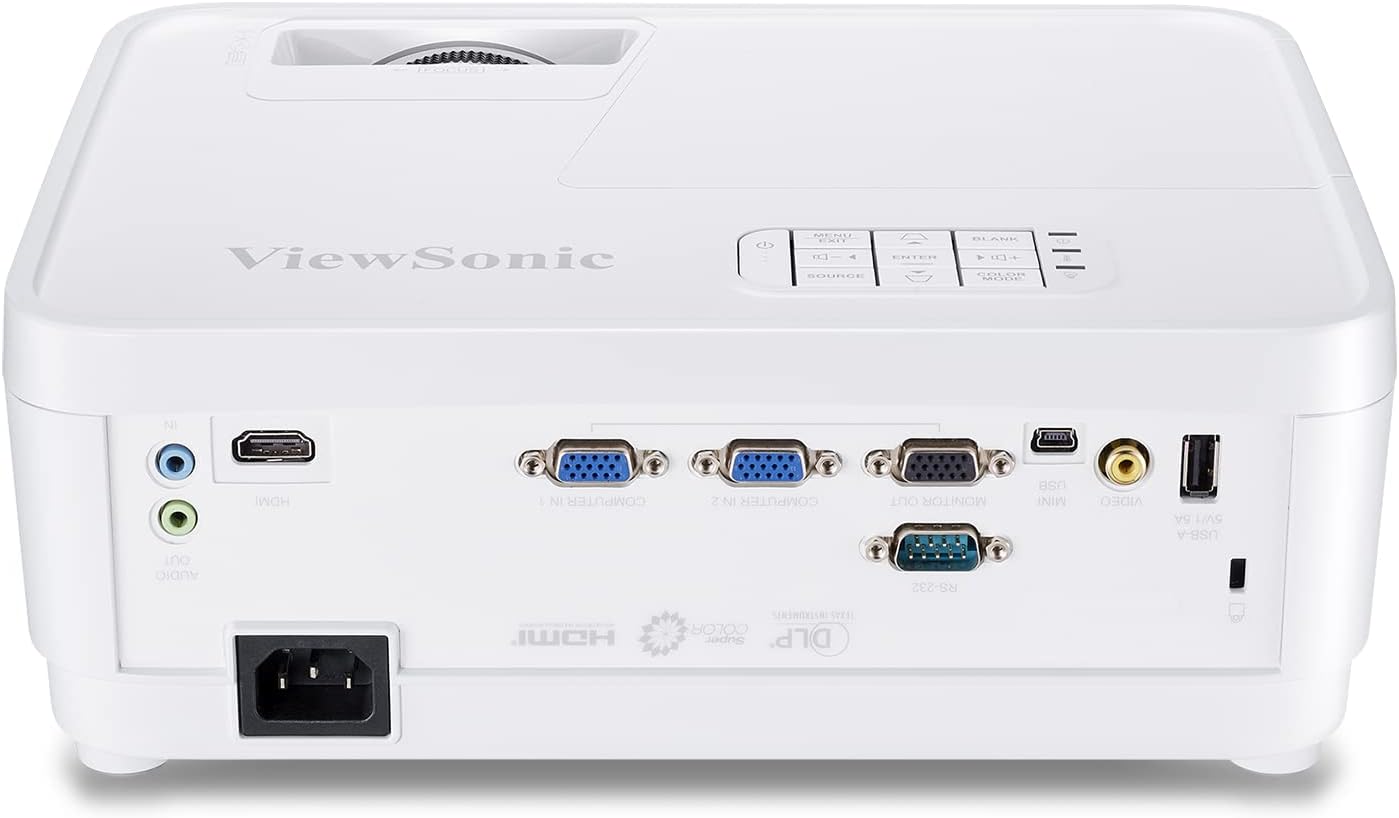
Figure 2.2.1: Front view of the PS501X projector, showing the lens and top-mounted control panel.
2.3 Connecting Devices
Connect your source devices (PC, Mac, media player) to the projector using the appropriate cables. The PS501X offers multiple input options:
- HDMI: For high-definition digital video and audio.
- VGA: For analog video input from computers.
- USB: For connecting compatible devices.
- RS232: For control system integration.

Figure 2.3.1: Rear panel of the PS501X projector, highlighting HDMI, VGA, and other connectivity ports.
After connecting, plug the power cable into the projector and a power outlet.
3. Operating Instructions
3.1 Power On/Off
Press the power button on the projector or the remote control to turn the unit on or off. Allow a few moments for the lamp to warm up or cool down.
3.2 Input Source Selection
Use the 'Source' button on the projector's control panel or remote to cycle through available input sources (HDMI, VGA, etc.) until your desired source is displayed.
3.3 Image Adjustment
- Focus: Rotate the focus ring on the projector lens until the image is sharp and clear.
- Keystone Correction: If the image appears trapezoidal, use the keystone correction function (usually found in the OSD menu or dedicated buttons on the remote) to adjust the image geometry. The PS501X supports horizontal and vertical keystone correction.
- Color Settings: Access the On-Screen Display (OSD) menu to adjust settings such as brightness, contrast, color temperature, and color effects (e.g., Movie, Photo, Vivid, User, Standard, Game modes) to suit your viewing environment and content.
- Aspect Ratio: Adjust the aspect ratio (e.g., Full) via the OSD menu to match your content and prevent distortion.

Figure 3.3.1: Illustration of horizontal and vertical keystone correction for adjusting image shape.

Figure 3.3.2: Example of vibrant color accuracy provided by SuperColor technology.
4. Maintenance
4.1 Lamp Life Management
The PS501X features a SuperEco mode that can extend the lamp life up to 15,000 hours. Utilizing this mode can significantly reduce power consumption and prolong the life of your projector lamp.

Figure 4.1.1: Visual representation of the extended lamp life in SuperEco mode.
4.2 Ventilation
To prevent overheating and ensure optimal performance, always ensure that the air vents on the projector are clear and unobstructed. Do not place the projector in an enclosed space without proper airflow.
4.3 Cleaning
Regularly clean the projector's exterior with a soft, dry cloth. For the lens, use a specialized lens cleaning cloth and solution to avoid scratches. Avoid using abrasive cleaners or solvents.
5. Troubleshooting
If you encounter issues with your ViewSonic PS501X projector, refer to the following common troubleshooting steps:
- No Image Displayed:
- Ensure the projector is powered on and the lamp is illuminated.
- Verify that the input source is correctly selected and the cable connections are secure.
- Check the source device (PC, media player) to ensure it is outputting a signal.
- Image is Blurry:
- Adjust the focus ring on the projector lens.
- Ensure the projection surface is flat and the projector is stable.
- Image is Distorted (Trapezoidal):
- Use the keystone correction function in the OSD menu to adjust the image shape.
- Ensure the projector is positioned directly in front of the screen as much as possible.
- No Audio:
- Check the audio cable connections (if using analog audio).
- Ensure the volume on both the projector and the source device is turned up and not muted.
- If using HDMI, verify that the audio output is correctly configured on the source device.
- Projector Overheating:
- Ensure all air vents are clear of obstructions.
- Operate the projector in a well-ventilated area.
- If the issue persists, power off the projector and allow it to cool down before restarting.
6. Specifications
| Model Number | PS501X |
| Brand | ViewSonic |
| Display Resolution | 1024 x 768 (XGA Native) |
| Brightness | 3400 Lumens |
| Connectivity Technology | HDMI, USB, VGA |
| Special Feature | Short Throw |
| Recommended Uses | Business, Education, Home Cinema |
| Lamp Wattage | 190W |
| Product Dimensions | 4.53 x 11.5 x 9.29 inches |
| Item Weight | 5.72 pounds |
| Batteries Required | 2 AAA batteries (for remote) |
| First Available Date | March 3, 2018 |
7. Warranty & Support
7.1 Warranty Information
For detailed warranty information regarding your ViewSonic PS501X projector, please refer to the warranty card included in your product packaging or visit the official ViewSonic website. Keep your proof of purchase for warranty claims.
7.2 Customer Support
If you require further assistance or have questions not covered in this manual, please contact ViewSonic customer support. Contact details can be found on the ViewSonic website or in your product documentation.


