
1. Introduction
This manual provides comprehensive instructions for the installation, operation, and maintenance of your ARRIS Touchstone® TG2472G Cable Voice Gateway. The TG2472G is a high-performance DOCSIS 3.0 home telephony gateway designed to deliver high-speed data, voice, and IP video services to your home network. It integrates a cable modem, a voice adapter, a 4-port Gigabit Ethernet router, MoCA 2.0, and a dual-band 802.11ac wireless access point into a single device.
Please read this manual carefully before setting up your device to ensure proper installation and optimal performance.
2. Safety Information
Observe the following safety precautions to reduce the risk of fire, electric shock, and injury:
- Do not expose this device to water or moisture.
- Do not use this product near water, for example, near a bathtub, wash bowl, kitchen sink or laundry tub, in a wet basement, or near a swimming pool.
- Do not block or cover any ventilation openings on the device.
- Do not place the device on a soft surface such as a bed or sofa, which could block the ventilation openings.
- Do not place the device in a confined space, such as a cabinet or bookshelf, unless proper ventilation is provided.
- Use only the power adapter supplied with this unit.
- Protect the power cord from being walked on or pinched, particularly at plugs, convenience receptacles, and the point where they exit from the device.
- Disconnect the power from the device before cleaning. Use a damp cloth for cleaning. Do not use liquid or aerosol cleaners.
- This device is intended for indoor use only.
3. Package Contents
Verify that all items are present in your package:
- ARRIS Touchstone® TG2472G Cable Voice Gateway
- Power Adapter
- Ethernet Cable
- Quick Start Guide
4. Product Overview
4.1 Front Panel

Figure 4.1: Front view of the ARRIS Touchstone TG2472G, displaying the ARRIS logo, model name, and a vertical row of LED indicators. These indicators provide status for Power, Upstream/Downstream (US/DS), Online connectivity, 2.4 GHz Wi-Fi, 5 GHz Wi-Fi, Telephone Line 1 (Tel 1), Telephone Line 2 (Tel 2), Battery status, and MoCA (Multimedia over Coax Alliance) activity.
The front panel of the TG2472G features several LED indicators that provide real-time status of the device's operation:
- Power: Indicates the power status of the gateway.
- US/DS (Upstream/Downstream): Shows the status of the upstream and downstream cable connection.
- Online: Indicates successful internet connectivity.
- 2.4 GHz: Shows the status of the 2.4 GHz Wi-Fi network.
- 5 GHz: Shows the status of the 5 GHz Wi-Fi network.
- Tel 1: Indicates the status of telephone line 1.
- Tel 2: Indicates the status of telephone line 2.
- Battery: Displays the status of the optional battery backup.
- MoCA: Indicates the status of the MoCA network connection.
4.2 Rear Panel
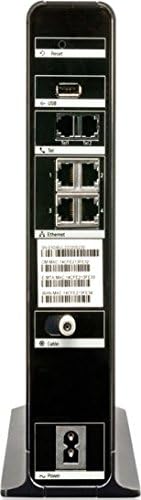
Figure 4.2: Rear view of the ARRIS Touchstone TG2472G, detailing its connectivity options. From top to bottom, it includes a recessed Reset button, two USB ports, two telephone (Tel) ports, four Gigabit Ethernet ports, a coaxial cable connector for the internet input, and the power input port at the bottom. Various labels and a MAC address sticker are also visible.
The rear panel provides all the necessary connection ports:
- Reset Button: Used to reset the device to factory default settings.
- USB Ports: For future use or connecting compatible devices.
- Tel 1/Tel 2 Ports: Connect your telephone devices for voice services.
- Ethernet Ports (1-4): Connect wired devices such as computers, gaming consoles, or smart TVs.
- Coax Port: Connects to your cable service provider's coaxial cable.
- Power Port: Connects to the supplied power adapter.
5. Setup
Follow these steps to set up your ARRIS TG2472G gateway:
- Choose a Location: Place the gateway in a central location in your home, away from obstructions and heat sources, to ensure optimal Wi-Fi coverage.
- Connect Coaxial Cable: Connect one end of a coaxial cable (not included) to the Coax port on the rear of the gateway and the other end to a cable wall outlet. Ensure the connection is finger-tight.
- Connect Telephone (Optional): If you have voice service, connect your telephone to the Tel 1 or Tel 2 port on the rear of the gateway using a standard telephone cable.
- Connect Ethernet Devices (Optional): For wired connections, connect an Ethernet cable from one of the Ethernet ports (1-4) on the gateway to the Ethernet port on your computer or other network device.
- Connect Power: Connect the supplied power adapter to the Power port on the rear of the gateway, then plug the other end into an electrical outlet.
- Power On: The gateway will automatically power on. Wait for the Power, US/DS, and Online LEDs on the front panel to become solid blue, indicating a successful connection to your internet service provider. This process may take several minutes.
- Activate Service: Contact your internet service provider (ISP) to activate your new gateway. You will need to provide the MAC address and serial number, usually found on a sticker on the bottom or rear of the device.
6. Operating Instructions
6.1 Connecting to Wi-Fi
To connect your wireless devices to the TG2472G's Wi-Fi network:
- Locate the Wi-Fi Network Name (SSID) and Password (Network Key) on the sticker on the bottom or side of your gateway.
- On your wireless device (smartphone, tablet, laptop), open the Wi-Fi settings.
- Select the SSID that matches your gateway's network name (e.g., "ARRIS-XXXX").
- Enter the Wi-Fi password when prompted.
- Your device should now be connected to the internet.
6.2 Accessing the Web Management Interface
The TG2472G features a web-based management interface for advanced configuration:
- Ensure your computer is connected to the gateway via Ethernet or Wi-Fi.
- Open a web browser (e.g., Chrome, Firefox, Edge).
- In the address bar, type the default IP address (usually
192.168.0.1or192.168.100.1) and press Enter. Refer to your ISP's documentation or the gateway's sticker for the exact IP address. - Enter the default username and password. These are often "admin" and "password" or found on the gateway's sticker. It is highly recommended to change these default credentials for security.
- From the interface, you can configure Wi-Fi settings, network security, parental controls, and other advanced features.
6.3 Voice Services
If your service plan includes voice, ensure your telephone is connected to the Tel 1 or Tel 2 port. The Tel LEDs on the front panel will illuminate when the line is active and ready for use.
7. Maintenance
Proper maintenance ensures the longevity and optimal performance of your gateway:
- Cleaning: Disconnect power before cleaning. Use a soft, dry cloth to wipe the exterior. Do not use liquid or aerosol cleaners.
- Ventilation: Ensure the ventilation openings are not blocked. Maintain adequate space around the device for airflow.
- Firmware Updates: Firmware updates are typically managed by your internet service provider. Do not attempt to manually update firmware unless instructed by your ISP.
- Restarting: If you experience connectivity issues, try restarting the gateway by unplugging the power cord for 10 seconds and then plugging it back in.
8. Troubleshooting
This section addresses common issues you might encounter:
| Problem | Possible Cause | Solution |
|---|---|---|
| No Power LED | Power adapter not connected or faulty outlet. | Ensure power adapter is securely connected to the gateway and a working electrical outlet. Try a different outlet. |
| US/DS LED blinking or off | No signal from cable provider or poor coaxial connection. | Check coaxial cable connections at the gateway and wall outlet. Ensure they are tight. Contact your ISP if the issue persists. |
| Online LED off or blinking | Gateway not activated or no internet connection. | Ensure US/DS LED is solid. Contact your ISP to activate the gateway or troubleshoot internet service. |
| No Wi-Fi connection | Incorrect Wi-Fi password, Wi-Fi disabled, or signal interference. | Verify Wi-Fi password. Check 2.4 GHz/5 GHz LEDs. Restart gateway. Reduce interference by moving gateway away from other electronics. |
| No dial tone on phone | Phone not connected correctly or voice service not active. | Ensure phone is connected to Tel 1/Tel 2 port. Check Tel LEDs. Contact your ISP to verify voice service activation. |
If you continue to experience issues after attempting these solutions, please contact your internet service provider for further assistance.
9. Specifications
- Model Name: TG2472G
- DOCSIS Standard: DOCSIS 3.0
- Channel Bonding: 24x8 Downstream/Upstream
- Wi-Fi Standard: 802.11ac (Dual-Band Concurrent 2.4GHz and 5GHz)
- Ethernet Ports: 4 x Gigabit Ethernet
- Voice Ports: 2 x FXS (PacketCable 2.0 compliant)
- MoCA: MoCA 2.0
- Processor: 1.2GHz Intel Atom Core Application Processor
- Dimensions: Approximately 13.94 x 11.77 x 4.13 inches
- Weight: Approximately 3 pounds
- Power Supply: External Power Adapter
- Special Features: Access Point Mode, Guest SSID, DLNA, File Sharing, ARRIS HomeAssure Enabled
10. Warranty Information
ARRIS products typically come with a limited warranty. The specific terms and duration of your warranty may vary depending on your region and the retailer from whom you purchased the device. Please refer to the warranty card included in your product packaging or visit the official ARRIS website for detailed warranty information.
Keep your purchase receipt as proof of purchase for warranty claims.
11. Support
For technical support, troubleshooting, or service activation, please contact your internet service provider (ISP). Your ISP is responsible for supporting the ARRIS TG2472G gateway as it is typically provided and managed by them.
You can also visit the official ARRIS support website for general product information and FAQs:
For additional resources, you may refer to the ARRIS brand store on Amazon: ARRIS Store


