
Yellow Jacket 68202
Yellow Jacket 2 Sensor Control Panel User Manual
Model: 68202
Introduction
This manual provides comprehensive instructions for the installation, operation, and maintenance of the Yellow Jacket 68202 Two Channel Refrigerant Monitor Control Panel. This device is designed for fixed monitoring of gas leaks, providing two levels of detection and operating on a 120V line input. Please read this manual thoroughly before using the product to ensure safe and efficient operation.
Important Safety Information
Always observe the following safety precautions to reduce the risk of injury or damage to the unit:
- Read all instructions before operating the device.
- Ensure the power supply matches the specified voltage (120V AC).
- Do not open the control panel enclosure unless instructed by qualified personnel.
- Installation must be performed by a qualified technician in accordance with local electrical codes.
- Disconnect power before performing any maintenance or service.
- This device is designed for fixed monitoring of gas leaks. Do not use for other purposes.
Package Contents
Verify that all items are present in the package:
- Yellow Jacket 68202 Control Panel (1 unit)
- User Manual (this document)
- Mounting Hardware (screws, anchors)
- Sensor Cables (quantity as per model configuration, typically 2)
Setup and Installation
Mounting the Control Panel
Choose a suitable location for the control panel, ensuring it is easily accessible and protected from extreme temperatures or moisture. The panel should be mounted vertically.
- Mark the desired mounting points on the wall using the panel as a template.
- Drill pilot holes at the marked locations.
- Secure the control panel to the wall using the provided mounting hardware.
Wiring Instructions
WARNING: All wiring must be performed by a qualified electrician and comply with all local and national electrical codes. Ensure power is disconnected before wiring.
- Connect the 120V AC power supply to the designated terminals on the control panel. Refer to the wiring diagram inside the panel cover.
- Connect the gas sensors to the respective sensor input terminals (Channel 1 and Channel 2). Ensure correct polarity.
- If using external alarm devices or relays, connect them to the appropriate output terminals.
- Verify all connections are secure and properly insulated.
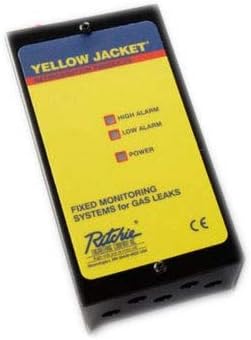
Figure 1: Front view of the Yellow Jacket 68202 Control Panel. The panel features indicator lights for High Alarm, Low Alarm, and Power, and is labeled for fixed monitoring systems for gas leaks.
Operation
Powering On
- Once all wiring is complete and verified, apply power to the control panel.
- The "POWER" indicator light on the front panel should illuminate, indicating the unit is receiving power.
- The system will undergo a brief self-test. During this time, the alarm indicators may flash.
Understanding Indicator Lights
- POWER: Illuminates green when the unit is powered on.
- LOW ALARM: Illuminates yellow when a low concentration of gas is detected by one or both sensors, triggering a pre-alarm condition.
- HIGH ALARM: Illuminates red when a high concentration of gas is detected, indicating a critical leak and triggering the main alarm.
Alarm Conditions and Reset
When an alarm condition (LOW or HIGH) is met, the corresponding indicator light will illuminate, and any connected external alarm devices will activate. To silence or reset the alarm:
- Address the source of the gas leak immediately.
- Once the gas concentration returns to safe levels, the alarm will typically self-reset. Some models may require a manual reset button press (refer to specific model variations if applicable, not present on this basic model).
Maintenance
Regular maintenance ensures the longevity and accuracy of your Yellow Jacket 68202 Control Panel.
- Cleaning: Periodically wipe the exterior of the control panel with a soft, dry cloth. Do not use abrasive cleaners or solvents.
- Sensor Calibration: Gas sensors require periodic calibration to maintain accuracy. Refer to the specific sensor manufacturer's instructions for calibration procedures and recommended intervals. This typically requires specialized equipment and should be performed by qualified personnel.
- Visual Inspection: Annually inspect all wiring and connections for signs of wear, corrosion, or damage. Ensure all mounting hardware is secure.
- Functional Test: Periodically test the alarm functionality by introducing a small, controlled amount of the target gas (if safe to do so and with proper ventilation) to verify sensor response and alarm activation.
Troubleshooting
If you encounter issues with your control panel, refer to the table below for common problems and solutions.
| Problem | Possible Cause | Solution |
|---|---|---|
| No Power Indicator Light | No power supply; loose wiring; faulty unit. | Check power source and circuit breaker. Verify all power connections are secure. If problem persists, contact support. |
| Alarm (LOW/HIGH) constantly active without gas present | Sensor malfunction; sensor needs calibration; environmental interference. | Ensure no gas is present. Check sensor connections. Sensor may require calibration or replacement. Consult a qualified technician. |
| Alarm does not activate when gas is present | Faulty sensor; incorrect wiring; alarm threshold settings incorrect (if adjustable). | Verify sensor is correctly connected. Test sensor with known gas source. Sensor may need replacement or calibration. Contact support. |
| External alarm device not activating | Incorrect wiring to external device; faulty external device. | Check wiring to the external alarm device. Test the external device independently. |
If the problem persists after attempting these solutions, please contact Yellow Jacket customer support.
Specifications
| Feature | Detail |
|---|---|
| Model Number | 68202 |
| Input Voltage | 120V AC |
| Detection Levels | 2 (Low Alarm, High Alarm) |
| Number of Channels | 2 |
| Application | Fixed Monitoring Systems for Gas Leaks |
| Manufacturer | Yellow Jacket |
| First Available Date | June 13, 2018 |
Warranty and Customer Support
Yellow Jacket products are manufactured to high-quality standards. For information regarding warranty coverage, please refer to the warranty card included with your product or visit the official Yellow Jacket website.
For technical assistance, troubleshooting, or service inquiries, please contact Yellow Jacket customer support:
- Website: www.yellowjacket.com
- Phone: Refer to the website for regional contact numbers.
Please have your model number (68202) and purchase date available when contacting support.
Ask a question about this manual
Ask about setup, troubleshooting, compatibility, parts, safety, or missing instructions. Manuals+ will review the question and use this page’s manual context to help answer it.