Product Overview
The BGS 9502 Cooling System Bleeding and Filling Tool is designed for efficient and safe maintenance of vehicle cooling systems. This 6-piece set allows for simple refilling and bleeding by creating negative pressure, ensuring all air pockets are removed and the system is filled completely. It also facilitates a vacuum tightness test to detect any leaks in the cooling system.

Figure 1: The BGS 9502 tool kit, showcasing the main device, hoses, and cone adapters within its protective case.
Key Features:
- Allows easy filling and bleeding of cooling systems by generating negative pressure.
- Ensures safe filling of all cavities with coolant, preventing airlocks.
- Enables a vacuum tightness test on the cooling system to identify leaks.
- Includes adaptors suitable for most vehicle types and radiators/expansion tanks.
- Comprehensive 6-piece set for complete cooling system service.
Components Included
The BGS 9502 set includes the following components:
- 1 Main Device: The central unit with a pressure gauge for vacuum generation and monitoring.
- 1 Filling Hose: Length: 1640 mm, used for drawing coolant into the system.
- 1 Extension Hose: 90° offset, length: 610 mm, for reaching difficult areas.
- 1 Cone Adaptor: Ø 17 - 41 mm, height: 45 mm, for various radiator/expansion tank openings.
- 1 Expansion Cone: Ø 24 - 52 mm, height: 45 mm, for larger openings.
- 1 Expansion Cone: Ø 27 - 50 mm, height: 45 mm, for specific larger openings.
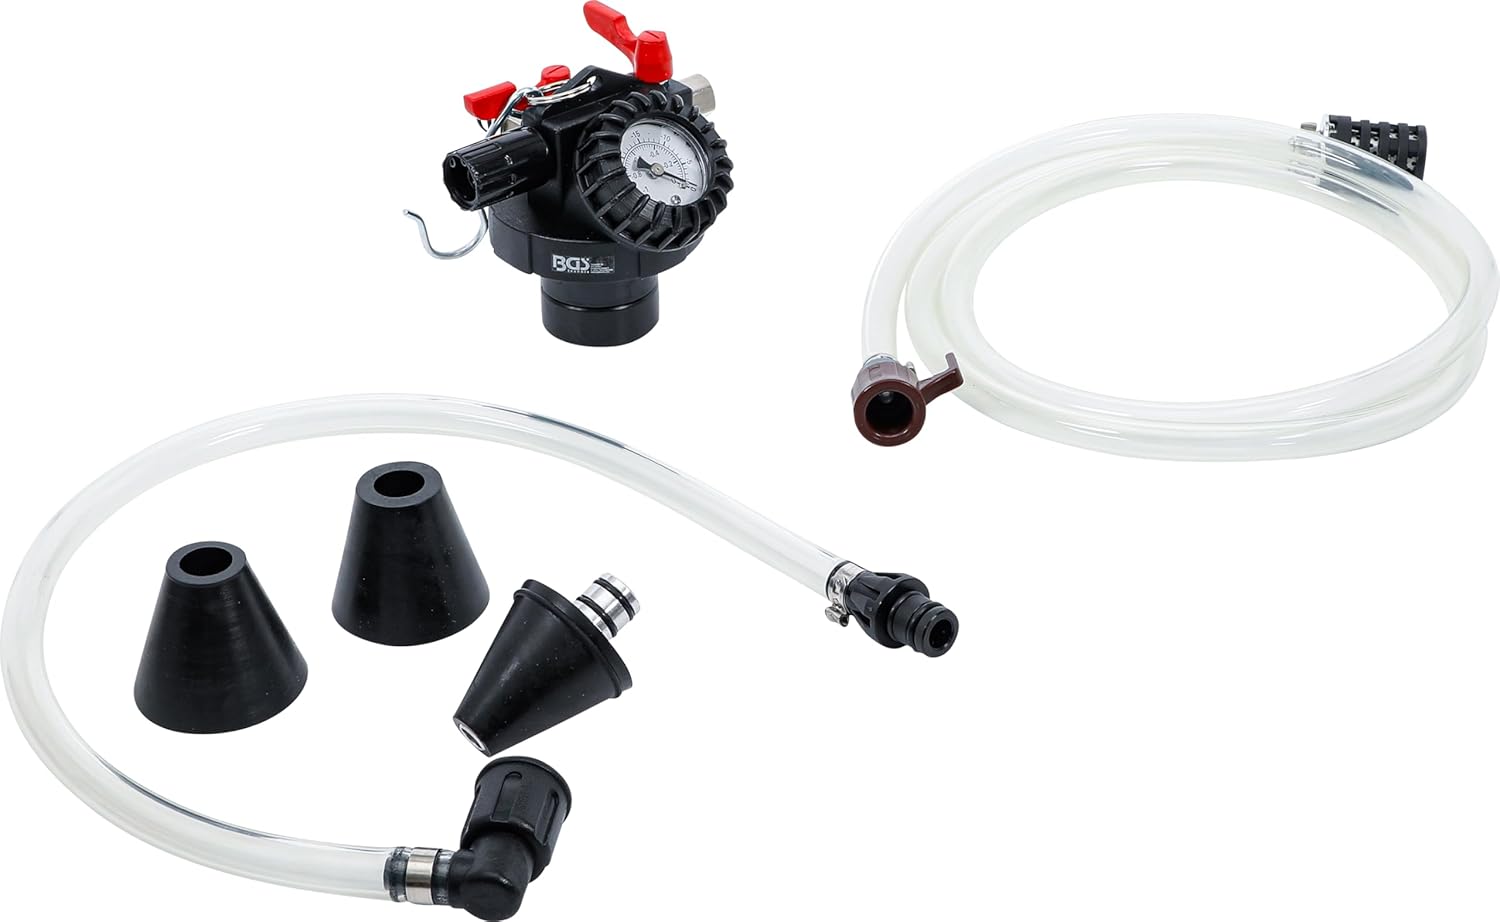
Figure 2: All 6 components of the BGS 9502 set, clearly showing the main device, hoses, and various cone adapters.
Setup and Preparation
- Safety First: Ensure the engine is cool before working on the cooling system. Wear appropriate personal protective equipment, including safety glasses and gloves.
- Vehicle Positioning: Park the vehicle on a level surface.
- Access Cooling System: Locate the radiator cap or expansion tank cap and remove it. Ensure the cooling system is drained if a complete coolant change is intended.
- Select Adaptor: Choose the appropriate cone adaptor (Ø 17-41 mm, Ø 24-52 mm, or Ø 27-50 mm) that fits snugly into the radiator or expansion tank opening.
- Connect Main Device: Attach the selected cone adaptor to the main device.
- Secure Connection: Insert the cone adaptor firmly into the cooling system opening, ensuring an airtight seal.
- Connect Air Supply: Connect a compressed air source (not included) to the main device's air inlet. The tool operates using shop air to create a vacuum.

Figure 3: Detailed view of the main device, highlighting connection points for air supply and hoses.
Operating Instructions
1. Vacuum Generation and Leak Test:
- With the main device and adaptor securely connected to the cooling system, open the air valve on the main device to begin drawing a vacuum.
- Observe the pressure gauge. The needle should move into the vacuum range. Continue until the desired vacuum level is reached (refer to vehicle manufacturer specifications if available, or a stable vacuum reading).
- Close the air valve. The vacuum should hold steady for at least 5-10 minutes. If the vacuum drops, it indicates a leak in the cooling system. Identify and repair any leaks before proceeding.
2. Coolant Filling:
- Once the vacuum test is successful and the vacuum is holding, place the free end of the filling hose into a container of new, appropriate coolant.
- Slowly open the coolant valve on the main device. The vacuum in the cooling system will draw the coolant from the container into the system.
- Monitor the coolant level in the container and the filling process. The system will fill until the vacuum is equalized.
- Once the system is full and no more coolant is being drawn, close the coolant valve.
- Carefully disconnect the air supply and then remove the main device from the radiator/expansion tank.
- Replace the radiator cap or expansion tank cap.
- Start the engine and allow it to reach operating temperature. Check for any remaining air bubbles and top up coolant if necessary after the thermostat opens.
Maintenance and Storage
- Cleaning: After each use, clean the main device, hoses, and adaptors with water to remove any coolant residue. Ensure all components are dry before storage.
- Inspection: Regularly inspect hoses for cracks or damage, and check adaptors for wear. Replace any damaged components immediately.
- Storage: Store the tool in its original carrying case in a clean, dry place, away from direct sunlight and extreme temperatures.

Figure 4: The BGS 9502 tool stored in its durable carrying case.
Troubleshooting
| Problem | Possible Cause | Solution |
|---|---|---|
| Tool does not hold vacuum. |
|
|
| Coolant not being drawn into system. |
|
|
| Air bubbles persist after filling. |
|
|
Specifications
| Attribute | Detail |
|---|---|
| Model Number | 9502 |
| Manufacturer | BGS technic |
| Number of Pieces | 6 |
| Product Dimensions (L x W x H) | 28.5 x 25 x 11 cm |
| Item Weight | 1.43 kg |
| Material | Alloyed Steel, Plastic |
| Filling Hose Length | 1640 mm |
| Extension Hose Length | 610 mm |
| Cone Adaptor 1 Diameter | Ø 17 - 41 mm |
| Expansion Cone 1 Diameter | Ø 24 - 52 mm |
| Expansion Cone 2 Diameter | Ø 27 - 50 mm |
| Batteries Required | No |
Warranty and Support
Specific warranty information for the BGS 9502 tool is typically provided at the point of purchase or within the product packaging. Please refer to your purchase documentation for details regarding warranty coverage and duration.
For technical support or inquiries regarding the use and maintenance of your BGS 9502 tool, please contact BGS technic customer service or your authorized dealer. Contact information can usually be found on the manufacturer's official website or on the product packaging.
Note: Always use genuine BGS replacement parts and accessories to ensure optimal performance and safety.