
DEWENWILS HU03E
Contents
DEWENWILS Indoor In-Wall Programmable Digital Timer Switch
Model: HU03E
Brand: DEWENWILS
Product Overview
The DEWENWILS Indoor In-Wall Programmable Digital Timer Switch is designed to automate the control of lights, fans, and motors within your home. This device offers advanced scheduling capabilities, including up to 7 ON/OFF programs per day, repeating weekly, to enhance convenience and energy efficiency. It features a clear digital display, a built-in battery backup to retain settings during power outages, and specialized modes like Daylight Saving Time (DST) and Random (RDM) for added security and flexibility.

Image: Front view of the DEWENWILS In-Wall Programmable Digital Timer Switch, showing its digital display and control buttons.
Safety Information
Before installation or operation, please read all safety instructions carefully. Failure to follow these instructions may result in electric shock, fire, or property damage.
- Neutral Wire Required: This timer switch requires a neutral wire for proper operation. Ensure your electrical box has a neutral wire (typically white) before attempting installation.
- Power Disconnection: Always turn off power at the circuit breaker before installing or servicing the switch. Verify power is off using a voltage tester.
- ETL Listed: This product is ETL listed, ensuring it meets recognized safety standards.
- Indoor Use Only: This timer switch is designed for indoor use in dry locations. Do not expose to water or excessive humidity.
- Electrical Ratings: Do not exceed the maximum electrical ratings: 1875W, 1000W Tungsten, 500VA Electronic Ballast, 1/2HP, 60Hz 8.3A Ballast.
- Professional Installation: If you are unsure about any part of the installation process, consult a qualified electrician.
Setup and Installation
This section provides instructions for installing your DEWENWILS In-Wall Timer Switch. All necessary accessories, including wire caps and screws, are included.
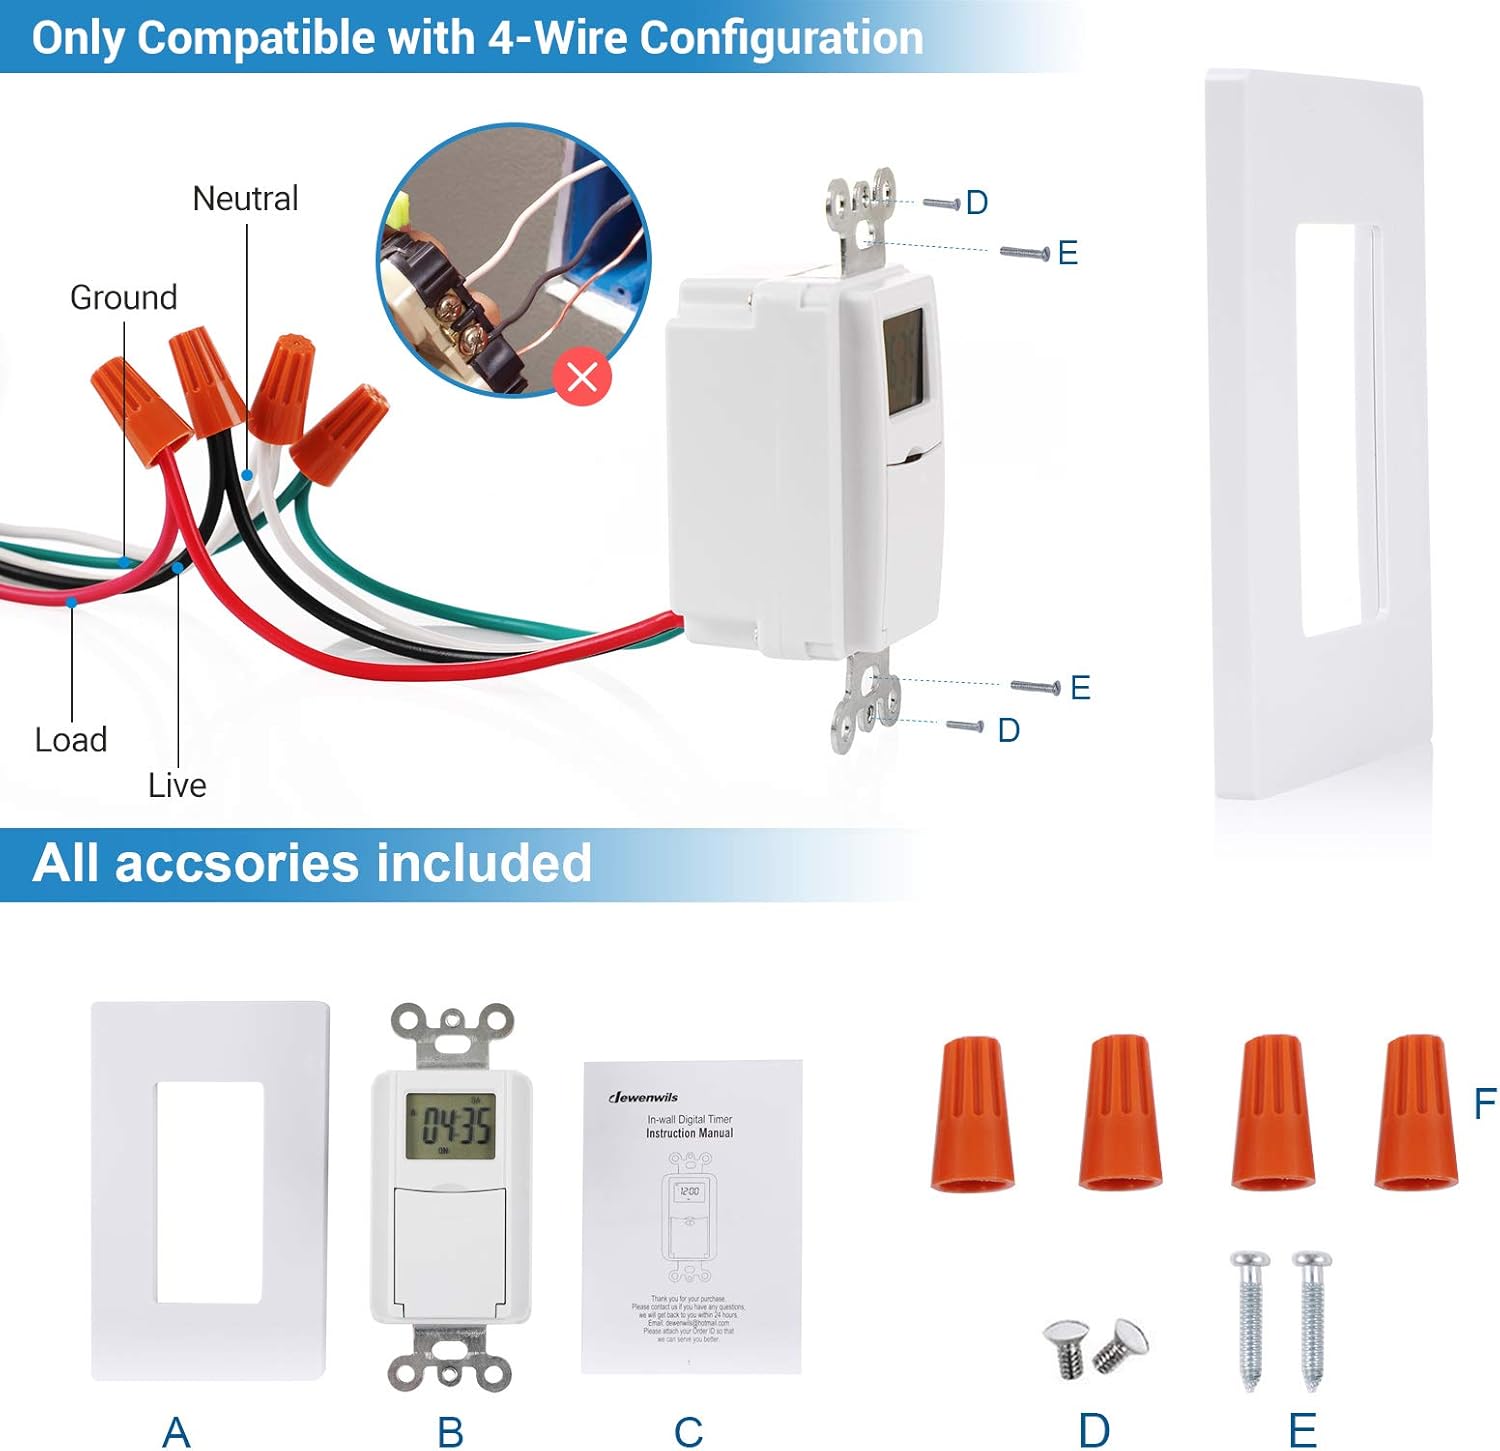
Image: Detailed wiring diagram showing connections for Live, Load, Neutral, and Ground wires, along with included accessories like wire caps and mounting screws.
Installation Steps:
- Turn Off Power: Locate the circuit breaker that controls the switch you are replacing and turn it off. Verify the power is off at the switch location using a voltage tester.
- Remove Old Switch: Carefully remove the existing wall plate and unscrew the old switch from the electrical box. Disconnect the wires from the old switch, noting their connections.
- Identify Wires: Identify the Live (Hot), Load, Neutral, and Ground wires in your electrical box.
- Live (Hot) Wire: Typically black, carries power from the circuit breaker.
- Load Wire: Typically black, connects to the light fixture or appliance.
- Neutral Wire: Typically white, required for this timer switch.
- Ground Wire: Typically bare copper or green.
- Connect New Switch: Connect the wires from your electrical box to the corresponding wires on the DEWENWILS timer switch using the provided wire caps. This switch is compatible with 4-wire configurations.
- Connect the Live wire to the timer's Live wire.
- Connect the Load wire to the timer's Load wire.
- Connect the Neutral wire to the timer's Neutral wire.
- Connect the Ground wire to the timer's Ground wire.
- Mount Switch: Carefully push the wired switch into the electrical box. Secure it with the provided mounting screws.
- Install Wall Plate: Attach the new wall plate over the switch.
- Restore Power: Turn the power back on at the circuit breaker. The timer's display should illuminate.
The timer has a built-in backup battery that retains settings for up to 3 months in case of a power outage, eliminating the need for reprogramming after short power interruptions.
Operating Instructions
The DEWENWILS timer switch offers intuitive programming for daily and weekly schedules. The control panel is located behind a small door on the front of the switch.

Image: Close-up view of the DEWENWILS timer switch control panel, showing the display and buttons for programming and manual control.
Setting Current Time:
To set the current day, hour, and minute:
- Press and hold the CLOCK button.
- While holding CLOCK, press DAY to set the current day of the week.
- While holding CLOCK, press HOUR to set the current hour (12-hour format with AM/PM).
- While holding CLOCK, press MIN to set the current minute.
Programming ON/OFF Times:
The timer allows for up to 7 ON/OFF programs. Each program consists of an ON time and an OFF time.
- Press the PROG button once. The display will show "1 ON".
- Press DAY to select the day(s) for this program (e.g., MO, TU, WE, TH, FR, SA, SU, or combinations like MO-FR, SA-SU, MO-SA, etc.).
- Press HOUR to set the desired ON hour.
- Press MIN to set the desired ON minute.
- Press PROG again. The display will show "1 OFF".
- Repeat steps 2-4 to set the desired OFF day(s), hour, and minute for this program.
- Continue pressing PROG to cycle through programs 2 ON, 2 OFF, up to 7 ON, 7 OFF. After setting all desired programs, press CLOCK to return to the current time display.
Special Modes:
- Random (RND) Mode:
To activate, press the RND button. The display will show "RND". In this mode, the timer will turn the connected device ON/OFF randomly within +/- 30 minutes of your programmed times. This feature can simulate occupancy for security purposes.
To deactivate, press RND again.
- Daylight Saving Time (DST) Mode:
To activate, press the DST button. The display will show "DST". This will automatically adjust the time forward by one hour for Daylight Saving Time.
To deactivate, press DST again.
Manual Control:
The timer switch allows for manual override of programmed settings.

Image: A hand pressing the lower part of the timer switch's cover to manually toggle the connected light, demonstrating the manual override feature.
- To manually turn the connected device ON or OFF, simply press the lower part of the cover that conceals the programming buttons. Each press will toggle the state (ON to OFF, or OFF to ON).
- If you manually turn the device ON and leave it, it will switch OFF at the next scheduled OFF program.
- If you manually turn the device OFF and leave it, it will switch ON at the next scheduled ON program.
Resetting the Timer:
To clear all programmed settings and reset the timer to its default state, use a pointed object (like a paperclip) to press the RESET button located on the control panel.
Maintenance
The DEWENWILS In-Wall Timer Switch is designed for long-lasting performance with minimal maintenance.
- Cleaning: To clean the surface of the timer switch, use a soft, dry cloth. Do not use abrasive cleaners, solvents, or excessive moisture, as these can damage the unit.
- Battery Backup: The internal battery backup is designed to maintain programmed settings for approximately 3 months during a power outage. This battery is not user-replaceable. If the display remains blank after power is restored or settings are consistently lost, the unit may need replacement.
- Environmental Conditions: Ensure the timer is installed in a dry, indoor environment. Avoid locations with high humidity, extreme temperatures, or direct exposure to sunlight.
Troubleshooting
If you encounter issues with your DEWENWILS In-Wall Timer Switch, refer to the following common problems and solutions:
| Problem | Possible Cause | Solution |
|---|---|---|
| Display is blank or not working. | No power to the switch; incorrect wiring; internal battery depleted. | Check circuit breaker. Verify wiring connections (Live, Neutral, Load, Ground). If power is present and wiring is correct, the internal battery may be fully depleted; allow time for it to charge or consider replacement if issue persists. |
| Programs are not activating. | Incorrect programming; manual override engaged; Random mode active. | Review programming steps carefully. Ensure the current time is set correctly. Check if the device was manually turned ON/OFF, as this overrides programs until the next scheduled event. Deactivate Random (RND) mode if not desired. |
| Light/device does not turn ON/OFF manually. | Incorrect wiring; faulty switch. | Ensure Load wire is correctly connected. Verify the light fixture or device is functional. If all connections are correct, the switch may be faulty. |
| Settings are lost after a power outage. | Extended power outage; internal battery depleted. | The internal battery holds settings for up to 3 months. For longer outages or if the battery is old, settings may be lost. Reprogram the timer. If this happens frequently with short outages, the battery may be at the end of its life. |
| Control cover feels flimsy or breaks easily. | Manufacturing variation or excessive force. | Handle the control cover gently when opening or closing. Avoid applying excessive force. |
Specifications
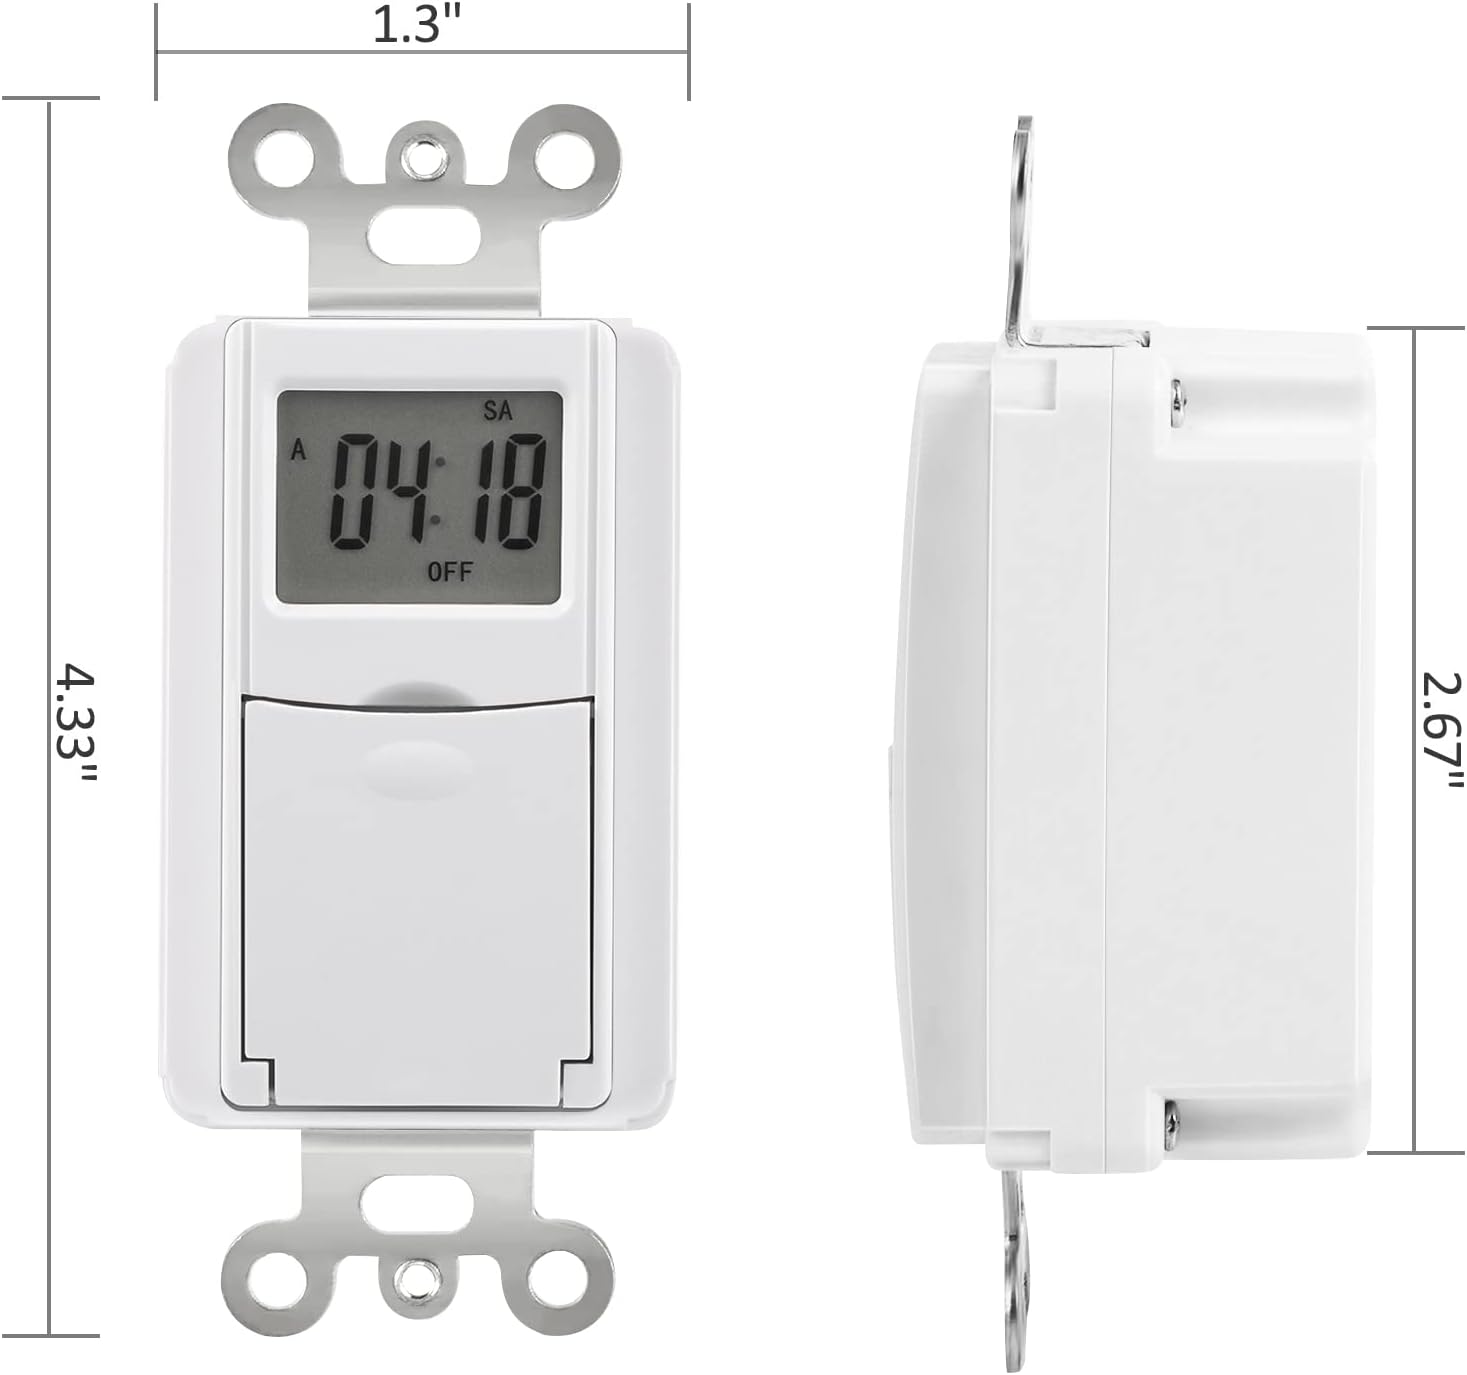
Image: Diagram showing the dimensions of the DEWENWILS In-Wall Timer Switch, including front and side views with measurements.
| Feature | Detail |
|---|---|
| Model Number | HU03E |
| Brand | DEWENWILS |
| Color | White |
| Material | Acrylonitrile Butadiene Styrene (ABS) |
| Product Dimensions (D x W x H) | 5.63" x 3.27" x 2.17" |
| Item Weight | 5.6 ounces |
| Number of Settings | 7 ON/OFF programs per day |
| Screen Size | 3.27 Inches (LCD) |
| Electrical Rating | 1875W, 1000W Tungsten, 500VA Electronic Ballast, 1/2HP, 60Hz 8.3A Ballast |
| Certifications | ETL Listed |
| Battery Backup | Retains settings for up to 3 months during power outage |
| UPC | 611901251981 |
Warranty and Support
DEWENWILS products are designed for reliability and durability. For specific warranty details or technical support, please refer to the official DEWENWILS website or contact their customer service directly.
You can visit the DEWENWILS Store on Amazon for more information and product updates.
When contacting support, please have your product model number (HU03E) and purchase information readily available.
Ask a question about this manual
Ask about setup, troubleshooting, compatibility, parts, safety, or missing instructions. Manuals+ will review the question and use this page’s manual context to help answer it.