1. Product Overview
The CORSAIR Carbide Series SPEC-Omega RGB is a mid-tower ATX gaming case designed for enthusiasts seeking a distinctive aesthetic and advanced lighting capabilities. Its asymmetrical, angular design, combined with integrated RGB light strips and tempered glass panels, provides a modern and visually striking appearance for your PC build.
Key Features:
- Tempered Glass Panels: Side and front tempered glass panels showcase your internal components and RGB lighting.
- Brilliant RGB Lighting: Features 30 RGB LEDs in the front fascia and two pre-installed CORSAIR HD120 RGB 120mm fans for extensive lighting customization.
- Complete Lighting Control: Includes a CORSAIR Lighting Node PRO digital RGB lighting controller for managing lighting effects via CORSAIR iCUE software.
- Versatile Cooling Options: Supports up to six 120mm fans, or liquid cooling radiators up to 360mm in the front, 240mm at the top, and 120mm in the rear.
- Direct Airflow Path: Optimized internal layout ensures cool air reaches critical components efficiently.
- Cable Management: An integrated PSU shroud helps conceal cables and drives for a clean interior.

Figure 1: Front-side view of the CORSAIR Carbide SPEC-Omega RGB Mid-Tower Gaming Case in White.
2. Setup Instructions
Follow these steps to properly set up your CORSAIR Carbide SPEC-Omega RGB gaming case and install your PC components.
2.1 Unpacking
- Carefully remove the case from its packaging.
- Inspect the case for any signs of damage during transit.
- Remove all protective films from the tempered glass panels.
- Locate the accessory box, which typically contains screws, zip ties, and the user manual.
2.2 Component Installation
The SPEC-Omega RGB case supports ATX and Mini-ITX motherboards. Ensure your components are compatible before installation.
- Remove Side Panels: Unscrew the hex bolts securing the tempered glass side panel and carefully remove it. Repeat for the opposite side panel if necessary for cable management.
- Install Motherboard: Secure your ATX or Mini-ITX motherboard onto the pre-installed standoffs. Ensure all screws are tightened appropriately.
- Install Graphics Card: Insert your graphics card into the appropriate PCIe slot on the motherboard and secure it with screws.
- Install Storage Drives: Utilize the three 2.5-inch drive bays behind the motherboard tray and the two 3.5-inch drive cages located beneath the PSU shroud. The 3.5-inch drive cage can be adjusted for radiator clearance or cable management.
- Install Power Supply (PSU): Mount your PSU within the dedicated shroud area at the bottom of the case.
- Connect Cables: Route all necessary power and data cables, utilizing the cable cutouts and grommets for a clean build. The PSU shroud helps conceal excess cables.
- Install Cooling: The case supports up to six 120mm fans. Two CORSAIR HD120 RGB fans are pre-installed. For liquid cooling, a 360mm radiator can be mounted in the front, a 240mm radiator at the top, and a 120mm radiator in the rear.
- Reattach Panels: Once all components are installed and cables managed, carefully reattach the side panels using the hex bolts.
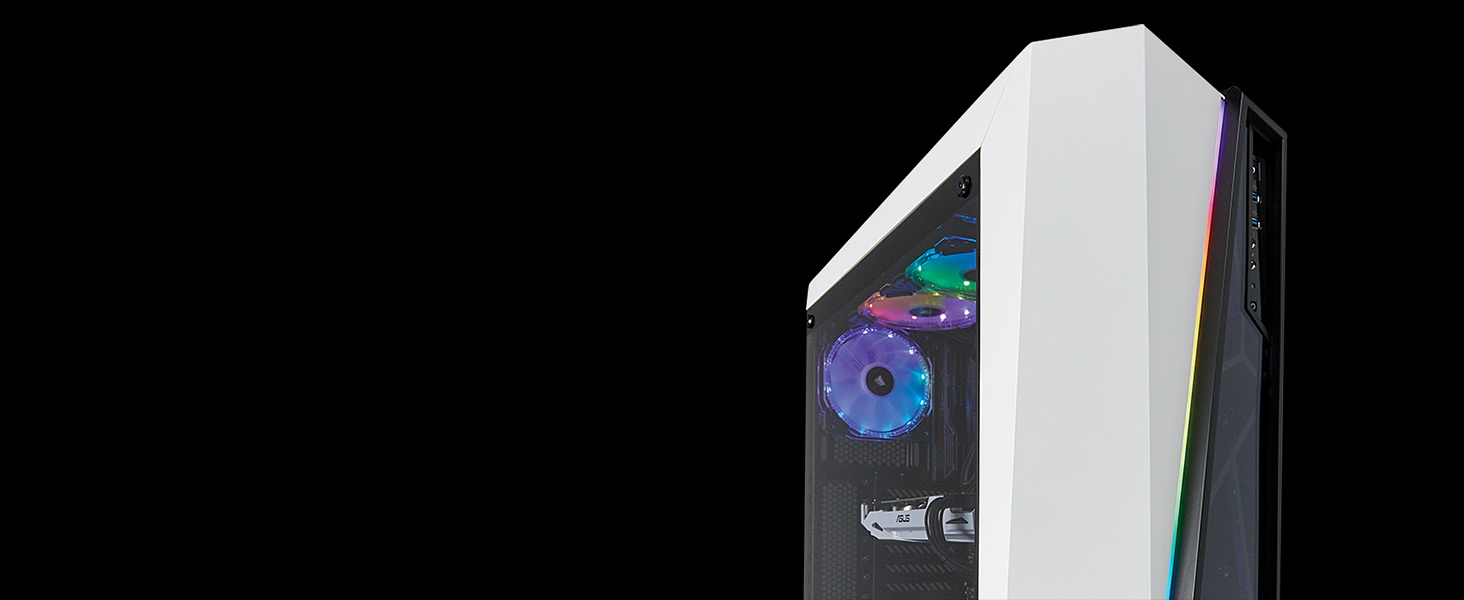
Figure 2: Internal view of the CORSAIR Carbide SPEC-Omega RGB case, highlighting component layout and RGB elements.
3. Operating Your Case
The primary operational aspect of the SPEC-Omega RGB case involves managing its integrated RGB lighting system.
3.1 RGB Lighting Control
The CORSAIR Carbide SPEC-Omega RGB case features a built-in Lighting Node PRO digital RGB lighting controller. This controller allows for extensive customization of the 30 RGB LEDs in the front fascia and the two included CORSAIR HD120 RGB fans.
- iCUE Software: To unlock the full potential of the RGB lighting, download and install the CORSAIR iCUE software from the official CORSAIR website.
- Customization: Within iCUE, you can select from a wide array of pre-set lighting modes, create your own custom lighting profiles, and synchronize lighting effects across all your iCUE-compatible CORSAIR products.
- Connectivity: Ensure the Lighting Node PRO is correctly connected to your motherboard via a USB 2.0 header and to your power supply via a SATA power connector. The RGB fans should be connected to the Lighting Node PRO.
Video 1: Official CORSAIR video showcasing the RGB lighting effects and design of the Carbide SPEC-Omega case.
4. Maintenance
Regular maintenance helps ensure optimal performance and longevity of your gaming case.
4.1 Cleaning
- Exterior: Use a soft, damp cloth to wipe down the exterior surfaces. Avoid abrasive cleaners that may scratch the finish.
- Tempered Glass Panels: Clean tempered glass panels with a glass cleaner and a microfiber cloth. To remove the side panel for cleaning, unscrew the hex bolts carefully. Avoid overtightening when reattaching.
- Dust Filters: The case includes removable dust filters. Regularly clean these filters by gently brushing or rinsing them with water. Ensure they are completely dry before reinstallation.
- Interior: Periodically use compressed air to remove dust buildup from internal components, fans, and radiator fins. Ensure the system is powered off and unplugged before cleaning the interior.
5. Troubleshooting
This section addresses common issues you might encounter with your CORSAIR Carbide SPEC-Omega RGB case.
5.1 Common Issues and Solutions
- Poor Airflow/High Temperatures:
- Ensure all case fans are properly installed and spinning in the correct direction (intake/exhaust).
- Clean dust filters and internal components to prevent airflow obstruction.
- Verify that no cables are blocking airflow paths inside the case.
- Consider adding additional fans or upgrading to a more robust cooling solution if temperatures remain high.
- RGB Lighting Not Working:
- Check all connections to the Lighting Node PRO, including the USB 2.0 header and SATA power.
- Ensure the RGB fans and LED strips are correctly connected to the Lighting Node PRO.
- Verify that the CORSAIR iCUE software is installed and up to date. Restart the software or your system.
- If individual LEDs or fans are not lighting up, check their specific connections to the controller.
- Difficulty Removing Front Panel:
- The front panel is secured by tabs. To remove it, first remove the glass side panel, then the top and back side panels. Reach through and simultaneously push in on the tabs holding the front panel in place, slowly working your way down. Avoid excessive force to prevent damage.
6. Technical Specifications
| Feature | Specification |
|---|---|
| Brand | Corsair |
| Model Name | SPEC-Omega RGB |
| Case Type | Mid Tower |
| Motherboard Compatibility | ATX, Mini-ITX |
| Color | White |
| Material | Tempered Glass |
| Cooling Method | Air |
| Number of Fans Included | 2 (HD120 RGB 120mm) |
| Internal Bays Quantity | 6 (3x 2.5-inch, 2x 3.5-inch) |
| Total USB 2.0 Ports | 2 |
| Total USB 3.0 Ports | 2 |
| Other Special Features | RGB Lighting, Lighting Node PRO Included |
| Item Weight | 7.75 Kilograms |
| UPC | 843591065436 |
7. Warranty and Support
CORSAIR products are manufactured to the highest quality standards. For detailed warranty information, please refer to the warranty card included with your product or visit the official CORSAIR website.
If you encounter any issues or require technical assistance, please contact CORSAIR customer support through their official website or the contact information provided in your product packaging. Have your product model and serial number ready for faster service.
Online Resources:
- Official CORSAIR Website: www.corsair.com
- Support Portal: Refer to the CORSAIR website for support articles, FAQs, and driver downloads (e.g., iCUE software).


