1. Introduction
Thank you for choosing the Kuvings D9900 Vertical Slow Juicer. This manual provides essential information for the safe and efficient operation, maintenance, and care of your new appliance. Please read all instructions carefully before first use and retain this manual for future reference.

Image 1.1: Kuvings D9900 Vertical Slow Juicer.
2. Important Safety Instructions
To reduce the risk of fire, electric shock, or injury, always follow basic safety precautions when using electrical appliances. This includes:
- Read all instructions before operating the juicer.
- Do not immerse the motor base in water or other liquids.
- Keep hands and utensils out of the feeding chute during operation to prevent injury. Use the food pusher provided.
- Ensure all parts are correctly assembled before turning on the appliance.
- Unplug from the outlet when not in use, before assembling or disassembling parts, and before cleaning.
- Do not operate any appliance with a damaged cord or plug, or after the appliance malfunctions or has been damaged in any manner.
- This appliance is for household use only.
3. Package Contents
Upon unpacking, please verify that all components are present:
- Kuvings D9900 Motor Base
- Juicing Bowl
- Auger (Squeezing Screw)
- Juicing Screen (Max Filter)
- Rotation Wiper
- Hopper with Feeding Chute and Safety Flap
- Pusher
- Juice Container
- Pulp Container
- Cleaning Brushes (2 types)
- Strainer
- Recipe Book

Image 3.1: Included cleaning brushes and drying stand.

Image 3.2: Kuvings recipe book.
4. Product Components
Familiarize yourself with the main parts of your Kuvings D9900 juicer:

Image 4.1: Key features of the Kuvings D9900, including the 8.2cm wide feeding chute, MaxFilter technology for fiber-free juice, and the silent, robust 240W motor.
- Wide Feeding Chute (8.2 cm): Allows for larger pieces of fruits and vegetables, reducing preparation time. Features a safety flap.
- Max Filter Technology: Designed to produce smooth, fiber-free juice.
- Silent Motor: Operates quietly with 240 Watts of power and a rotation speed of 48 RPM.
5. Setup and Assembly
Follow these steps to assemble your juicer before first use:
- Place the motor base on a stable, flat surface.
- Insert the juicing bowl onto the motor base, aligning the red dots.
- Place the rotation wiper into the juicing bowl.
- Insert the juicing screen (Max Filter) into the rotation wiper, ensuring it sits securely.
- Place the auger (squeezing screw) into the center of the juicing screen.
- Attach the hopper with the feeding chute onto the juicing bowl, aligning the red dots and rotating until it locks into place.
- Position the juice container under the juice outlet and the pulp container under the pulp outlet.
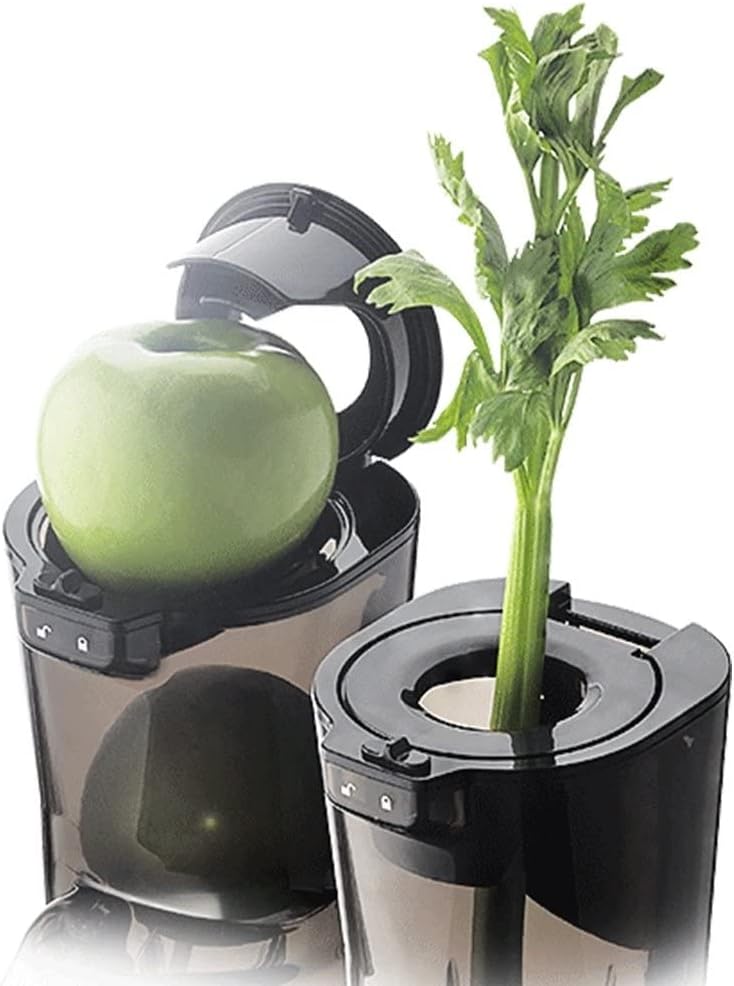
Image 5.1: The wide feeding chute accommodates larger ingredients.
6. Operating Instructions
Prepare your ingredients and begin juicing:
- Wash all fruits and vegetables thoroughly.
- Cut ingredients into appropriate sizes to fit the feeding chute. Remove hard seeds, pits, or thick skins.
- Ensure the juice cap is closed if you wish to mix juices inside the bowl.
- Plug the power cord into a grounded electrical outlet.
- Turn the power switch to the 'ON' position.
- Slowly feed ingredients into the chute. Use the pusher only if necessary to guide ingredients. Do not force ingredients.
- Once juicing is complete, turn the power switch to 'OFF' and unplug the appliance.
- Open the juice cap to release the juice into the container.

Image 6.1: Juicing various fruits and vegetables.

Image 6.2: Fresh juice being extracted.
7. Cleaning and Maintenance
Regular cleaning ensures optimal performance and longevity of your juicer. All removable parts are recommended for hand washing only.
- Unplug the juicer from the power outlet.
- Disassemble the juicer in reverse order of assembly.
- Rinse all removable parts under running water immediately after use to prevent pulp from drying.
- Use the provided cleaning brushes to thoroughly clean the juicing screen and other components. Pay special attention to the small mesh holes of the filter.
- Wipe the motor base with a damp cloth. Never immerse the motor base in water.
- Allow all parts to air dry completely before reassembling or storing.

Image 7.1: Cleaning the juicing screen with a brush.
8. Troubleshooting
If you encounter issues with your Kuvings D9900, refer to the following common problems and solutions:
| Problem | Possible Cause | Solution |
|---|---|---|
| Juicer does not turn on. | Not plugged in; parts not assembled correctly; safety lock not engaged. | Check power connection; reassemble all parts, ensuring red dots align and the hopper is locked. |
| Excessive vibration or noise. | Parts not assembled correctly; hard ingredients. | Disassemble and reassemble carefully; cut hard ingredients into smaller pieces. |
| Pulp is wet. | Overfeeding; ingredients too soft. | Feed ingredients slowly; alternate soft and hard ingredients. |
| Juice leaks from the bottom. | Juicing bowl not properly seated; juice cap closed for too long with too much liquid. | Ensure juicing bowl is correctly aligned; open juice cap periodically to release juice. |
If the problem persists after attempting these solutions, please contact customer support.
9. Product Specifications
| Feature | Specification |
|---|---|
| Brand | Kuvings |
| Model Number | D9900 (WCK24-D9900GMGrisMat) |
| Color | Anthracite |
| Dimensions (L x W x H) | 14 x 19.99 x 45.01 cm |
| Weight | 10.24 kg |
| Power | 240 Watts |
| Rotation Speed | 48 RPM |
| Material | Plastic |
| Special Feature | Silent Motor |
| Recommended Use | Fruits and Vegetables |
| Care Instructions | Hand wash only |
10. Warranty and Support
Warranty Information
The Kuvings D9900 Vertical Slow Juicer motor is robust and comes with a 5-year warranty. Please refer to your purchase documentation for full warranty terms and conditions, which may vary by region.
Customer Support
For technical assistance, warranty claims, or inquiries about replacement parts, please contact Kuvings customer support through their official website or the contact information provided with your purchase. Information regarding the availability of spare parts is not provided in this manual.


