
Introduction
This manual provides essential information for the proper installation, operation, and maintenance of your Scandvik 10881 Compact Marine Galley Pull Out Faucet. Please read these instructions thoroughly before beginning installation or use to ensure correct function and longevity of the product. Retain this manual for future reference.
Safety Information
- Always turn off the water supply before attempting any installation or maintenance.
- Ensure all connections are secure to prevent leaks.
- If you are unsure about any step, consult a qualified professional.
Package Contents
Verify that all components are present before beginning installation:
- Scandvik 10881 Faucet Unit with Pull-Out Sprayer
- Flexible Supply Hoses (5-inch length)
- Mounting Hardware (washers, nuts)
- Installation Gasket
Specifications
| Brand | Scandvik |
| Model Number | 10881 |
| Material | Stainless Steel |
| Finish Type | Silver |
| Mounting Type | Deck Mount (Single Hole) |
| Handle Type | Lever |
| Hose Length | 5 Inches (Pull-out) |
| Item Weight | 3.43 Pounds |
Dimensions
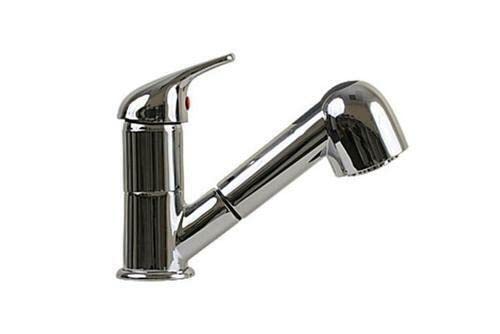
The diagram illustrates the key dimensions of the Scandvik Compact Marine Galley Pull Out Faucet. The faucet stands approximately 5 1/2 inches tall from the mounting surface. The pull-out sprayer extends to a height of 4 1/2 inches. The total horizontal length from the faucet base to the end of the sprayer is 7 1/2 inches. The base of the faucet has a diameter of 2 inches.
Setup & Installation
This faucet is designed for single-hole deck mount installation.
- Prepare the Mounting Surface: Ensure the mounting hole on your galley sink or countertop is clean and free of debris. The hole should accommodate the faucet base.
- Install the Faucet: Place the gasket (if provided) over the mounting hole. Insert the faucet body through the mounting hole.
- Secure the Faucet: From underneath the sink, slide the rubber washer, then the metal washer, and finally thread the mounting nut onto the faucet shank. Tighten the nut securely by hand, then use an appropriate tool to ensure a firm, stable installation. Avoid overtightening.
- Connect Water Supply Lines: Attach the hot and cold water supply lines from your plumbing system to the corresponding flexible hoses extending from the faucet. Ensure all connections are hand-tight, then use a wrench to tighten an additional quarter turn. Do not overtighten.
- Check for Leaks: Once all connections are made, slowly turn on the main water supply and check for any leaks at all connection points. Tighten any leaking connections as necessary.
Operating Instructions
The Scandvik 10881 faucet features a single lever for water flow and temperature control, and a pull-out sprayer for extended reach.
- Water Flow and Temperature: Lift the single lever handle to turn on the water and control the flow rate. Move the lever left for hot water and right for cold water to adjust the temperature.
- Pull-Out Sprayer: Grasp the sprayer head and pull it out from the faucet body. The flexible hose allows for extended reach. After use, guide the sprayer head back into the faucet body until it is fully seated.
- Non-Swiveling Feature: Please note that this faucet is designed with a fixed body and does not swivel.
Maintenance
Regular cleaning and maintenance will help preserve the finish and functionality of your faucet.
- Cleaning the Finish: Clean the faucet regularly with a soft cloth and mild soap and water. Rinse thoroughly and dry with a soft cloth to prevent water spots. Avoid abrasive cleaners, harsh chemicals, or scouring pads, as these can damage the finish.
- Cleaning the Sprayer Nozzles: If water flow from the sprayer becomes uneven, mineral deposits may be blocking the nozzles. Gently rub the rubber nozzles with your finger or a soft brush to dislodge any buildup.
- Checking Connections: Periodically inspect all water connections for any signs of leaks or corrosion. Tighten connections if necessary.
Troubleshooting
Refer to the following table for common issues and their potential solutions:
| Problem | Possible Cause | Solution |
|---|---|---|
| Low water flow | Clogged aerator/nozzles; partially closed shut-off valve; kinked supply line. | Clean sprayer nozzles. Ensure shut-off valves are fully open. Check supply lines for kinks. |
| Leaks at connections | Loose connections; damaged washers/gaskets. | Tighten connections. Replace worn or damaged washers/gaskets. |
| Water temperature issues | Incorrect hot/cold supply connections; water heater issues. | Verify hot and cold supply lines are connected correctly. Check water heater settings. |
Warranty & Support
For information regarding product warranty or technical support, please refer to the manufacturer's official website or contact their customer service department. Keep your purchase receipt as proof of purchase.