
Blackmagic Design BM-SWPANELCCU4
Blackmagic Design ATEM Camera Control Panel User Manual
Model: BM-SWPANELCCU4
Introduction
The Blackmagic Design ATEM Camera Control Panel is an advanced control surface designed for professional live broadcasting. It provides seamless management of up to four URSA Mini, URSA Broadcast, Blackmagic Studio, or Micro Studio cameras. This panel offers intuitive, hands-on control over critical camera functions, ensuring comprehensive command over your broadcast's quality and consistency.
Product Overview

Figure 1: Angled view of the Blackmagic Design ATEM Camera Control Panel, showcasing the four camera control sections with LCD screens, knobs, and joysticks.

Figure 2: Top-down view of the control panel, highlighting the layout of controls for each of the four cameras, including scene preset buttons, master gain, and color correction dials.
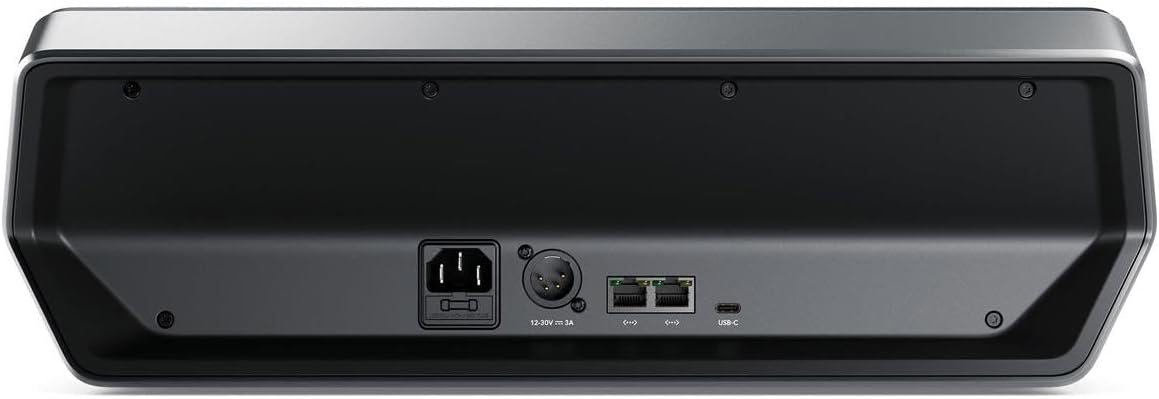
Figure 3: Rear view of the control panel, displaying the power input, XLR audio connection, dual Ethernet ports, and a USB-C port for connectivity.
Setup
- Unpacking: Carefully remove the ATEM Camera Control Panel from its packaging. Inspect for any signs of damage.
- Power Connection: Connect the provided power cable to the power input on the rear of the unit (refer to Figure 3). Plug the other end into a suitable power outlet.
- Network Connection: Connect an Ethernet cable from one of the Ethernet ports on the rear of the panel to your network switch or directly to your ATEM switcher. This connection facilitates communication with your Blackmagic Design cameras.
- Camera Connection: Ensure your Blackmagic Design cameras (URSA Mini, URSA Broadcast, Blackmagic Studio, or Micro Studio cameras) are properly connected to the same network as the ATEM Camera Control Panel. The panel can manage up to four compatible cameras.
- USB-C Connection (Optional): For firmware updates or direct computer control/configuration, connect a USB-C cable from the panel's USB-C port to your computer.
Operating Instructions
The ATEM Camera Control Panel is designed for intuitive, real-time camera adjustments. It features four dedicated camera controllers, each with its own LCD screen and set of controls.
Basic Camera Control
- Iris Control: Use the dedicated joystick or rotary encoder for precise iris adjustments, controlling the amount of light entering the camera.
- Shutter Speed: Adjust the shutter speed to manage motion blur and exposure.
- White Balance: Fine-tune the white balance to ensure accurate color reproduction under varying lighting conditions.
- Gain: Control the camera's gain setting to amplify the video signal in low-light environments.
- Pedestal: Adjust the black level (pedestal) for each camera to achieve desired contrast.
- RGB for White and Black: Utilize the RGB controls to perform detailed color correction on both the white and black levels of your video signal.
Scene Presets
The top section of each camera controller allows you to save and recall scene presets. This feature is crucial for rapid adjustments to cameras based on changes in lighting or scene requirements. To save a preset, configure your camera settings as desired, then press and hold a designated preset button. To recall, simply press the corresponding preset button.
Monitoring
Each camera controller includes a large LCD screen that displays current camera settings and status information, providing immediate visual feedback on your adjustments.
Maintenance
- Cleaning: Use a soft, dry cloth to clean the exterior of the panel. For stubborn marks, a slightly damp cloth with mild soap can be used, ensuring no liquid enters the device. Avoid abrasive cleaners or solvents.
- Storage: When not in use for extended periods, store the panel in a cool, dry place away from direct sunlight and extreme temperatures.
- Firmware Updates: Periodically check the Blackmagic Design website for firmware updates. Keeping the firmware updated ensures optimal performance and access to new features.
Troubleshooting
| Problem | Possible Cause | Solution |
|---|---|---|
| Panel does not power on. | No power, faulty cable, or power supply issue. | Check power cable connection to the panel and outlet. Ensure the outlet is functional. Try a different power cable if available. |
| Cameras not responding to control panel. | Network connectivity issue, incorrect IP settings, or camera not compatible. | Verify Ethernet cable connections. Ensure the panel and cameras are on the same network and have correct IP configurations. Confirm camera compatibility with the ATEM Camera Control Panel. |
| Controls are unresponsive or erratic. | Firmware issue, software glitch, or hardware malfunction. | Restart the control panel and connected cameras. Check for and install any available firmware updates. If the issue persists, contact Blackmagic Design support. |
Specifications
| Feature | Detail |
|---|---|
| Product Dimensions | 23 x 19 x 8 inches |
| Item Weight | 14.66 pounds |
| Model Number | BM-SWPANELCCU4 |
| Brand | Blackmagic Design |
| Compatible Devices | Blackmagic Design URSA Mini, URSA Broadcast, Blackmagic Studio, or Micro Studio cameras |
| Max Number of Supported Devices | 4 Cameras |
| Color | Black |
| Special Feature | Ergonomic design for professional use |
| Connectivity | Ethernet, USB-C |
Warranty and Support
For detailed warranty information and technical support, please refer to the official Blackmagic Design website or contact their customer service directly. Warranty terms and conditions may vary by region and purchase date.
Official Website: www.blackmagicdesign.com
Related documentsBM-SWPANELCCU4


Ask a question about this manual
Ask about setup, troubleshooting, compatibility, parts, safety, or missing instructions. Manuals+ will review the question and use this page’s manual context to help answer it.