
Introduction
This manual provides detailed instructions for the safe installation, operation, and maintenance of your Hampton Bay Carriage House 52-inch LED Indoor Polished Brass Ceiling Fan. Please read all instructions carefully before beginning installation to ensure proper function and safety. Keep this manual for future reference.

Image: The Hampton Bay Carriage House 52-inch LED Ceiling Fan with polished brass finish and five wooden blades, featuring a four-light kit with clear glass shades.
Important Safety Instructions
- WARNING: To reduce the risk of fire, electric shock, or personal injury, mount fan directly from building structure and/or to an outlet box marked acceptable for fan support of 35 lbs (15.9 kg) and use the mounting screws provided with the outlet box.
- WARNING: All wiring must be in accordance with national and local electrical codes. Consult a qualified electrician if you are unfamiliar with wiring.
- WARNING: Do not operate the fan with damaged power cords or plugs.
- Ensure the installation site allows for blade clearance from walls and floor.
- Always disconnect power at the circuit breaker or fuse box before installation or servicing.
- Do not insert objects into the path of the fan blades while the fan is operating.
- This product is designed for indoor use only.
Package Contents
Verify that all components listed below are included in your package before beginning installation.
- Motor Housing Assembly
- Fan Blades (5)
- Blade Brackets (5)
- Light Kit Assembly
- Glass Shades (4)
- LED Bulbs (4)
- Mounting Bracket
- Hardware Pack (screws, washers, wire nuts)
- Pull Chains (for fan speed and light)

Image: Close-up of the reversible fan blades, showing both the medium oak and rosewood finishes.
Specifications
| Brand | Hampton Bay |
| Model Number | 46008 |
| Fan Size | 52 inches |
| Finish Type | Polished Brass |
| Blade Material | Wood (Reversible: Medium Oak / Rosewood) |
| Number of Blades | 5 |
| Light Source | LED |
| Number of Lights | 4 |
| Bulb Wattage | 9.5 Watts per bulb |
| Bulb Base | E26 |
| Control Method | Pull Chain |
| Indoor/Outdoor Usage | Indoor |
| Product Dimensions | 52"L x 14.6"W x 14.6"H |
| Item Weight | 21 Pounds |
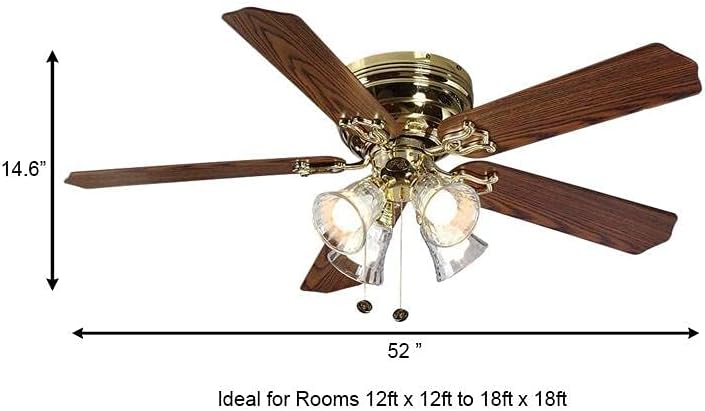
Image: Diagram illustrating the 52-inch width and 14.6-inch height of the ceiling fan, indicating suitability for rooms 12ft x 12ft to 18ft x 18ft.
Setup and Installation
Before You Begin: Ensure power is turned off at the circuit breaker. Gather necessary tools: screwdriver, wire strippers, electrical tape, ladder.
1. Mounting the Bracket
- Secure the mounting bracket to the ceiling outlet box using the screws provided with the outlet box. Ensure the bracket is firmly attached and can support the fan's weight.
2. Wiring the Fan
- Connect the household supply wires to the fan wires according to the wiring diagram provided in the full installation guide (not included here). Typically, connect black to black, white to white, and ground to ground. Use wire nuts to secure connections.
- Carefully tuck all wires into the outlet box.
3. Attaching the Fan Body
- Lift the fan motor assembly and align it with the mounting bracket. Secure the fan body to the bracket using the provided screws.
4. Installing the Fan Blades
- Attach each fan blade to a blade bracket using the screws provided. Ensure the desired blade finish (medium oak or rosewood) is facing downwards.
- Secure each blade assembly to the motor housing.

Image: Close-up view of a fan blade attached to its bracket, ready for installation onto the motor housing.
5. Installing the Light Kit
- Connect the light kit wires to the corresponding wires from the fan motor assembly.
- Attach the light kit assembly to the bottom of the fan motor housing.
- Install the four LED bulbs into the sockets.
- Secure the glass shades onto the light kit.

Image: Detailed view of the polished brass light fixture with clear glass shades and the wooden fan blades.
Operating Instructions
Once installation is complete and power is restored, your Hampton Bay Carriage House ceiling fan is ready for operation.
Fan Speed Control
The fan speed is controlled by one of the pull chains extending from the light kit. Pull the chain repeatedly to cycle through the fan speeds:
- Pull 1: High Speed
- Pull 2: Medium Speed
- Pull 3: Low Speed
- Pull 4: Off
Light Control
The light kit is controlled by the other pull chain. Pull the chain to turn the lights On or Off.
Reversible Airflow
Your fan features a reversible motor for year-round comfort. A switch on the fan's motor housing allows you to change the direction of airflow:
- Downward Airflow (Summer): Set the switch to circulate air downwards, creating a cooling effect.
- Upward Airflow (Winter): Set the switch to circulate air upwards, helping to distribute warm air evenly throughout the room.
Maintenance
Regular maintenance ensures optimal performance and extends the life of your ceiling fan.
Cleaning
- Always turn off power at the circuit breaker before cleaning.
- Use a soft, damp cloth to clean the fan blades and motor housing. Do not use abrasive cleaners or solvents, as these can damage the finish.
- Dust the glass shades regularly. For deeper cleaning, remove the shades and wash them with mild soap and water, then dry thoroughly before reattaching.
Bulb Replacement
- Ensure power is off before replacing bulbs.
- Allow bulbs to cool completely before touching them.
- Unscrew the old bulb and replace it with a new E26 base LED bulb (max 9.5 Watts).
Tightening Fasteners
- Periodically check all screws and fasteners on the fan and light kit to ensure they are secure. Tighten any loose screws to prevent wobbling or noise.
Troubleshooting
Before contacting customer support, review the following common issues and solutions.
| Problem | Possible Cause | Solution |
|---|---|---|
| Fan does not start |
|
|
| Fan wobbles |
|
|
| Light kit does not work |
|
|
Warranty and Support
For warranty information or technical assistance, please refer to the warranty card included with your product or contact Hampton Bay customer service. Keep your proof of purchase for warranty claims.
Customer Service: Please visit the Hampton Bay official website or contact their support line for further assistance.


