1. Introduction
This manual provides detailed instructions for the installation, operation, maintenance, and troubleshooting of your Genie Chain Drive 750 3/4 HPc Garage Door Opener, Model 7035-TKV. Please read all instructions carefully before beginning installation or operation to ensure safe and efficient use of your product.
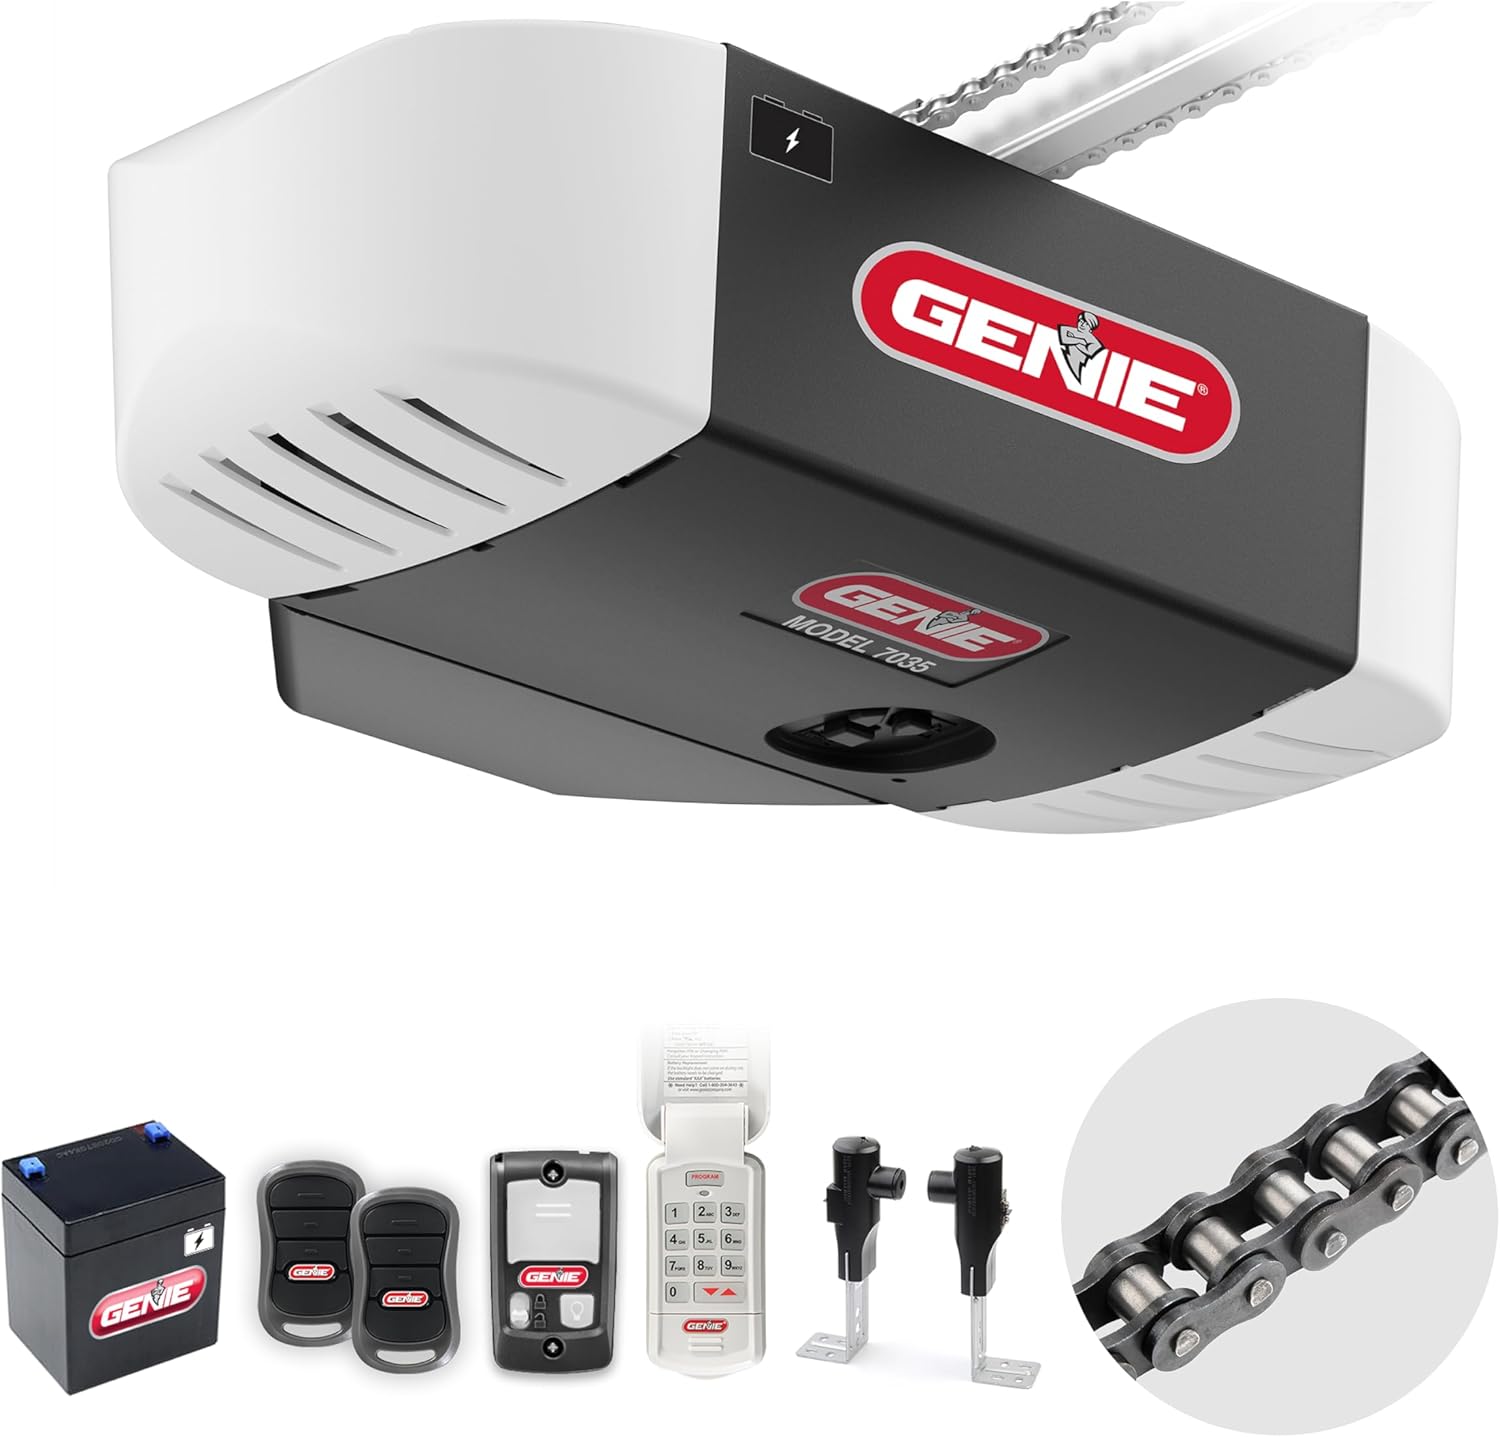
The Genie Chain Drive 750 is designed for residential sectional garage doors up to 7 feet high and 500 lbs in weight. It features a durable chain drive system, a 3/4 HPc DC motor with GenieSense technology for reliable operation, and an integrated battery backup for continued functionality during power outages.
2. Safety Information
Your safety is paramount. Always follow these safety guidelines:
- Read and understand all instructions before installation and operation.
- Ensure the garage door is properly balanced before installing the opener.
- Keep the area around the garage door clear of obstructions.
- Do not allow children to operate the garage door opener or play near the garage door.
- Regularly test the Safe-T-Beam safety sensors to ensure proper function.
- In case of power failure, the integrated battery backup will provide temporary operation.
3. Components Included
Your Genie Chain Drive 750 Garage Door Opener package includes the following:
- Genie Chain Drive Garage Door Opener Head
- 12V Battery Backup Unit
- Two (2) Pre-programmed 3-button Garage Door Opener Remotes
- Wireless Keypad
- Safe-T-Beam Safety Sensors (pair)
- Multi-function Wall Console with vacation lock and light control button
- 5-piece Rail System
- Installation Instructions and Hardware

4. Setup and Installation
The Genie Chain Drive 750 features an easy-to-assemble 5-piece rail system. For detailed, interactive 3D instructions, it is highly recommended to download the BILT app.

Key Installation Steps:
- Assemble the Rail System: The 5-piece rail system snaps together without additional hardware.
- Mount the Opener: Securely mount the opener head and rail system to the garage ceiling. Ensure proper alignment with the center of the garage door.
- Install Safe-T-Beam Sensors: Mount the safety sensors on either side of the garage door opening, no higher than 6 inches from the floor. Ensure they are aligned and the indicator lights are solid.
- Connect Wiring: Connect the safety sensors and wall console wiring to the opener head.
- Install Wall Console: Mount the multi-function wall console in a convenient location, at least 5 feet above the floor, away from moving parts of the door.
- Connect Battery Backup: Plug the 12V battery backup unit into the designated port on the opener head.
- Power On and Program Limits: Plug in the opener and follow the instructions to set the open and close limits for your garage door.

For a visual guide on installation, refer to the official Genie installation video:
5. Operating Instructions
Your Genie Chain Drive 750 offers multiple ways to operate your garage door:
- Remote Controls: Use the included pre-programmed 3-button remotes to open and close the door.
- Wireless Keypad: Enter your personalized PIN on the wireless keypad to operate the door from outside the garage.
- Multi-function Wall Console: The wall console provides buttons for opening/closing the door, controlling the light, and a vacation lock for added security.
- Battery Backup Operation: In the event of a power outage, the integrated 12V battery backup automatically engages, allowing for up to 50 cycles of operation.

Programming Wireless Devices: The opener supports programming up to 16 wireless devices, including additional Genie remotes, wireless wall consoles, HomeLink, Car2u, or Genie Keypads. Refer to the detailed programming instructions in your full manual or the BILT app for specific steps.
Watch this video for an overview of Genie garage door openers:
6. Maintenance
Regular maintenance ensures the longevity and safe operation of your garage door opener:
- Monthly Inspection: Check the garage door balance, lubricate moving parts (rollers, hinges, tracks), and inspect the chain for proper tension.
- Safety Sensor Test: Perform a monthly test of the Safe-T-Beam sensors by placing an object in their path while the door is closing. The door should reverse.
- Battery Backup Check: Ensure the battery backup is charged. The LED indicators on the opener head will show the battery status.
- Remote Battery Replacement: Replace remote control batteries as needed.
For more information on the durable chain drive system, refer to this video:
7. Troubleshooting
This section addresses common issues you might encounter with your Genie Chain Drive 750.
Battery Backup Troubleshooting
The opener features color-coded LEDs on the front to indicate the battery charge status:

| LED Status | Condition | Action |
|---|---|---|
| On/Green Steady | Ok = Charged | None Required |
| On/Green Flashing | Discharging | Power is out. Battery in use. |
| On/Yellow Flashing | Charging | None Required |
| On/Red to Yellow Flashing | Dead Battery | Allow to charge 48 hours. If charging fails, replace battery. |
| On/White Steady | Battery Backup in Operation | No fault. Courtesy light while in battery backup mode. Light will turn off after 4 minutes. |
8. Specifications
Detailed specifications for the Genie Chain Drive 750 Garage Door Opener:
| Feature | Detail |
|---|---|
| Model Number | 7035-TKV |
| Motor Horsepower | 3/4 HPc DC Motor |
| Drive Type | Chain Drive |
| Door Compatibility | Most 7 ft. high sectional garage doors (up to 500 lbs) |
| Battery Backup | Integrated 12V Battery Backup (up to 50 cycles) |
| Wireless Devices | Supports up to 16 programmable devices |
| Safety Features | Safe-T-Beam System, GenieSense Technology |
| Included Batteries | 2 CR2 batteries (for remotes) |
| Item Weight | 34.8 pounds |
| Product Dimensions | 27.5 x 12 x 8 inches |


9. Warranty and Support
Genie stands behind its products with comprehensive warranty coverage:
- Limited Lifetime Motor Warranty
- 5 Year Chain Warranty
- 5 Year Parts Warranty
- 1 Year Accessories Warranty
For technical support, please contact our US-based technical support representatives available by phone or chat 6 days a week. Refer to your product packaging or the official Genie website for contact details.


