Introduction
This manual provides comprehensive instructions for the assembly, use, and maintenance of your SortWise 3-Tier Shoe Rack. Designed for efficient shoe storage, this unit helps organize your entryway, closet, or other living spaces.

Image: The SortWise 3-Tier Shoe Rack, showcasing its capacity to organize multiple pairs of shoes across three levels.
Safety Information
Please read and understand all safety instructions before assembly and use. Failure to follow these guidelines may result in injury or damage to the product.
- Weight Limit: Do not exceed the recommended weight limit for each shelf or the entire unit. Overloading can cause the rack to collapse.
- Proper Installation: Ensure all components are securely connected and the rack is stable before placing items on it. Improper installation can lead to tipping.
- Placement: Place the shoe rack on a flat, stable, and level surface to prevent wobbling or tipping.
- Children and Pets: Keep children and pets away from the unit during assembly. Do not allow children to climb on or play with the shoe rack.
- Sharp Edges: Handle components with care during assembly to avoid cuts or pinches.
Product Components
Before beginning assembly, verify that all parts are present and undamaged. If any parts are missing or damaged, please contact customer support.

Image: Key components of the shoe rack, including the high-quality plastic connectors and thickened plastic tubes, which form the frame and shelves.
| Component | Description | Quantity |
|---|---|---|
| Thickened Iron Tubes | Used for horizontal shelves and vertical supports. All short poles are of the same length for simplified assembly. | Varies (approx. 18-24) |
| High Quality Plastic Connectors | Corner and T-shaped connectors to join tubes. | Varies (approx. 12-16) |
| Arch Handles (Optional) | Top handles for aesthetic finish. | 2 |
Assembly Instructions
No tools are required for the assembly of this shoe rack. Follow these steps carefully for quick and easy setup.

Image: Visual guide illustrating the six simple steps to assemble the SortWise 3-Tier Shoe Rack.
- Step 1: Connect Crossbars. Connect four horizontal tubes (crossbars) using two T-shaped plastic joints. This forms one side of a shelf.
- Step 2: Complete First Tier. Repeat Step 1 to create the other side of the shelf. Then, connect these two sides with additional horizontal tubes to complete the first tier. Ensure all connections are firm.
- Step 3: Install Upright Poles. Insert the upright poles into the plastic connectors of the completed first tier. These poles will connect the upper and lower frames.
- Step 4: Repeat for Additional Tiers. Repeat Steps 1 and 2 to assemble the second tier. Then, place it onto the upright poles installed in Step 3. Repeat for the third tier. Ensure all connections are secure as you build upwards.
- Step 5: Install Arch Handles (Optional). If desired, install the arch handles onto the top upright poles for a finished look.
- Step 6: Final Check. Once all tiers are assembled, gently shake the rack to ensure stability. Adjust any loose connections. The shoe rack is now complete.
Operating and Usage
The SortWise 3-Tier Shoe Rack is designed for versatile shoe storage. Here are guidelines for optimal use:
- Capacity: The rack can store up to 18 pairs of heels or 12 pairs of athletic shoes/men's shoes. Distribute weight evenly across the shelves.
- Shoe Types:
- The tier distance of 6 5/16" (16 cm) is suitable for regular shoes such as sneakers, flats, and low heels.
- For boots, jackboots, or high-top shoes, utilize the top shelf where there is no upper tier to restrict height.
- Placement: Ideal for entryways, closets, wardrobes, cabinets, garages, or other storage areas.

Image: The shoe rack displaying its capacity to hold numerous pairs of shoes, including heels and flats, across its three tiers.
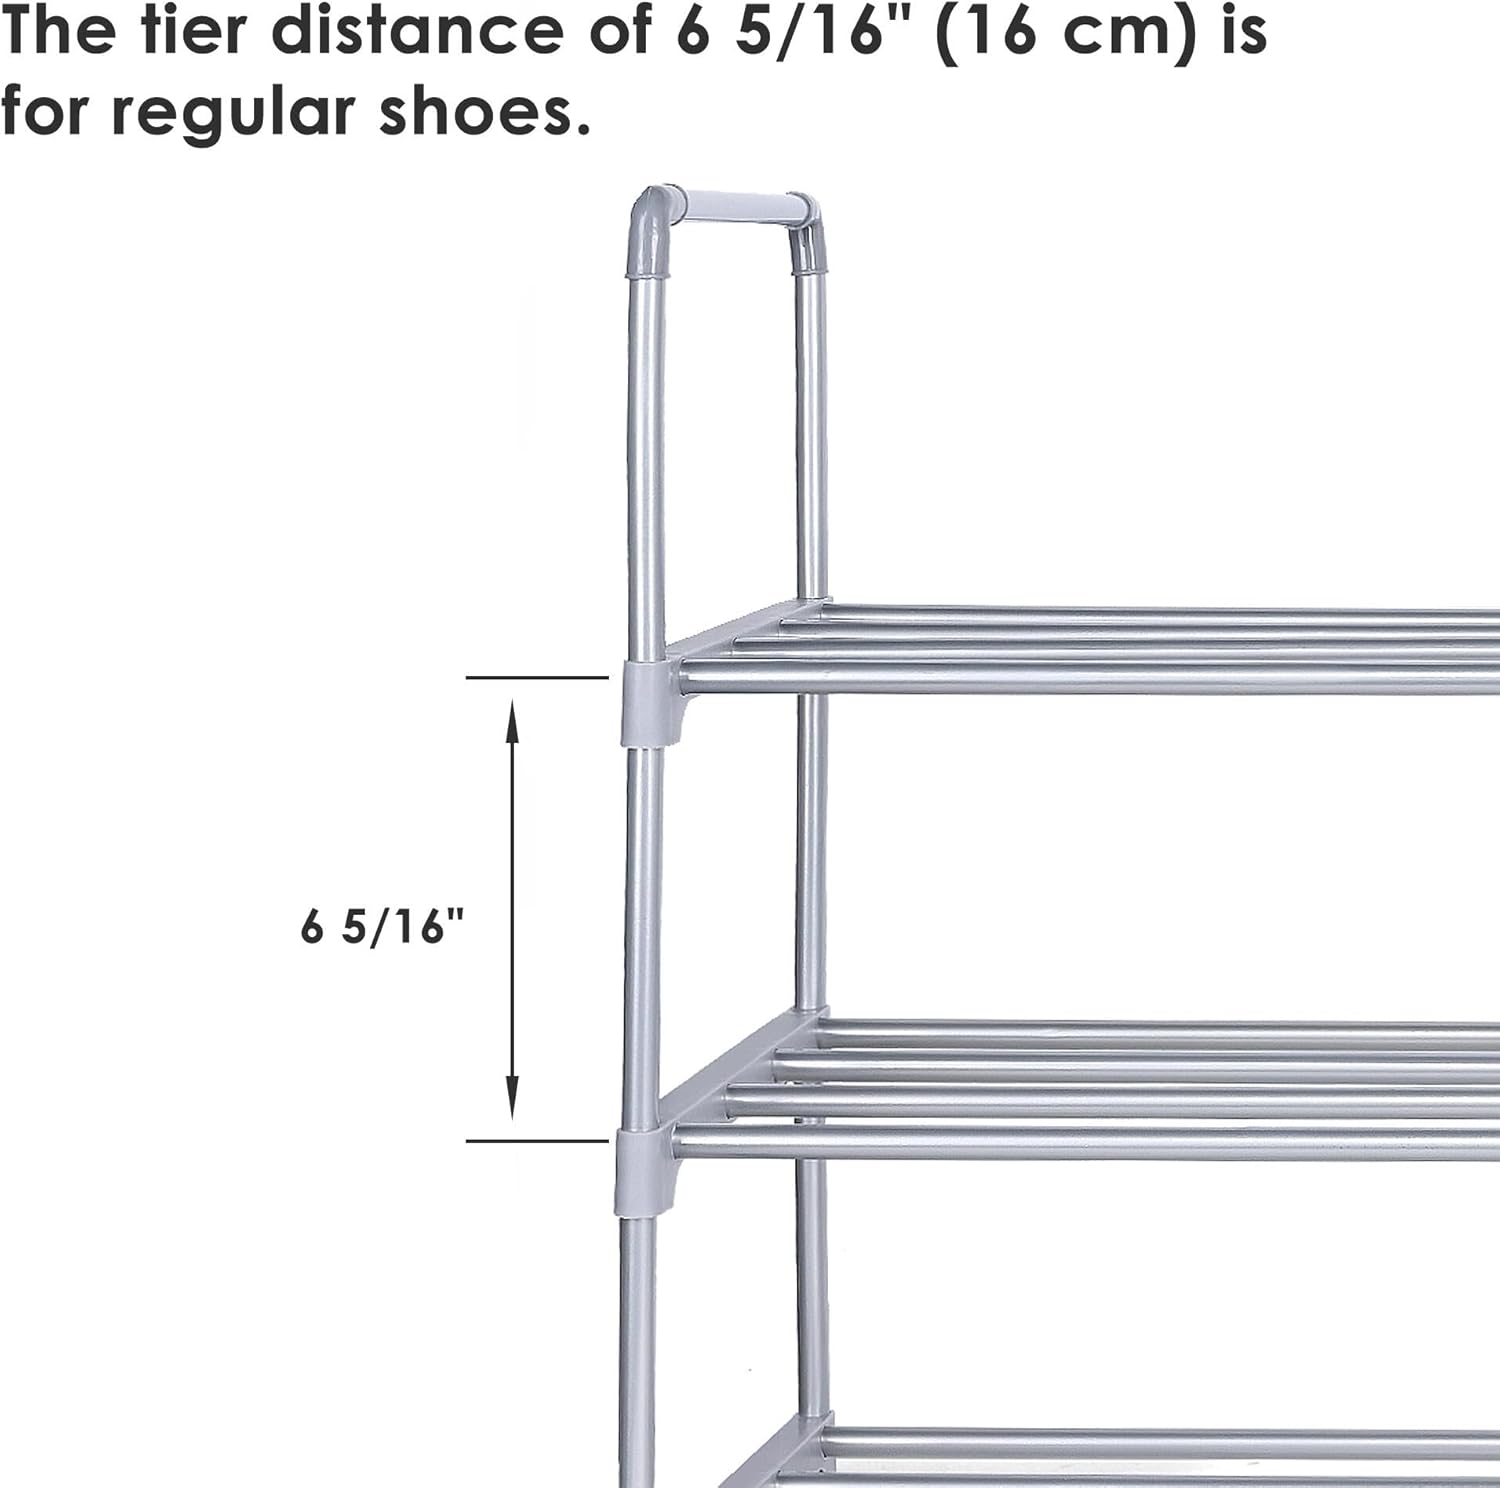
Image: A diagram highlighting the 6 5/16 inch (16 cm) vertical clearance between shelves, suitable for most standard shoe types.
Maintenance
To ensure the longevity and appearance of your SortWise Shoe Rack, follow these simple maintenance tips:
- Cleaning: Wipe down the tubes and plastic connectors with a soft, damp cloth. Avoid abrasive cleaners or harsh chemicals that could damage the finish.
- Dusting: Regularly dust the shelves to prevent accumulation, especially if storing shoes directly on them.
- Stability Check: Periodically check all connections to ensure they remain tight and secure. Re-tighten if necessary to maintain stability.
- Avoid Excessive Moisture: While the materials are durable, prolonged exposure to excessive moisture is not recommended.
Troubleshooting
If you encounter issues with your shoe rack, refer to the following common problems and solutions:
| Problem | Possible Cause | Solution |
|---|---|---|
| Rack is wobbly or unstable. | Loose connections; uneven surface; overloaded shelves. | Ensure all tubes are fully inserted into connectors. Place on a flat, level surface. Redistribute or reduce weight on shelves. |
| Tubes or connectors detach easily. | Incomplete insertion during assembly; excessive force or movement. | Disassemble and reassemble, ensuring each tube is firmly pushed into its connector until it clicks or feels secure. Avoid dragging the rack when moving; lift it. |
| Insufficient storage space. | Exceeding stated capacity; inefficient shoe placement. | Review the stated capacity (18 heels / 12 athletic shoes). Consider stacking smaller shoes or placing one shoe per slot for maximum density. Utilize the top shelf for taller items. |
Specifications
| Feature | Detail |
|---|---|
| Product Name | SortWise 3-Tier Shoe Rack |
| Model Number | B079FD6Q38 |
| Dimensions (L x W x H) | 35" L x 11 5/8" W x 20 7/8" H (89 x 29.5 x 53 cm) |
| Material | Thickened Iron Tubes, High Quality Plastic Connectors |
| Capacity | Up to 18 pairs of heels OR 12 pairs of athletic/men's shoes |
| Tier Distance | 6 5/16" (16 cm) for regular shoes |
| Assembly Required | Yes, tool-free assembly |
| Item Weight | 1.18 kg |

Image: A detailed diagram illustrating the overall dimensions of the shoe rack: 35 inches long, 11 5/8 inches wide, and 20 7/8 inches high.
Warranty and Support
For warranty information, product support, or to inquire about replacement parts, please contact SortWise customer service. Refer to your purchase documentation for specific warranty terms and contact details.
Manufacturer: SortWise
Place of Business: Lachine, Quebec H8T 2Y3, CA
For further assistance, visit the official SortWise store on Amazon: SortWise Store