Introduction
This manual provides instructions for the proper setup, operation, and maintenance of your Oneal OMX-6 6-Channel Audio Mixer. Please read this manual thoroughly before using the device to ensure optimal performance and safety.
The Oneal OMX-6 is a compact mixing console designed for versatile audio applications. It features 6 input channels plus an auxiliary input, 3-band equalization, and balanced microphone/line inputs, offering flexibility for various audio configurations.
Important Safety Instructions
- Read these instructions.
- Keep these instructions.
- Heed all warnings.
- Follow all instructions.
- Do not use this apparatus near water.
- Clean only with a dry cloth.
- Do not block any ventilation openings. Install in accordance with the manufacturer's instructions.
- Do not install near any heat sources such as radiators, heat registers, stoves, or other apparatus (including amplifiers) that produce heat.
- Do not defeat the safety purpose of the polarized or grounding-type plug. A polarized plug has two blades with one wider than the other. A grounding-type plug has two blades and a third grounding prong. The wide blade or the third prong are provided for your safety. If the provided plug does not fit into your outlet, consult an electrician for replacement of the obsolete outlet.
- Protect the power cord from being walked on or pinched, particularly at plugs, convenience receptacles, and the point where they exit from the apparatus.
- Only use attachments/accessories specified by the manufacturer.
- Unplug this apparatus during lightning storms or when unused for long periods of time.
- Refer all servicing to qualified service personnel. Servicing is required when the apparatus has been damaged in any way, such as power-supply cord or plug is damaged, liquid has been spilled or objects have fallen into the apparatus, the apparatus has been exposed to rain or moisture, does not operate normally, or has been dropped.
Setup Guide
1. Unpacking and Inspection
Carefully remove the mixer from its packaging. Inspect the unit for any signs of damage during transit. Retain the packaging for future transport or storage.
2. Power Connection
Connect the power cord to the AC IN port on the rear panel of the mixer. Ensure the power switch is in the OFF position before connecting to a power outlet. This mixer supports a wide voltage range of 120-240V.

Figure 1: Rear panel connections, including the AC IN port and power switch.
3. Audio Input Connections
The OMX-6 features 6 channels with balanced microphone (XLR) and line (1/4" TRS) inputs, plus an additional auxiliary input.
- Microphone Inputs: Connect microphones to the XLR inputs (MIC) on each channel.
- Line Inputs: Connect instruments or other line-level devices to the 1/4" TRS inputs (LINE) on each channel.
- Auxiliary Input: Use the dedicated auxiliary input for connecting CD players, DVD players, or MP3 devices.
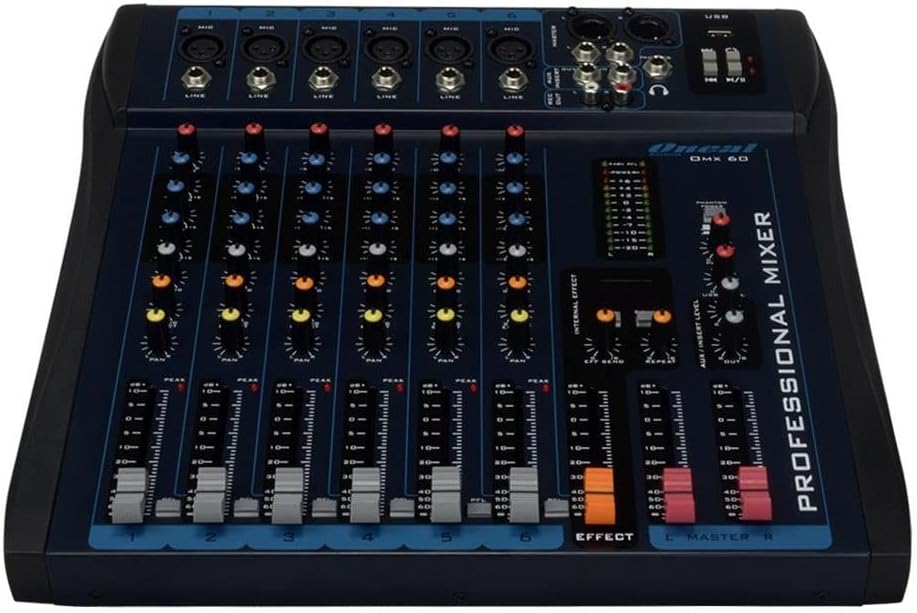
Figure 2: Front panel showing microphone and line inputs for each channel.
4. Audio Output Connections
Connect your main speakers or recording devices to the master output ports. The mixer also includes a headphone output for monitoring.
Operating Instructions
1. Powering On
After all connections are made, switch the power button to the ON position. The power indicator light should illuminate.
2. Channel Controls
Each of the 6 channels features the following controls:
- GAIN: Adjusts the input sensitivity for the microphone or line input. Start with the GAIN knob fully counter-clockwise and gradually increase until the PEAK LED flashes only occasionally.
- HIGH, MID, LOW (3-Band EQ): Adjusts the treble, midrange, and bass frequencies for the respective channel.
- AUX: Controls the level of the channel signal sent to the auxiliary output for external effects or monitor mixes.
- PAN: Adjusts the stereo position of the channel signal (left to right).
- LEVEL Fader: Controls the overall output level of the channel.
- PFL (Pre-Fader Listen): Activates pre-fader monitoring for the channel through headphones.
- PEAK LED: Indicates when the input signal is too high, potentially causing distortion. Reduce GAIN if this LED lights up frequently.
3. Equalization Turbo Loud
The Turbo Loud button provides an instant enhancement to the equalization, offering a more pronounced sound profile. Experiment with this feature to suit your audio needs.
4. Master Section Controls
The master section controls the overall output of the mixer:
- MASTER L/R Faders: Control the main stereo output level.
- LEVEL METER: Displays the output level of the main mix. Aim for levels around 0 dB during normal operation, avoiding consistent peaking into the red.
- PHONES: Headphone output jack and level control for monitoring.
- USB Playback/Recording: If equipped, use the USB port for connecting a USB drive for playback or for connecting to a computer for recording. Refer to specific USB instructions if applicable.
5. Internal Effects (if applicable)
If your model includes internal effects, use the dedicated controls (e.g., EFFECT, REPEAT, SEND) to apply and adjust effects to your mix. The AUX/INSERT LEVEL control may also be used for external effects loops.
Maintenance
Cleaning
Wipe the mixer with a soft, dry cloth. Do not use liquid cleaners or aerosols. Ensure the unit is powered off and unplugged before cleaning.
Storage
When not in use for extended periods, store the mixer in a cool, dry place, away from direct sunlight and extreme temperatures. Keep it covered to prevent dust accumulation.
Troubleshooting
No Sound Output
- Check all power connections and ensure the mixer is powered on.
- Verify that the MASTER L/R faders are raised.
- Ensure individual channel LEVEL faders are raised and GAIN is set appropriately.
- Check connections to speakers or amplifiers.
- Confirm that input sources are active and sending a signal.
Distorted Sound
- Reduce the GAIN on individual channels if the PEAK LED is frequently lighting up.
- Lower the MASTER L/R faders if the main level meter is consistently in the red.
- Check input cables for damage or improper connection.
Hum or Noise
- Ensure all cables are properly shielded and connected.
- Check for ground loops. Try connecting all audio equipment to the same power outlet or power conditioner.
- Keep audio cables away from power cables.
Specifications
| Feature | Detail |
|---|---|
| Brand | Oneal |
| Model | OMX-6 |
| Number of Channels | 6 + 1 Auxiliary |
| Audio Input | 6 channels (microphones, line, CD/DVD/MP3) + 1 auxiliary |
| Equalization | 3-Band (Low/Mid/Hi) per channel, Turbo Loud feature |
| Microphone Inputs | Balanced per channel |
| Line Inputs | Balanced per channel |
| Monitor Control | Individual per channel (MON/PFL) |
| Power Source | Wired Electric |
| Voltage | 120-240V |
| Maximum Consumption | 7W |
| Package Dimensions | 52 x 35 x 11 cm |
| Item Weight | 4.4 kg |
| ASIN | B079F662Y4 |
| EAN/GTIN | 7898584231223, 7898934820107 |
Warranty Information
This product comes with a standard manufacturer's warranty against manufacturing defects for 90 days from the date of purchase.
Please retain your proof of purchase for warranty claims. The warranty does not cover damage caused by misuse, accidents, unauthorized modifications, or normal wear and tear.
Customer Support
For technical assistance, service, or warranty inquiries, please contact Oneal customer support through their official website or authorized service centers.
Website: www.oneal.com.br


