Introduction
This manual provides detailed instructions for the installation, operation, maintenance, and troubleshooting of your MOEN Noell Single-Handle Kitchen Faucet with Side Sprayer. Please read all instructions carefully before beginning installation and retain this manual for future reference.
Safety Information
- Always turn off the main water supply before installing or servicing the faucet.
- Wear safety glasses and gloves during installation to prevent injury.
- Ensure all connections are secure to prevent leaks.
- If you are unsure about any part of the installation process, consult a qualified plumber.
Package Contents
Verify that all components are present before beginning installation:
- Faucet Body (Single-Handle)
- Side Sprayer with Hose
- Mounting Hardware
- Deck Plate (Escutcheon)
- Hot and Cold Water Supply Lines
- Installation Instructions
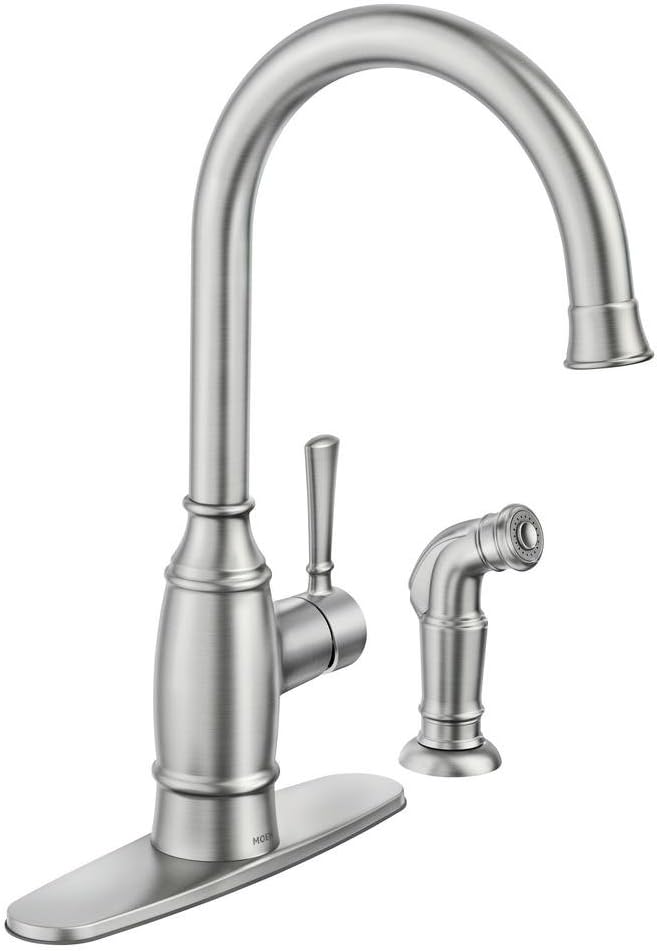
Image: MOEN Noell Single-Handle Kitchen Faucet with Side Sprayer, showcasing the main faucet body, single handle, and separate side sprayer unit.
Specifications
| Brand | Moen |
| Model Name | 87506SRS |
| Finish Type | Spot Resist Stainless |
| Material | Stainless Steel |
| Number of Handles | 1 |
| Installation Type | Single Hole (Deck Mount) |
| Hole Count | 1 (or 2-4 with included deck plate) |
| Spout Height | 14.75 Inches |
| Spout Reach | 8.21 Inches |
| Item Weight | 4.1 Pounds |
| Product Dimensions | 15.3 x 9 x 3.5 inches |
| Hose Length (Sprayer) | 24 Inches |

Image: Dimensional diagram of the faucet, indicating spout height, spout reach, and overall faucet height for installation planning.
Setup and Installation
This section provides a general overview of the installation process. Refer to the detailed instructions included with your product for specific steps and diagrams.
Before You Begin:
- Turn off the hot and cold water supply valves under the sink.
- Clear the area under the sink for access.
- Remove your old faucet, if applicable.
Installation Steps:
- Prepare the Sink: Ensure the mounting surface is clean and dry. If using the deck plate, place it over the sink holes.
- Install the Faucet: Insert the faucet body through the main hole in the sink or deck plate. Secure it from underneath with the provided mounting hardware (washer and mounting nut). Tighten firmly but do not overtighten.
- Connect Water Supply Lines: Attach the hot and cold water supply lines from the faucet to the corresponding shut-off valves. Use a wrench to tighten connections, ensuring they are snug to prevent leaks.
- Install Side Sprayer: Insert the side sprayer base into its designated hole on the sink or deck plate. Secure it from underneath with its mounting nut. Connect the sprayer hose to the designated port on the faucet body.
- Test for Leaks: Slowly turn on the hot and cold water supply valves. Check all connections for leaks. Run the faucet and sprayer for a few minutes to flush out any debris and check for proper operation.

Image: The MOEN Noell faucet installed in a kitchen setting, demonstrating its appearance and functionality with water flowing.
Operating Instructions
Faucet Handle Operation:
- Water Flow: Lift the single handle to turn on the water and increase flow. Push down to turn off the water.
- Temperature Control: Move the handle to the left for hot water and to the right for cold water. Adjust the handle position to achieve the desired water temperature.
Side Sprayer Operation:
- To activate the side sprayer, ensure the main faucet handle is in the 'on' position.
- Squeeze the lever on the side sprayer to divert water flow from the main spout to the sprayer. Release the lever to return water flow to the main spout.

Image: A hand demonstrating the use of the side sprayer, showing water being directed into the sink for rinsing.
Maintenance and Cleaning
Proper care will help maintain the finish and performance of your MOEN Noell faucet.
- Cleaning the Finish: For the Spot Resist Stainless finish, clean with a soft, damp cloth and mild soap. Rinse thoroughly with warm water and dry with a soft cloth.
- Avoid Abrasives: Do not use abrasive cleaners, harsh chemicals, or scouring pads, as these can damage the finish.
- Aerator Maintenance: Periodically unscrew the aerator from the end of the spout and rinse out any debris or mineral deposits. This helps maintain optimal water flow.

Image: Close-up view highlighting the Spot Resist Stainless finish, designed to resist fingerprints and water spots, making cleaning easier.
Troubleshooting
If you encounter issues with your faucet, refer to the following common problems and solutions:
- Low Water Flow:
Possible Cause: Clogged aerator or mineral buildup in supply lines.
Solution: Remove and clean the aerator. Check supply lines for kinks or obstructions. - Leaks from Faucet Base:
Possible Cause: Loose mounting nut or worn O-rings.
Solution: Ensure the mounting nut under the sink is securely tightened. If leaks persist, contact Moen customer support for replacement parts. - Side Sprayer Not Working or Leaking:
Possible Cause: Sprayer hose kinked, diverter valve issue, or damaged sprayer head.
Solution: Check the sprayer hose for kinks. Ensure the main faucet is on. If the sprayer head is damaged, it may need replacement. - Excessive Splashing:
Possible Cause: Water stream is too concentrated.
Solution: Consider replacing the aerator with one designed for wider water dispersion. Ensure the aerator is clean and free of debris. - Loose Gooseneck Spout:
Possible Cause: Internal retaining ring or component is damaged or loose.
Solution: This often requires internal adjustment or replacement of specific parts. Contact Moen customer support for guidance.
Warranty Information
Moen products are manufactured under the highest standards of quality and workmanship. Moen offers a limited lifetime warranty to the original consumer purchaser against leaks, drips, and finish defects during normal residential use. Other components are warranted for a specific period. For complete warranty details and to register your product, please visit the official Moen website or contact Moen customer service.
Support and Contact
For further assistance, technical support, or to order replacement parts, please contact Moen directly:
- Website: Visit www.moen.com for product information, FAQs, and support resources.
- Customer Service: Refer to the contact information provided on the Moen website or in your product packaging for phone and email support.


